By: Team AY1920S1-CS2103T-T13-2 Since: Sep 2019 Licence: MIT
1. Introduction
Mortago is a mortuary management system for hospitals. Mortago is optimized for efficient mortuary managers who prefer to work with a Command Line Interface (CLI) while still having the benefits of a Graphical User Interface (GUI).
Mortago provides a convenient dashboard for the mortuary manager to keep track of all bodies and fridges, outstanding tasks, and notifs. It replaces and improves upon the traditional whiteboard system. Mortago allows the mortuary management to be more accurate in managing tasks, calculating the availability of space, viewing archives and generating reports automatically.
Interested? Refer to Section 2, “Quick Start” below to get started. Enjoy!
2. Quick Start
This section summarizes how you can quickly set up Mortago on your computer.
2.1. Setting Up
-
Ensure you have
Java 11or above installed in your Computer. -
Download the latest
mortago.jarhere. -
Copy the file to the folder you want to use as the home folder for Mortago.
-
Double-click the file to start the app. The GUI should appear in a few seconds.
2.2. Exploring Mortago
Upon launching Mortago, you should see the following user interface.
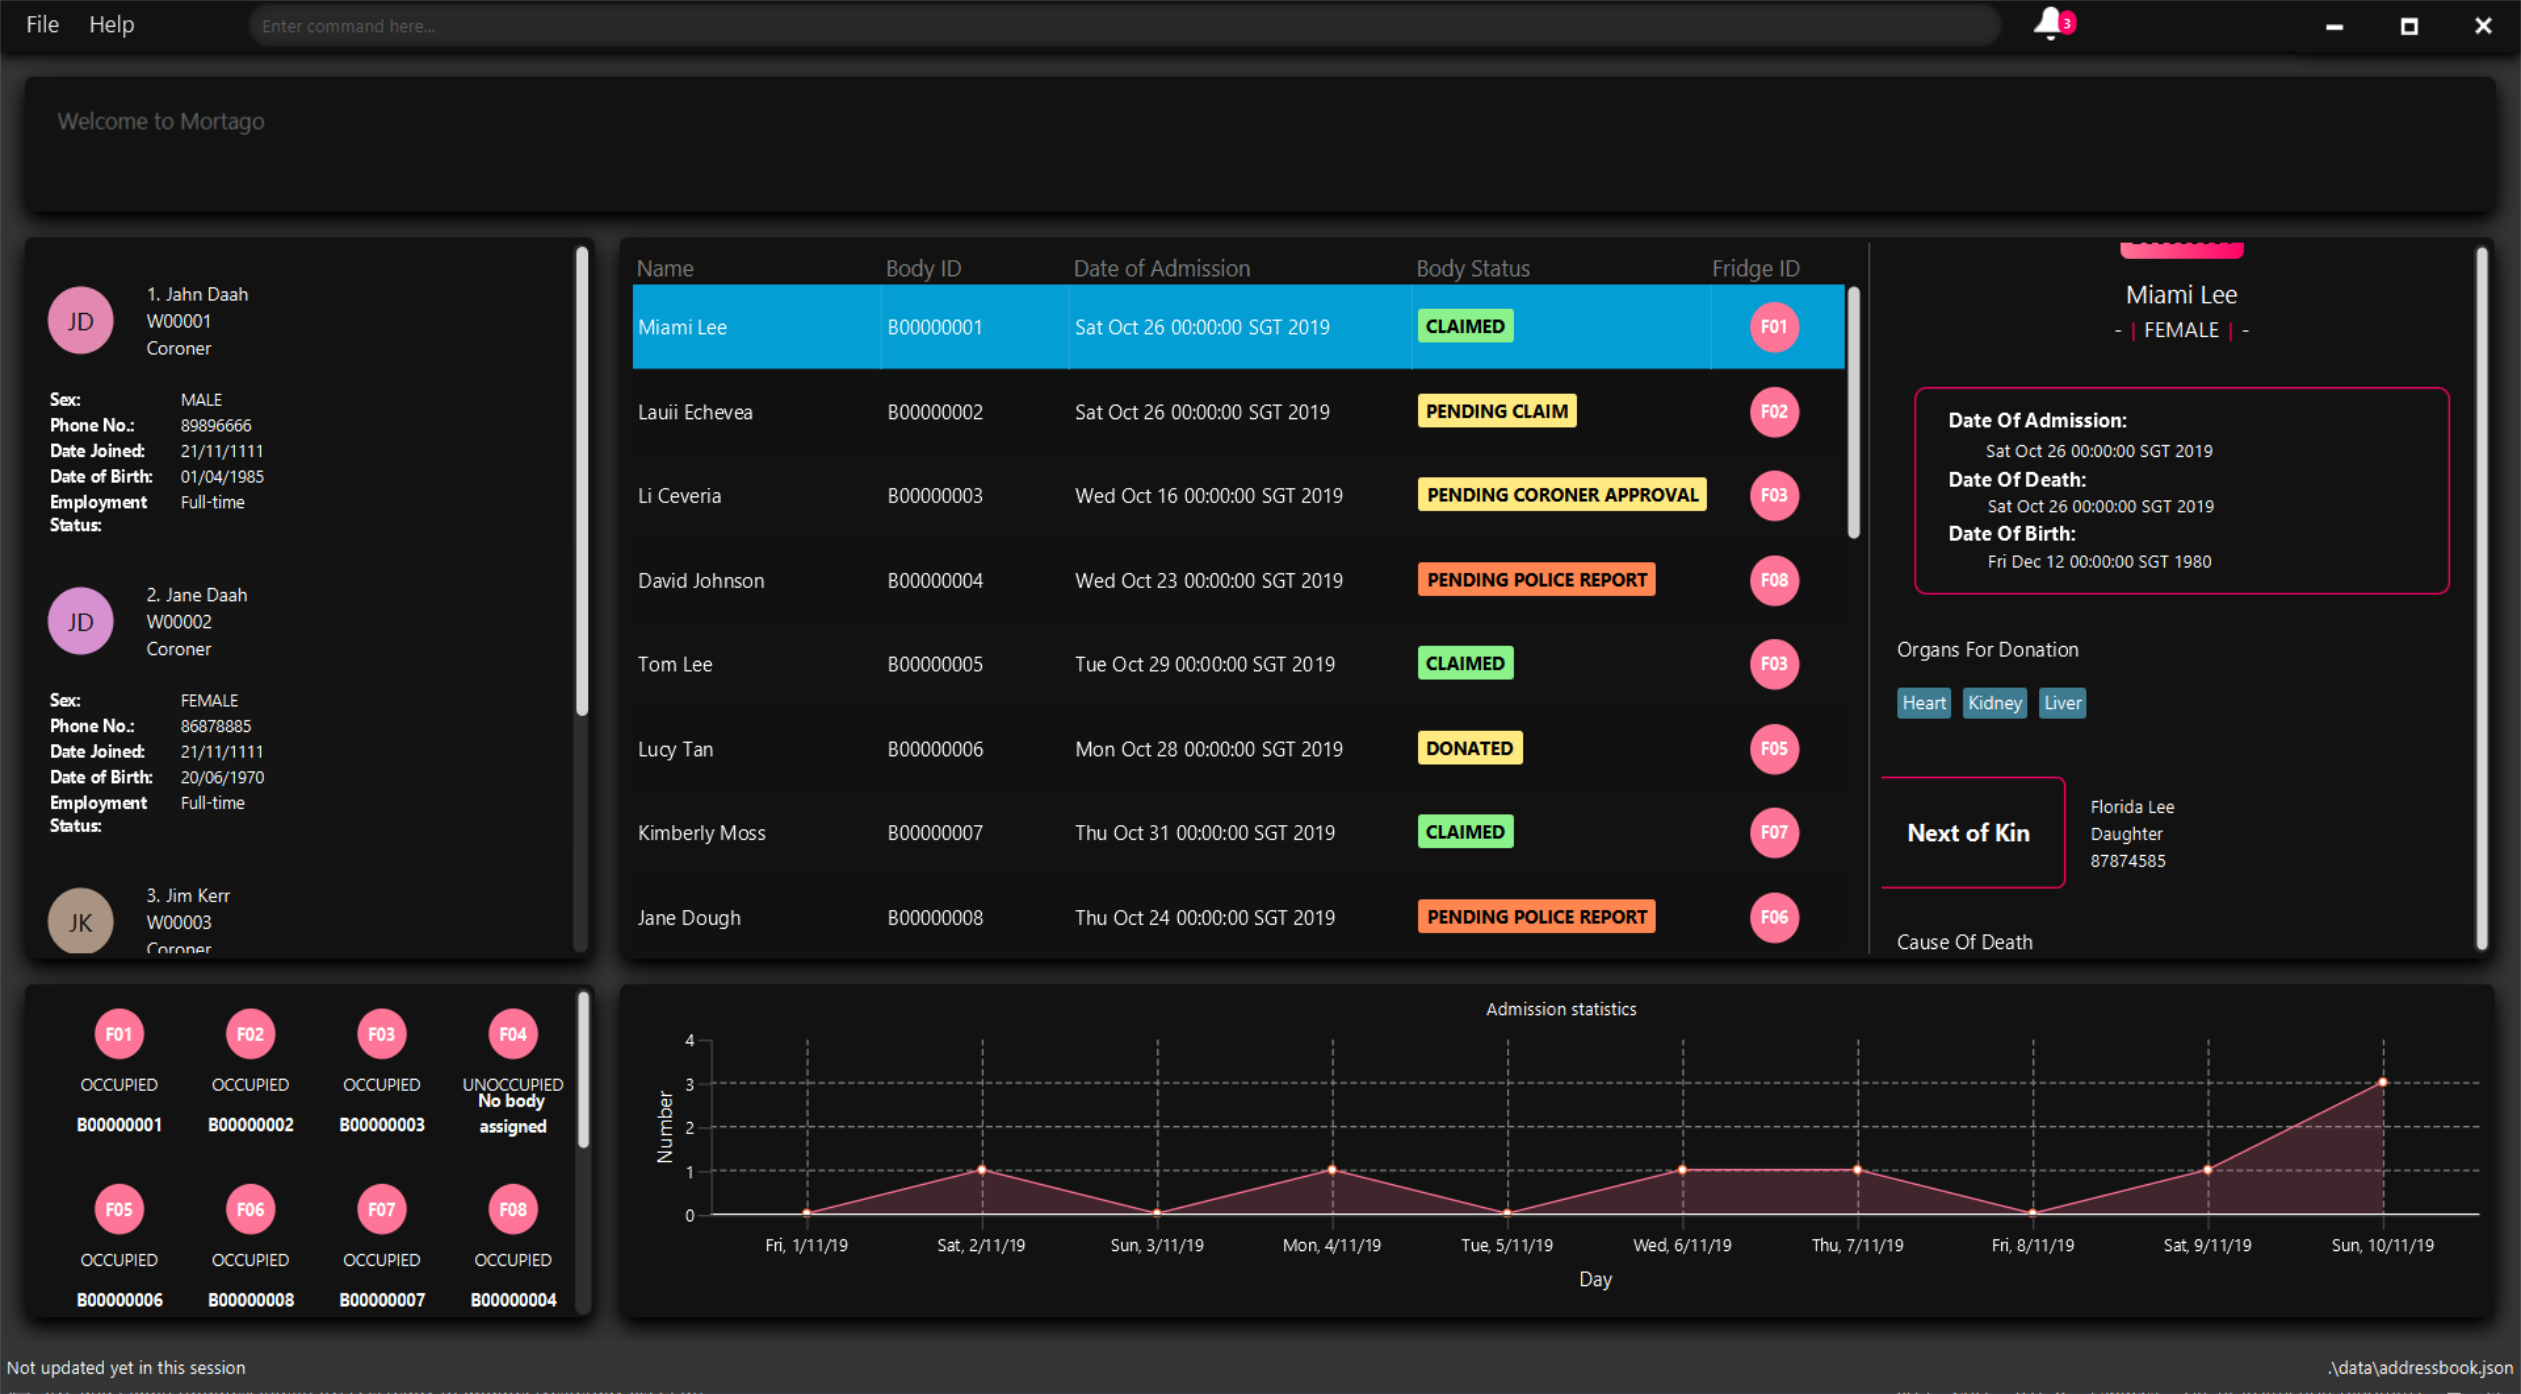
Type the command in the command box and press Enter to execute it.
The following are examples of some commands you can try:
-
list -b: lists all bodies. -
add -w/name John Doe /sex male /dateJoined 12/12/2019: adds a worker named John Doe to the management system. -
delete -w 1: deletes the worker with worker ID W000001. -
exit: exits the app.
3. Command Specifications
Before diving into the features that Mortago has for you, you need to know several key information on how to use Mortago. The following sections elaborate on these key information, such as the general format for commands in Mortago.
3.1. Command Format
Most commands in Mortago follow the general format: COMMAND_WORD -FLAG ATTRIBUTES
-
COMMAND_WORDspecifies what you want Mortago to do.-
eg.
addtells Mortago to create an entry according to the details that you supply in the later half of the command.
-
-
-FLAGspecifies what type of entity in Mortago you are referring to.-
There are 3 types of entities in Mortago: worker, body and fridge. Each of them has its respective
-FLAG, given below:-
-windicates a worker -
-bindicates a body -
-findicates a fridge
-
-
-
ATTRIBUTESspecifies the information about an entity that you need to supply for the command to be executed successfully. The following section elaborates more on whatATTRIBUTESare in Mortago.
3.2. Attributes
|
||
Attributes are properties of a worker, body or fridge that are supplied by you when executing a command. For example, The full list of attributes for each entity can be found in Section 3.1.1. |
Here are some information you need in order to interpret the various command formats in this User Guide.
-
You will find that
ATTRIBUTESin this User Guide are represented with the format:/attributeName attributeValue-
You should always provide the
/attributeName, exactly as it is stated in the User Guide, before specifying the details of theattributeValuethat the entity has. -
For example, date of births in Mortago are represented using
/dob dateOfBirth. Therefore, the/attributeNameis/dobandattributeValueisdateOfBirth. If you wish to specify an entity born on 12 December 2000, you should key it as/dob 12/12/2000.
-
-
You may find that some
ATTRIBUTEScan only accept specific values, or that these values must follow a certain format. You can refer to Appendix 7.1 for the full list of valid values or format for theseATTRIBUTES. -
You must enter
ATTRIBUTESsuccessively in a single-line command. Mortago does not prompt you to key in any mandatoryATTRIBUTESthat you may have missed out. -
ATTRIBUTESare provided successively in commands and Mortago does not prompt you, step by step, theATTRIBUTESyou need to provide. -
ATTRIBUTESin parentheses are optional.-
e.g. The following 2 commands are valid for the add command, with the abridged format:
add -b /name name (/religion religion /status status).-
add -b /religion Buddhism -
add -b /religion Buddhism /status arrived
-
-
-
ATTRIBUTESspecified in a command can be given in any order.-
e.g. The following 2 commands are valid for the add command, with the abridged format:
add -b (/religion religion /status status).-
add -b /religion Buddhism /status arrived -
add -b /status arrived /religion Buddhism
-
-
-
ATTRIBUTESthat are tagged with…and in square parentheses must be supplied with at least oneATTRIBUTE.-
For the filter command:
filter [/attributeName attributeValue …]::-
filter /name Johnandfilter /sex femaleare valid commands. -
filteris an invalid command.
-
-
-
You are not required to provide
ATTRIBUTEScontained in parentheses.-
For example, the following 3 commands are valid for the add command, with the abridged format:
add -b /name name /sex sex /doa dateOfAdmission (/religion religion) (/status status).-
add -b /name John /sex Male /doa 12/12/2011 -
add -b /name John /sex Male /doa 12/12/2011 /religion Buddhism -
add -b /name John /sex Male /doa 12/12/2011 /religion Buddhism /status arrived
-
-
-
You must provide at least one
ATTRIBUTEwhenATTRIBUTESare tagged with…and contained in square parentheses ([]).-
For the filter command:
filter [/attributeName attributeValue …]:-
filter /name Johnandfilter /sex femaleare valid commands. -
filteris an invalid command.
-
-
3.3. Identification Number
This section describes what Identification Numbers are in Mortago. This information is key in order for you to use Mortago effectively.
-
All entries in Mortago have a unique Identification Number tagged to it.
-
The identification number is automatically generated by Mortago for your convenience.
-
Identification numbers in Mortago follow the format as shown below, where
#is a number from 0-9:-
bodyentries:B######## -
workerentries:W##### -
fridgeentries:F##
-
-
If you need to enter the identification number of an entity for a command, providing the number (e.g.
20instead ofW00020) is sufficient.
4. Features
This section details a comprehensive walkthrough of the features in Mortago.
4.1. Create, Read, Update and Delete Entities
This section details various commands to manage your entity entries in Mortago.
4.1.1. Add an entity: add
You can add a body, worker or fridge by entering an add command with the given format below.
Format:
This table details how you can craft your add command to add an entity in Mortago.
Adding a Worker |
Adding a Fridge |
Adding a Body |
||||
add -w |
add -f
|
add -b
|
| Please refer to Appendix 7.1 for a comprehensive list of valid values and formats for various attributes like sex, phone and dates. |
Example:
-
add -w /name Mary /phone 87654321 /sex female /dateJoined 18/08/2019 /designation Autopsy Technician-
You will see in the worker panel that a worker with the name "Mary", along with its associated details, will be added.
-
-
add -f-
You will see in the fridge panel that an empty fridge will be added.
-
-
add -b /name John Doe /sex male /dob 12/12/1984 /dod 12/08/2019 2358 /doa 13/08/2019 0200 /status arrived /nric S8456372C /religion Catholic /NOKname Jack Smith /relationship Husband /NOKphone 83462756 /cod Car Accident /details Heavy bleeding and head injury /organsForDonation NIL-
You will see in the body panel that a body with the name "John Doe", along with its associated details, will be added.
-
4.1.2. Updating an entity: update
You can update the attributes of a body or worker by entering an update command. You have to indicate the entity type you want to update with a flag, as described in section 3.
-f is not a valid flag for this command. Fridges are automatically updated when bodies are assigned or removed.
|
You can specify one or more attributes to change, but at least one valid attribute must be provided.
Format: update -FLAG /id id [/attributeName attributeValue …]
When you update the fridgeId of a Body, changes to the fridges are made as follows:
-
Previous fridge’s status is set to
UNOCCUPIEDand is no longer assigned thisBody. -
New fridge’s status is set to
OCCUPIEDand is assigned thisBody.
When you update the status of a Body to CONTACT_POLICE, the Notif associated with the Body is automatically
deleted.
When you update bodyStatus to ARRIVED, a Notif pop-up is be shown after 10 seconds.
When a Body is assigned a Fridge and you update its status to CLAIMED or DONATED, it is removed from the
Fridge and its status is set to UNOCCUPIED.
There are some attributes that you can update once the entity is created. For this command, the list of valid attributes and their command prefixes can be found below:
Body |
Worker |
Name |
Phone Number |
| Make sure you key in dates in the format DD/MM/YYYY. |
Example:
Imagine that someone (Jane Doe) just got promoted! You have to change her designation to 'Manager' in Mortago.
Instead of typing out all the irrelevant attributes a Worker has, you just have to input her ID number and her new designation.
To update Jane Doe’s designation:
1) Locate her identification number on the dashboard. You see on the dashboard that her ID number is W00001.
2) Type update -w /id 1 /designation Manager into the command box, and press Enter to execute it.
3) The result box indicates that the delete command has been undone.
4) You can also see on the dashboard that Jane Doe’s designation has been updated.
| Command | Expected Output |
|---|---|
|
Output box shows: This entity was successfully updated. ID Number: W00001 |
4.1.3. Locating entries by name: find
You can find bodies or workers whose names contain any of the given keywords by entering a find command with the given format below.
-
The search is case insensitive. e.g
hansmatchesHans -
The order of the keywords does not matter. e.g.
Hans BomatchesBo Hans -
Only the name is searched.
-
Only full words are matched e.g.
Hanis not matchHans -
Persons matching at least one keyword is returned (i.e.
ORsearch). e.g.Hans BoreturnsHans Gruber,Bo Yang
Format: find -FLAG [keyword…]
Examples:
-
find -b John
Returns any bodies having namesJohn -
find -w Betsy Tim John
Returns any workers having namesBetsy,Tim, orJohn
4.1.4. Deleting an entry : delete
You can delete a body, worker or fridge entry, using its Identification Number by entering a delete command with the
given format below.
Format: delete -FLAG id
You only need to enter the numeric value of the Identification Number while ignoring the prefixed 0s. For example, if
you want to delete a Fridge with id F01, you need to only enter delete -f 1.
When you delete a Body:
-
Mortago automatically deletes its associated
Notifs. You can learn more aboutNotifsin Section 3.2.1. -
If you had assigned a
Fridgeto thisBody, Mortago automatically sets the status of theFridgetoUNOCCUPIED.
You cannot delete a Fridge with status OCCUPIED. To still proceed with deletion, you need to either delete the
Body or assign it to another Fridge.
Example:
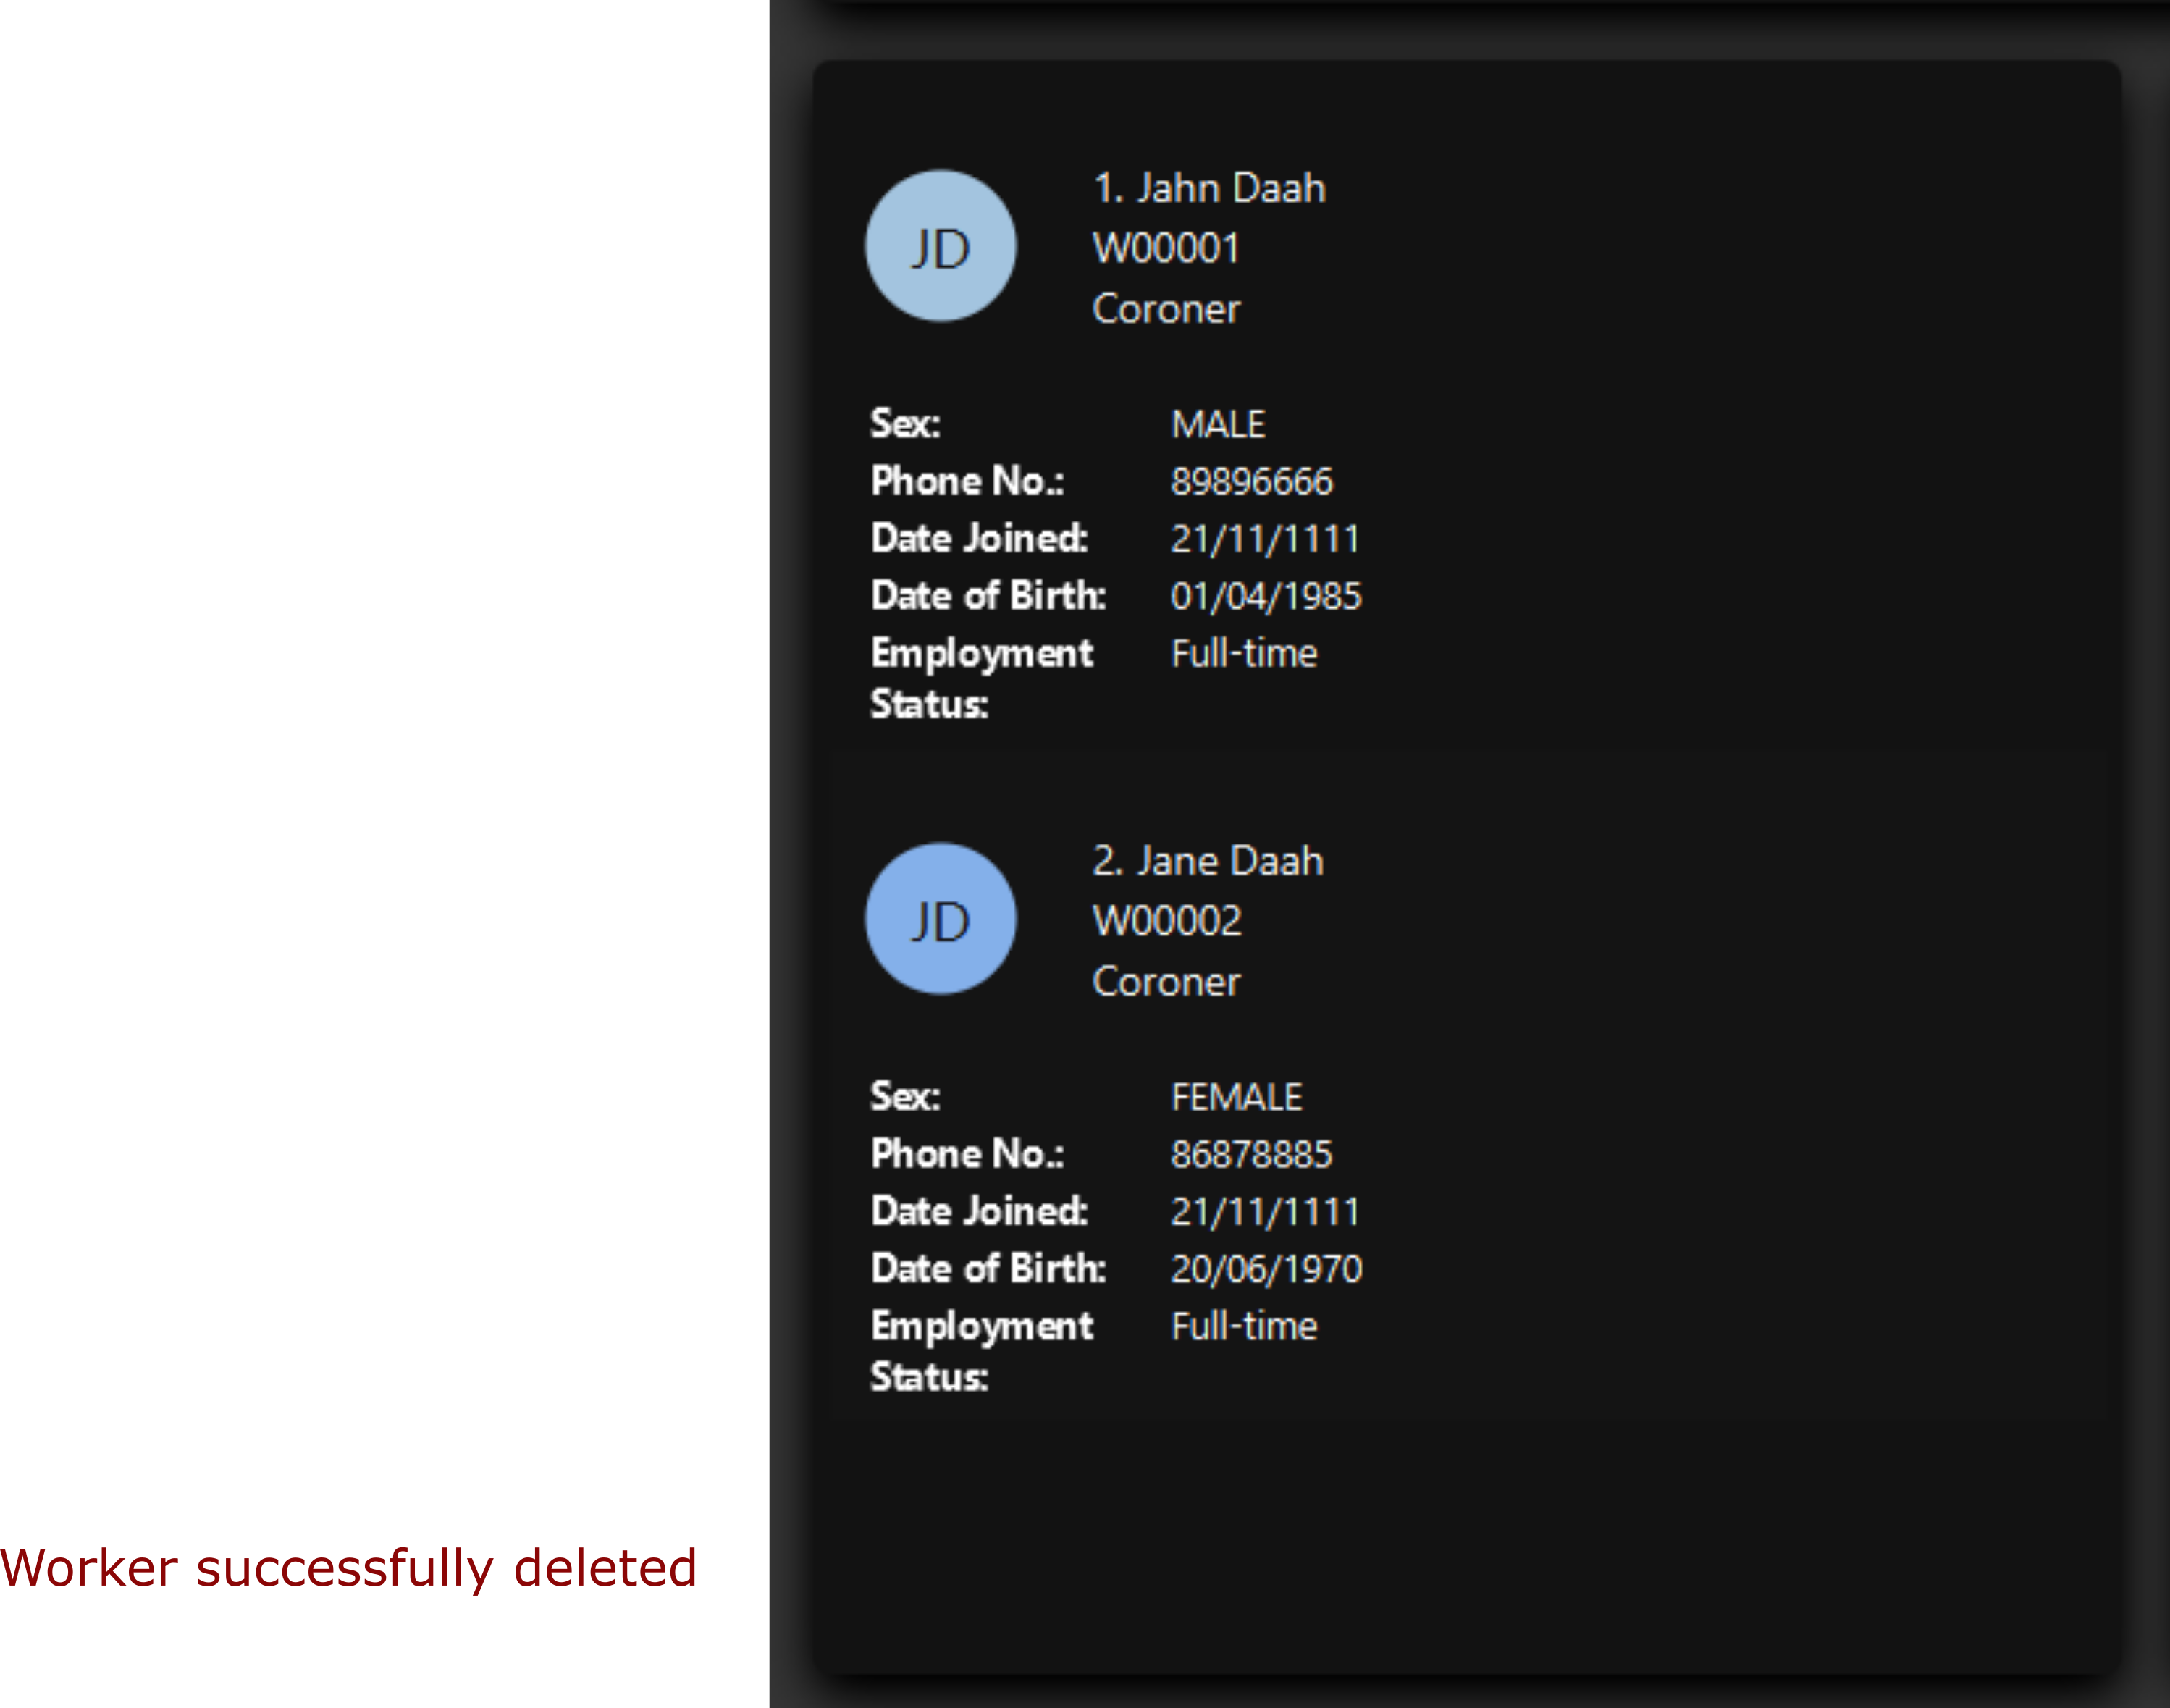
Imagine that you added someone (Jim Kerr) by mistake and you want to remove his details from Mortago. You see that his ID number is W00003.
To delete his record:
1) Type delete -w 3 and press ENTER to execute it.
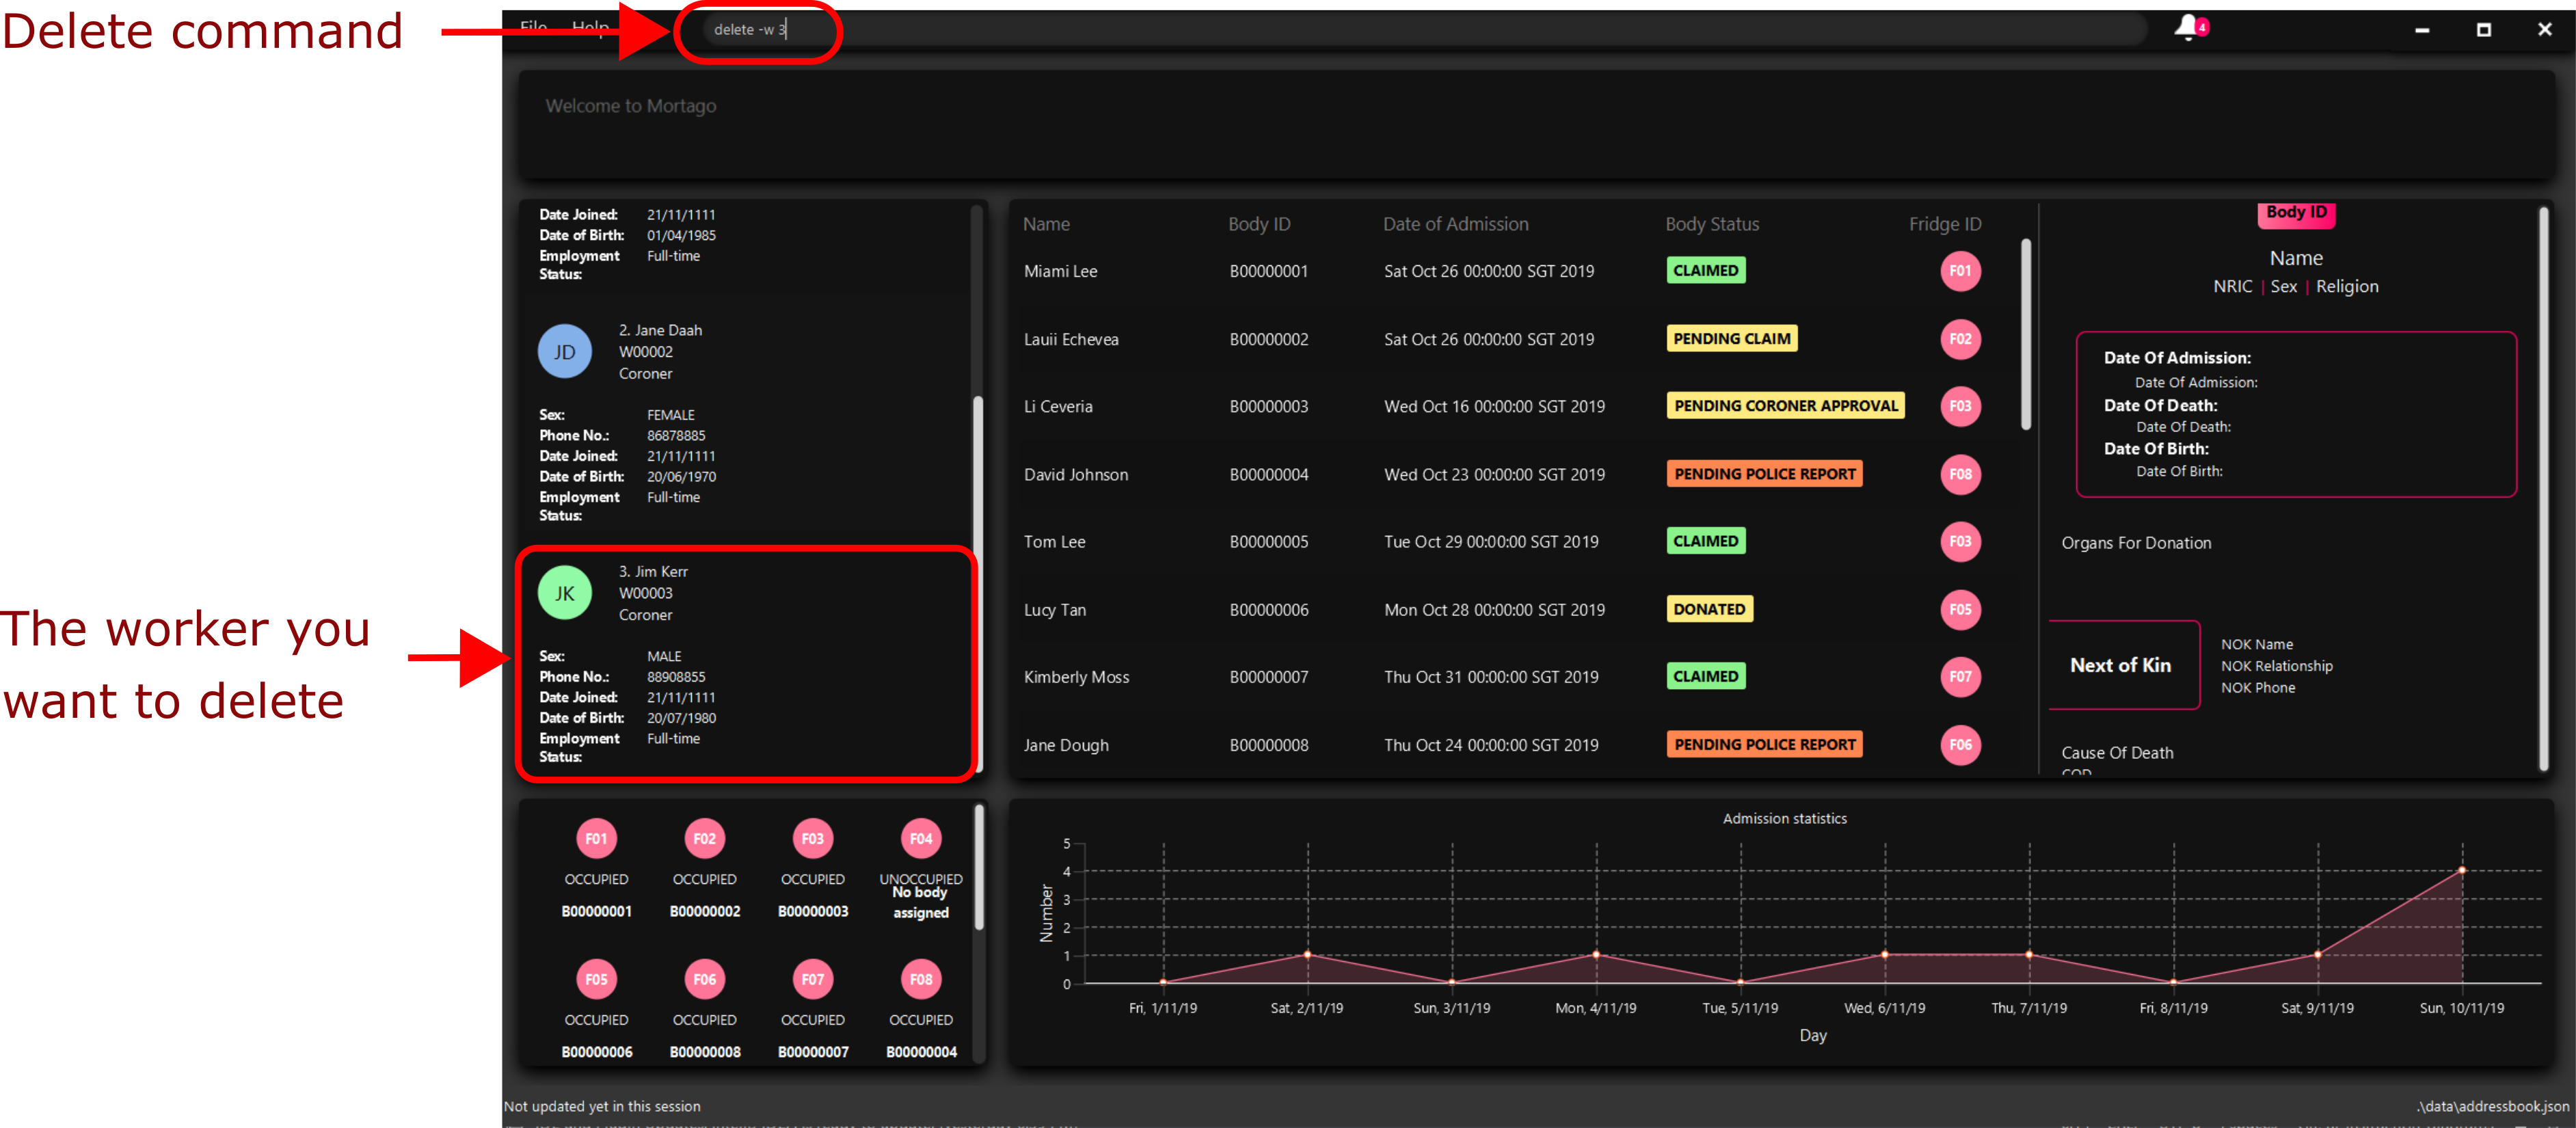
2) The result box displays the message as shown below.

3) And you can check that Jim Kerr is no longer in the list of workers.
4.1.5. Clearing all entries : clear
You can clear all entries from Mortago by entering a clear command given below.
Format: clear
4.1.6. List all entries : list
You can list all entries of bodies, workers, or fridges.
Format: list -FLAG
Flags |
Usage |
-b |
View all bodies. |
-w |
View all workers. |
-f |
View all fridges. |
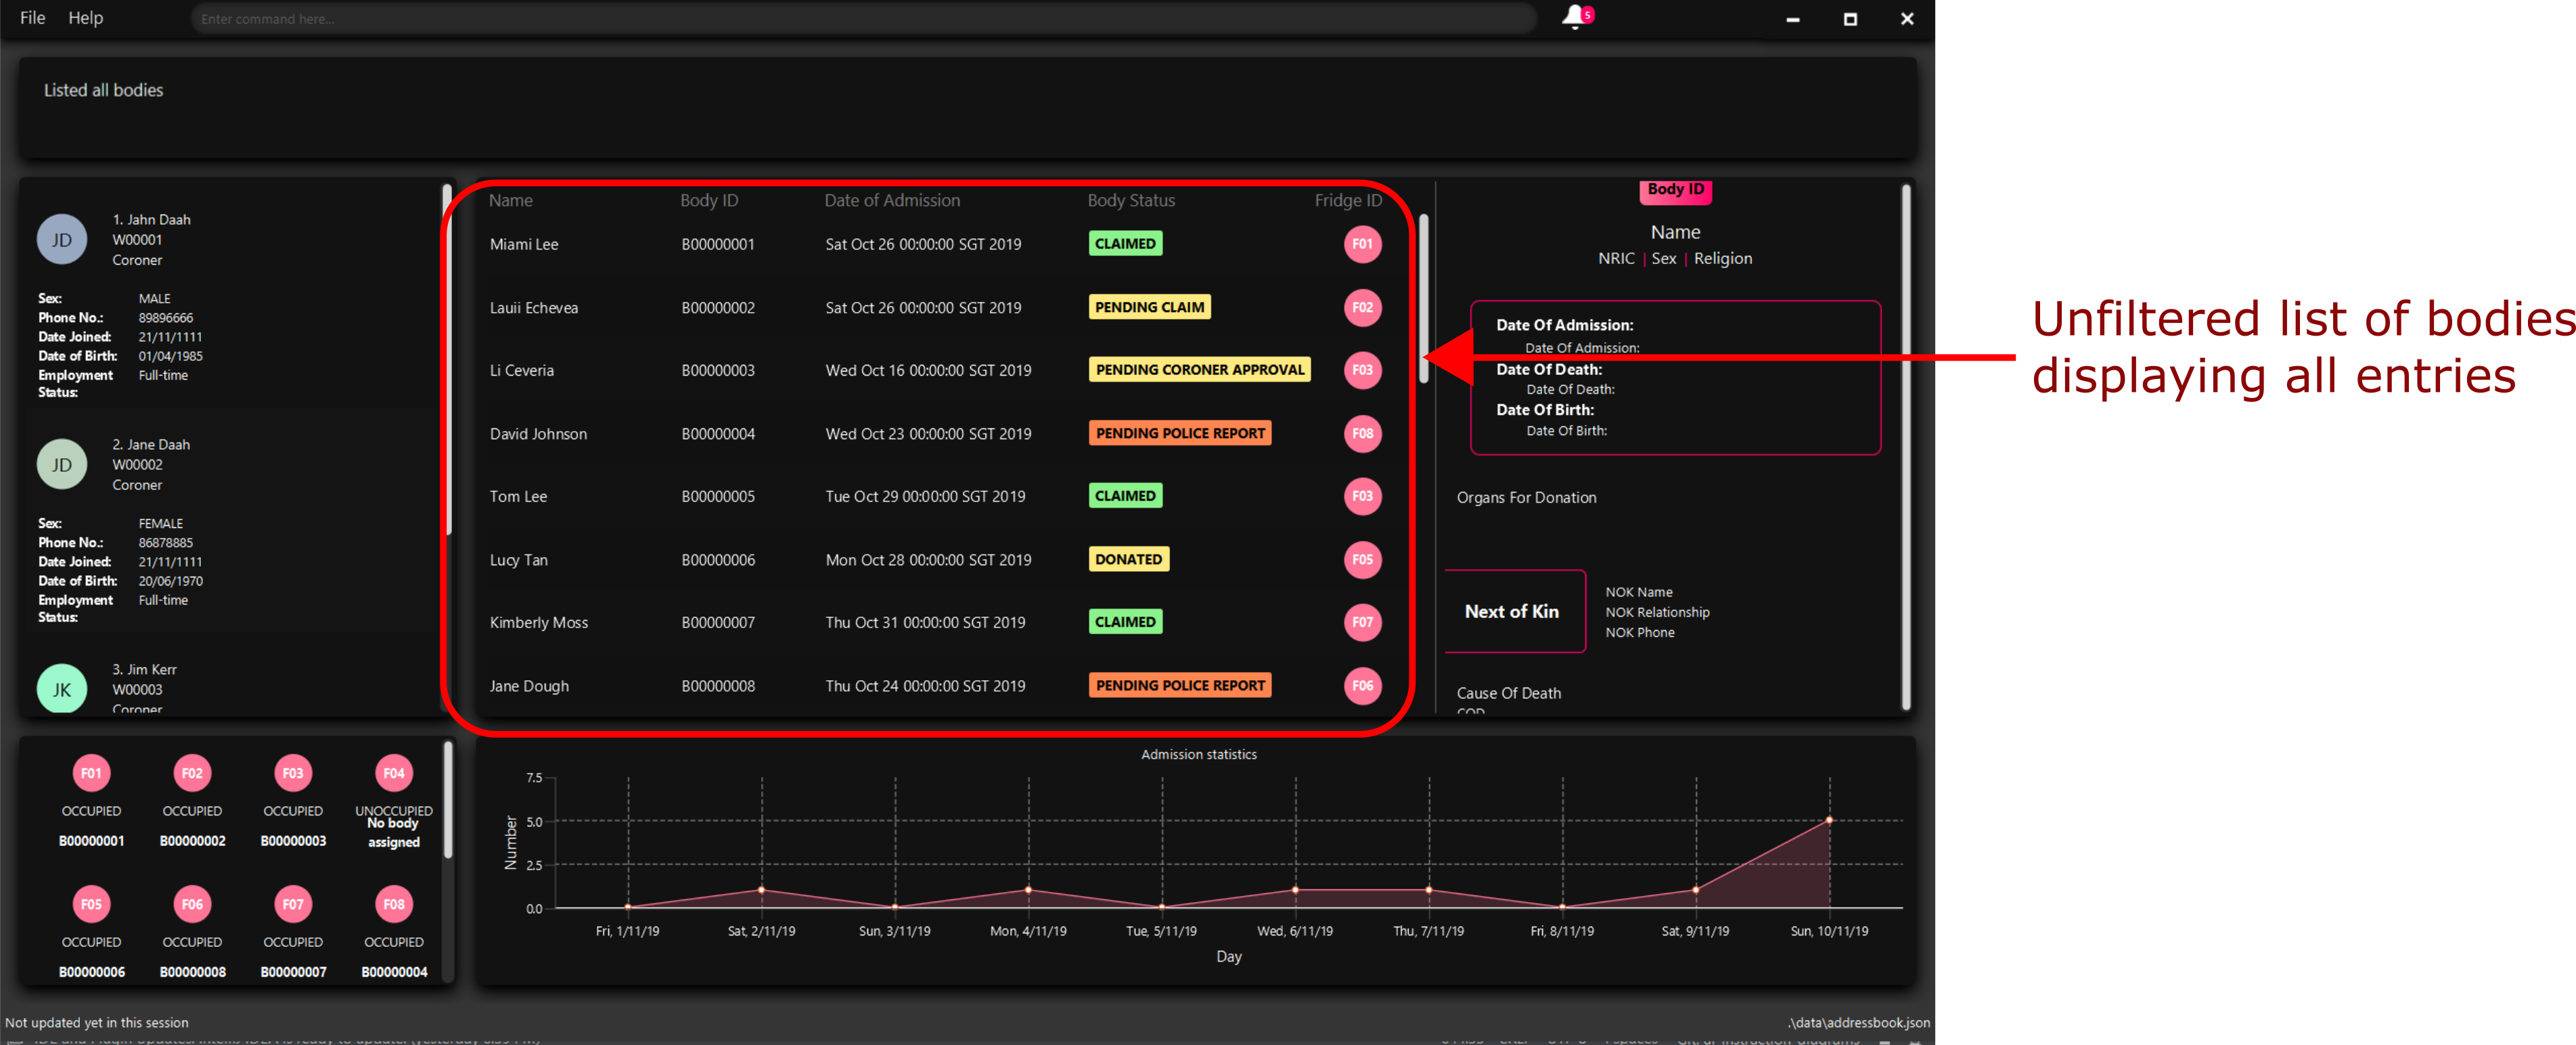
Example: list -b
After filtering specific bodies, you may now want to view the full list of bodies:
1) Mortago shows filtered list of bodies.
2) Type list -b in the Command Line Interface (CLI).

3) Mortago shows unfiltered list of bodies.
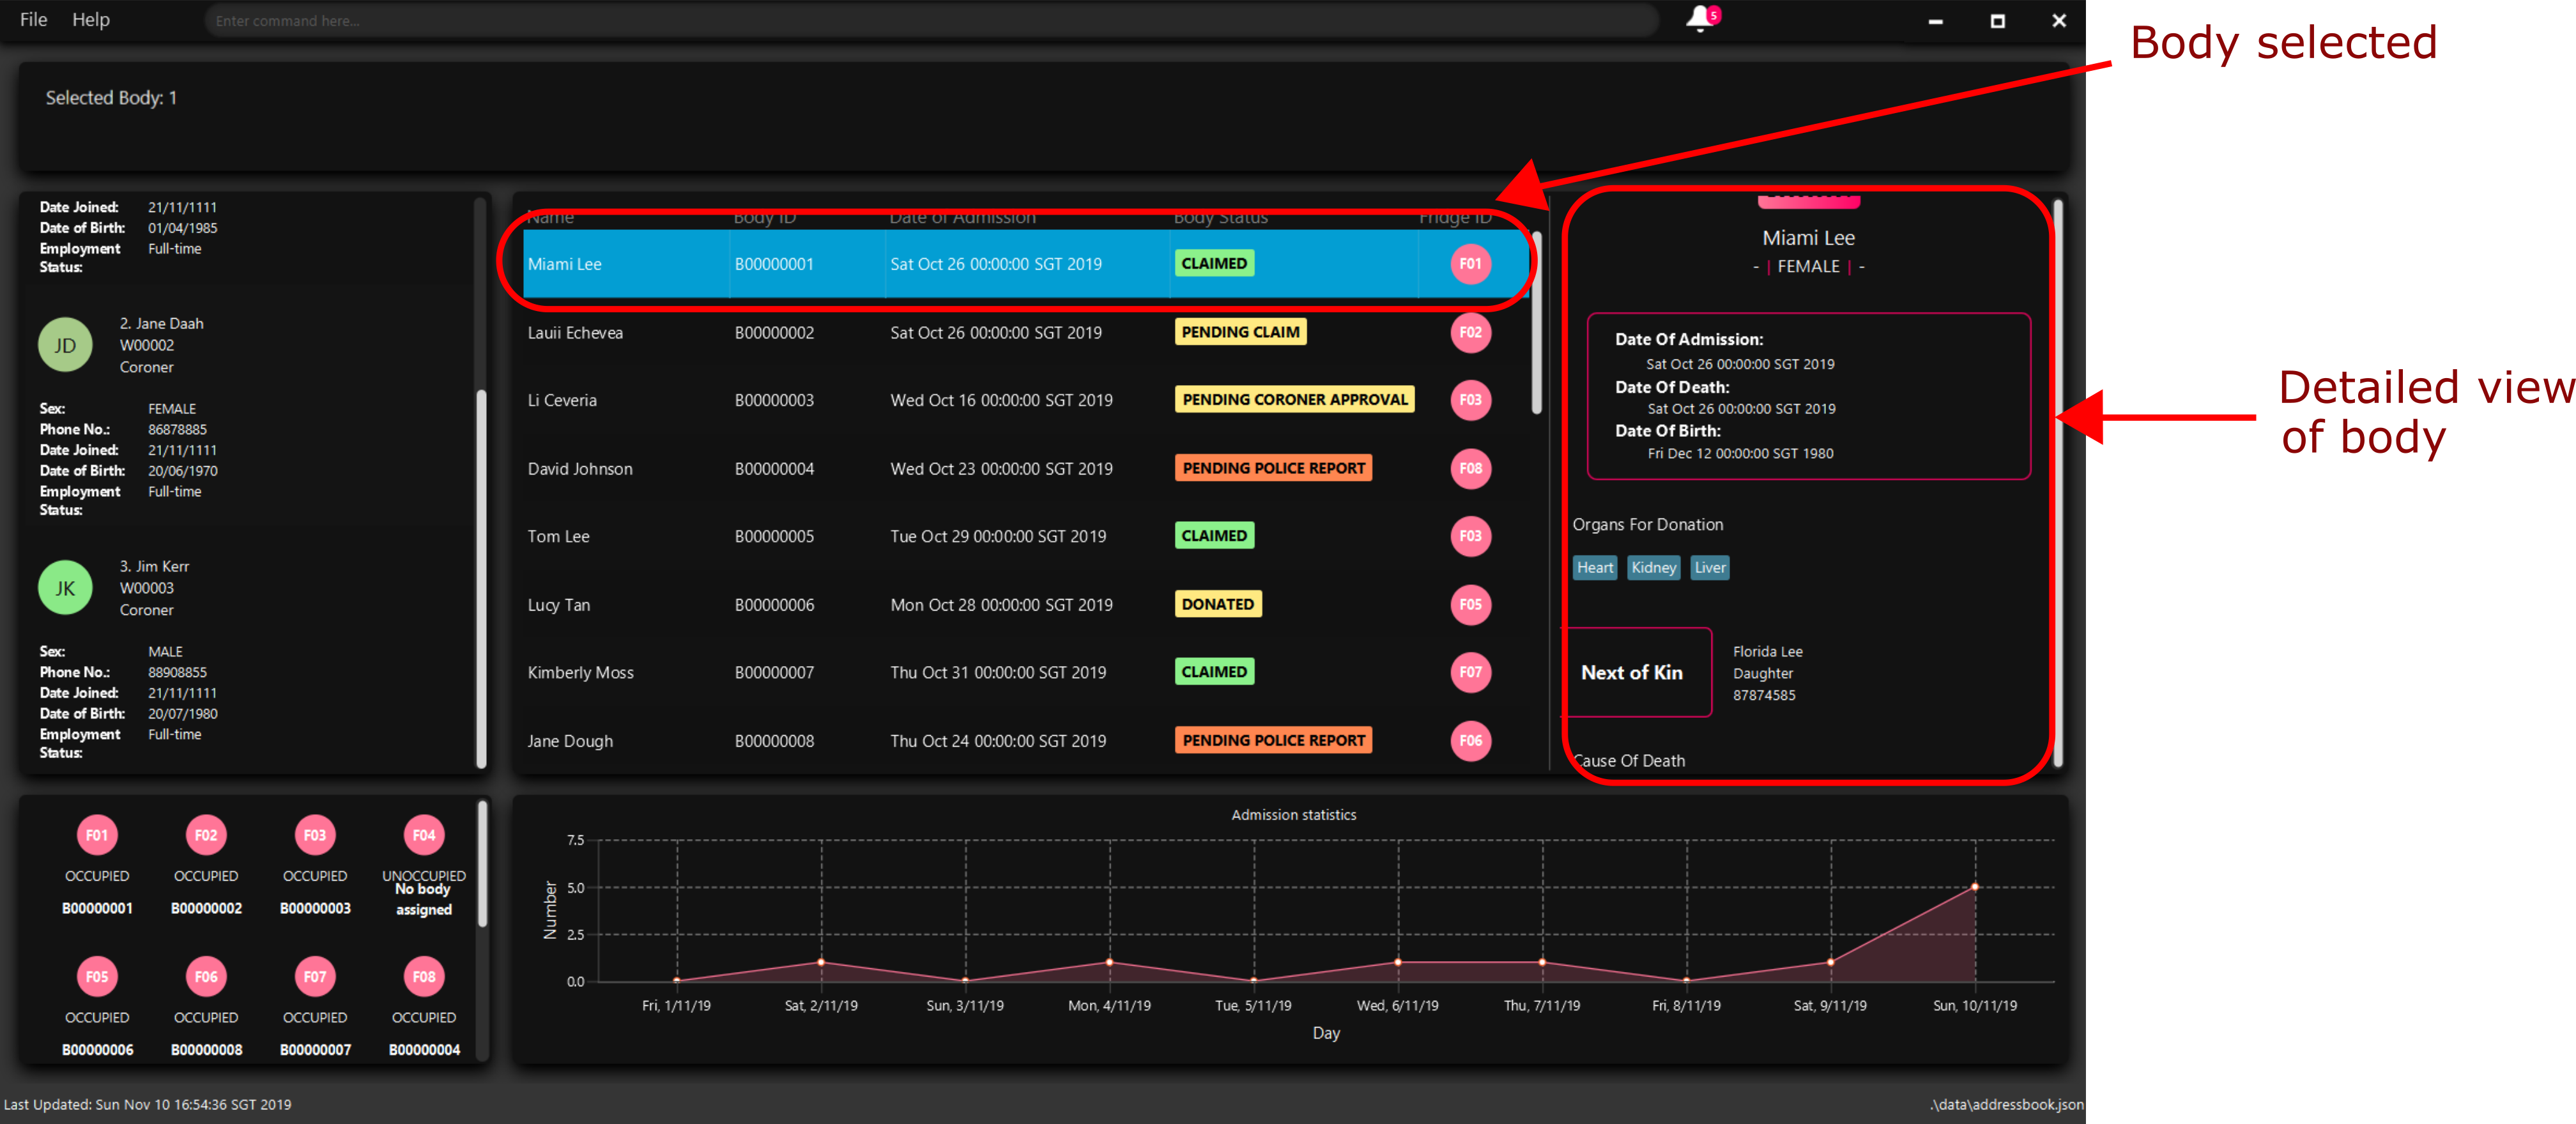
4.1.7. Selecting a body: select
You can select a body and view its full details by entering a select command with the given format below.
Format: select id
Example: select 1
The following illustrates how you can use the select command.
-
Suppose you wish to select a body with ID B00000001.
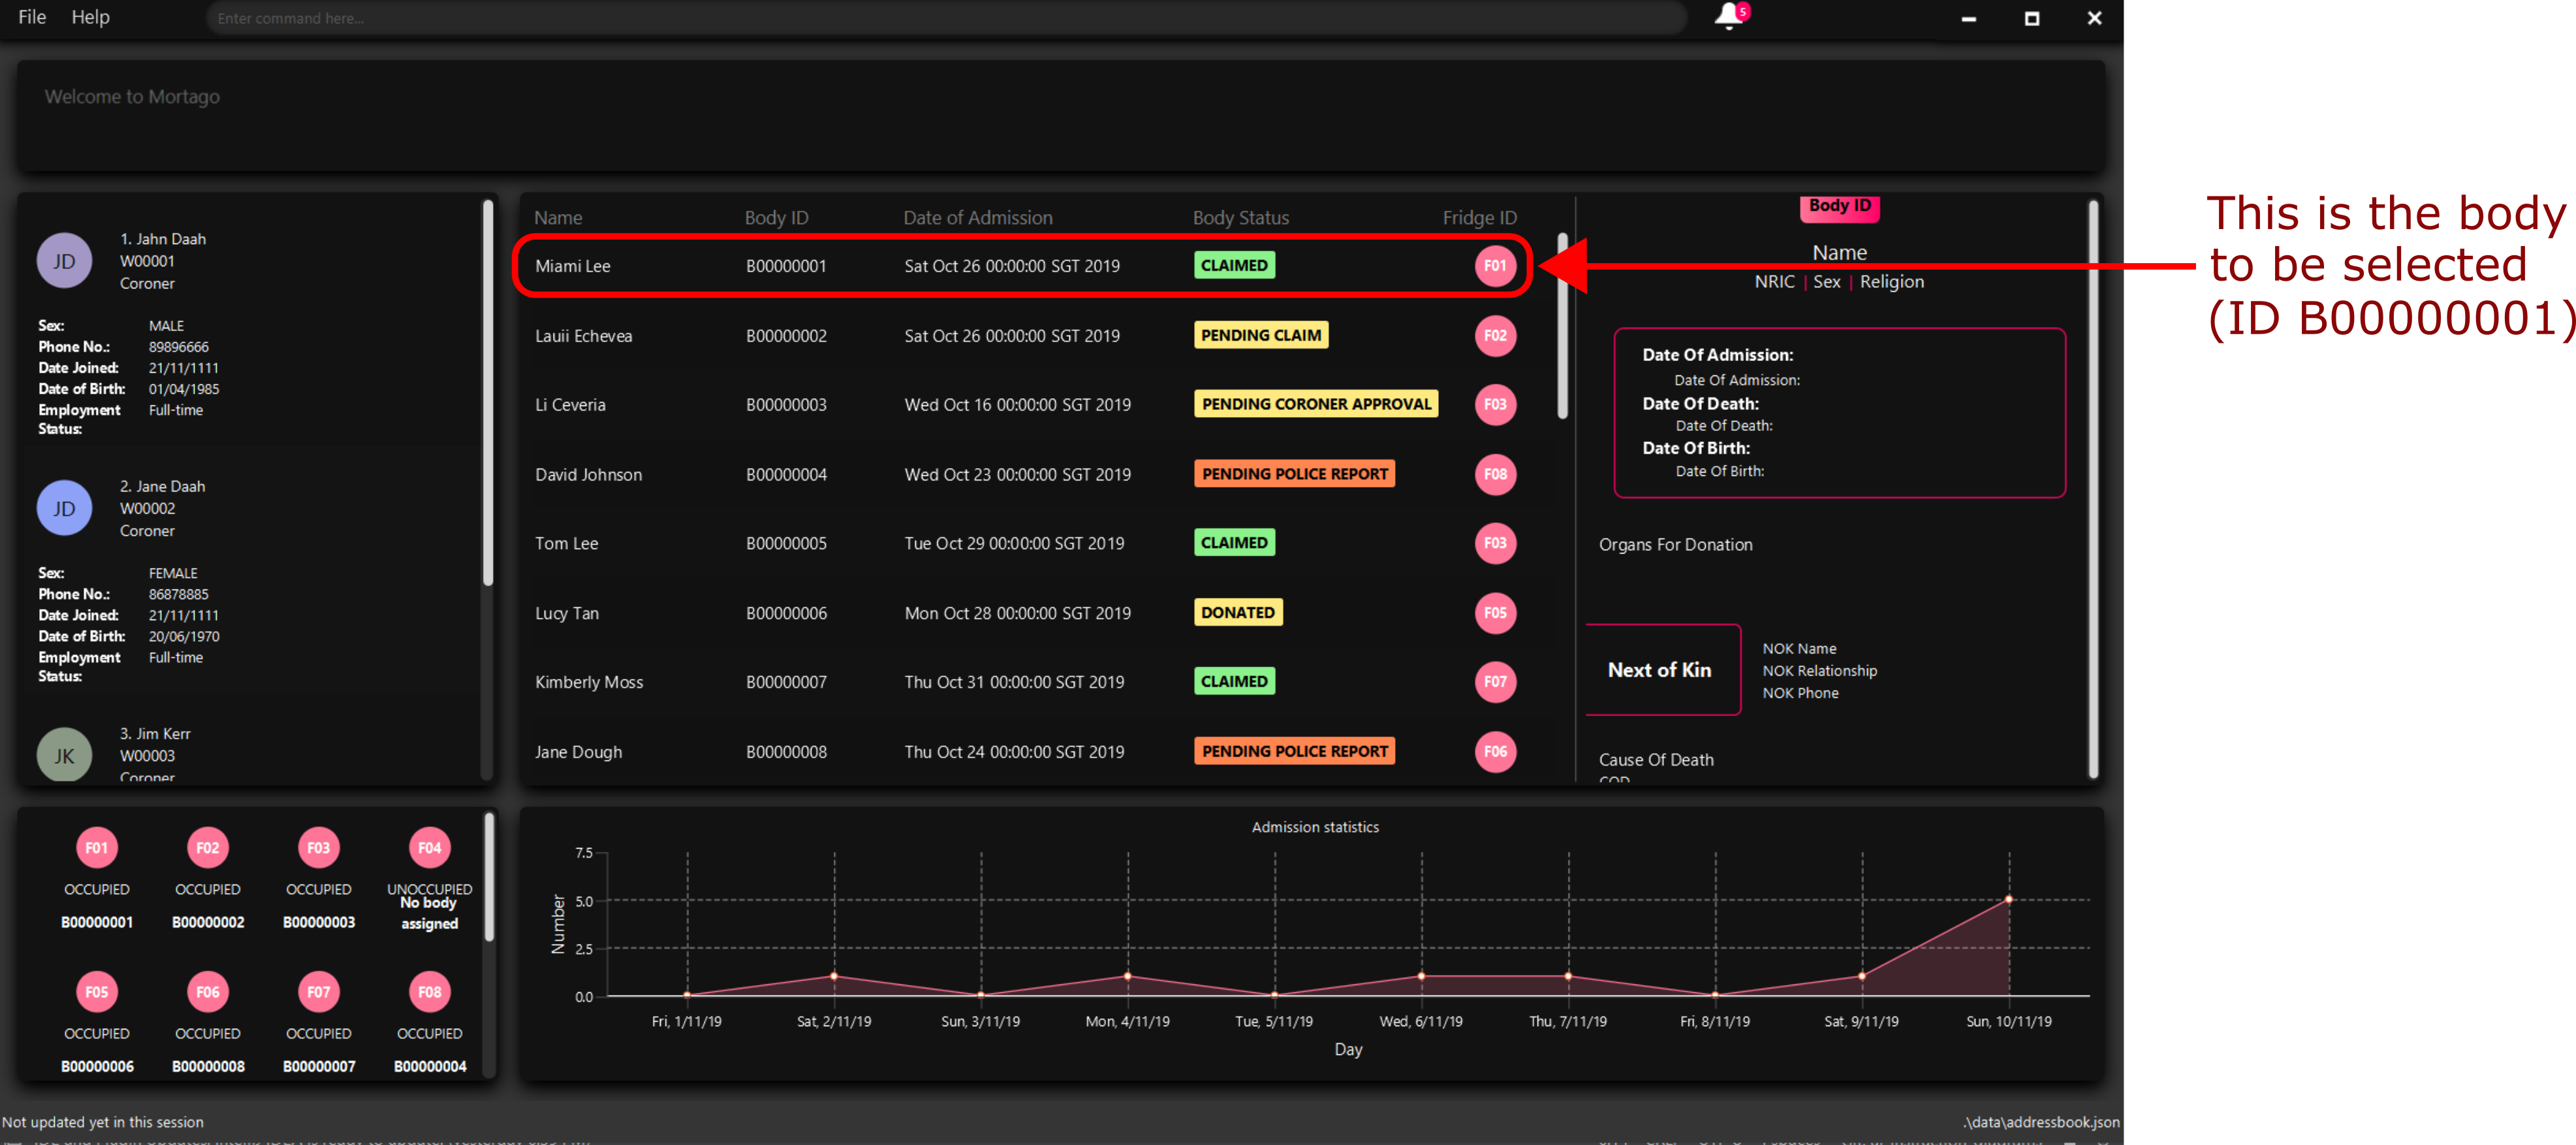
-
Enter in
select 1in the command box.

-
The body with ID B00000001 will be selected and you can view all its details on the side panel.
4.2. General
4.2.1. View notifs panel: showNotifs
This command allows you to view all Notif(s).
A Notif is a notification associated with a Body. In Singapore, if the next-of-kin is not contactable for more
than 24 hours from the time of addition of a Body in Mortago,
police must informed. Mortago removes the hassle of manually keeping track of the status of bodies! For the purpose of
testing, instead of 24 hours, Mortago currently
uses 10 seconds.
When you add a Body or manually set its status to ARRIVED, Mortago
automatically
changes its status to CONTACT_POLICE if its status is still ARRIVED after 10 seconds. It then shows a pop-up
to
remind you to
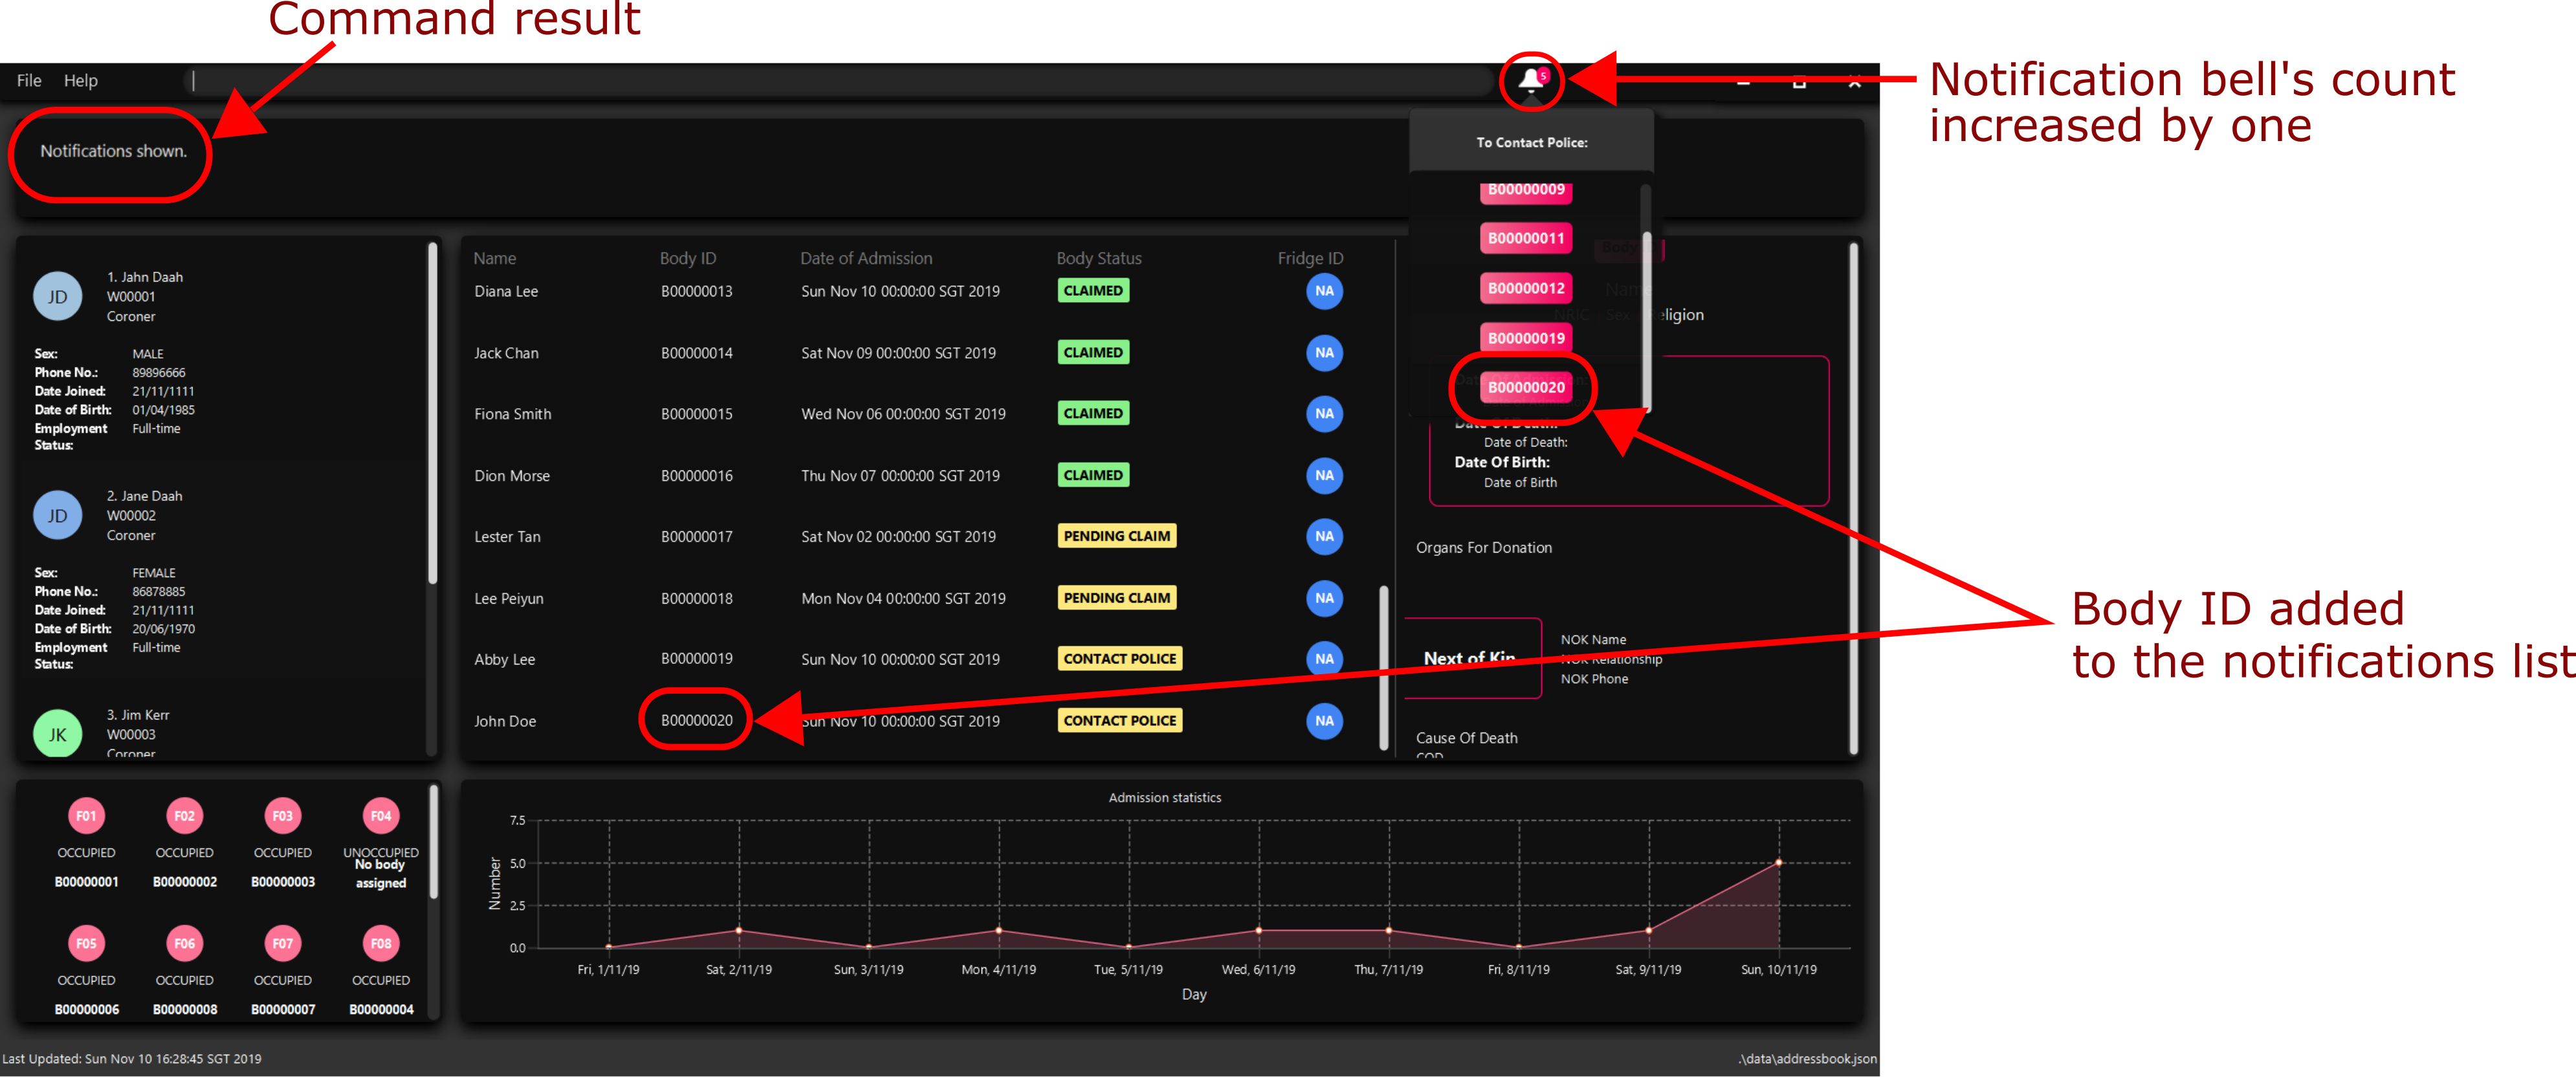
contact the police. It creates a Notif for this Body and you can view all Notif(s) by either clicking on the
notification bell or typing the showNotif command.
Format: showNotifs
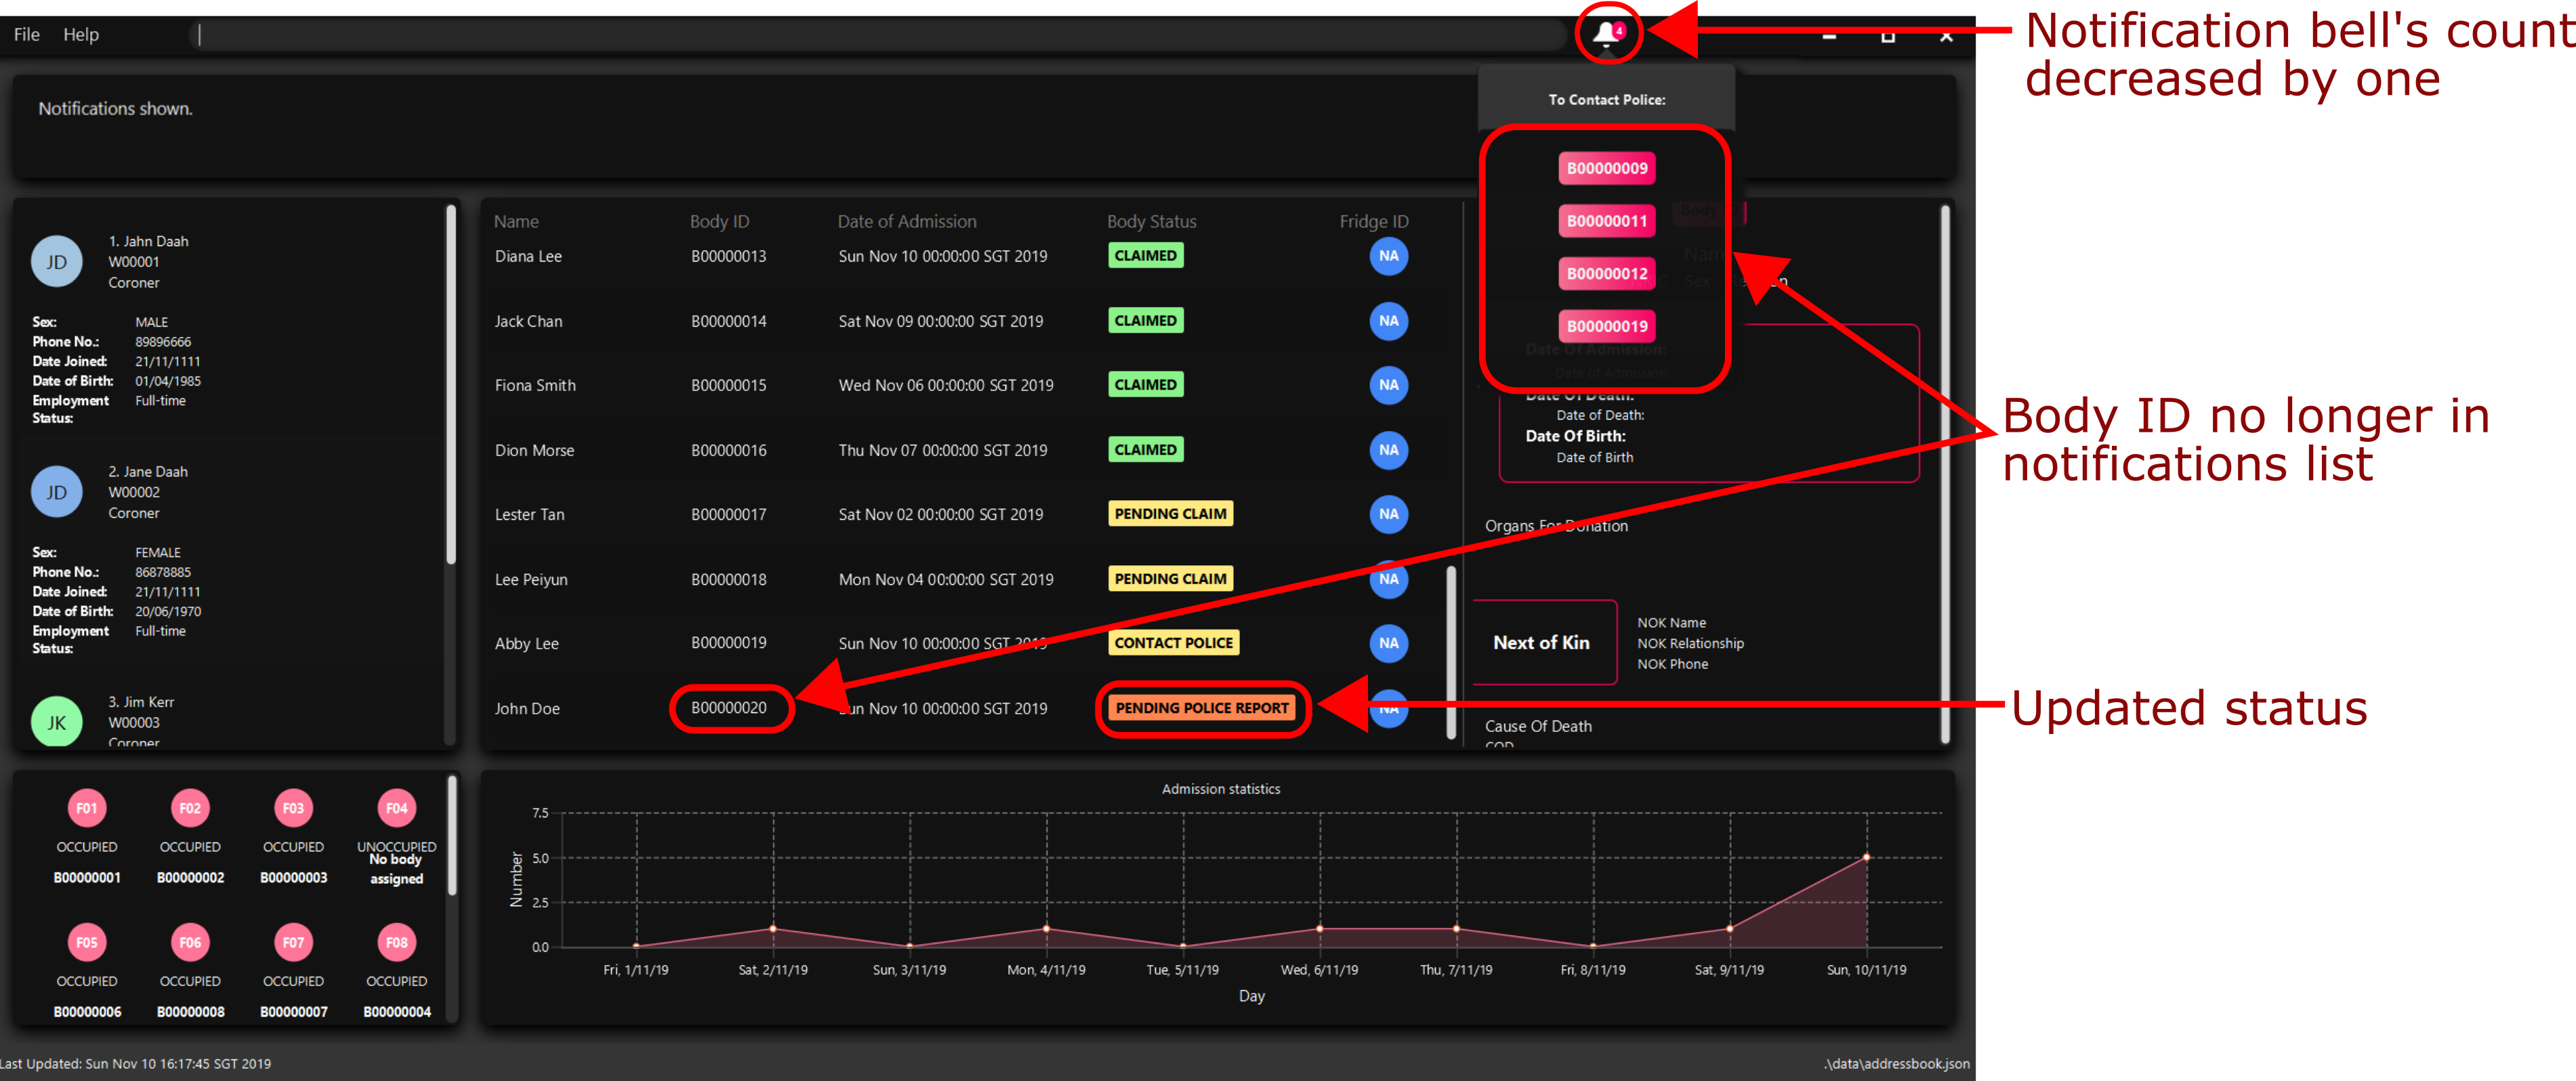
Once you change the status of the Body from CONTACT_POLICE to any other possible status as described in
Section 8.1,
its associated Notif is deleted.
If you change the status of the Body before 10 seconds, no pop-up and Notif are created.
Example:
Imagine that a new Body (John Doe) has just arrived at your mortuary.
1) Type the add command as specified in the example in Section 3.1.1. Currently the status of this Body
is ARRIVED
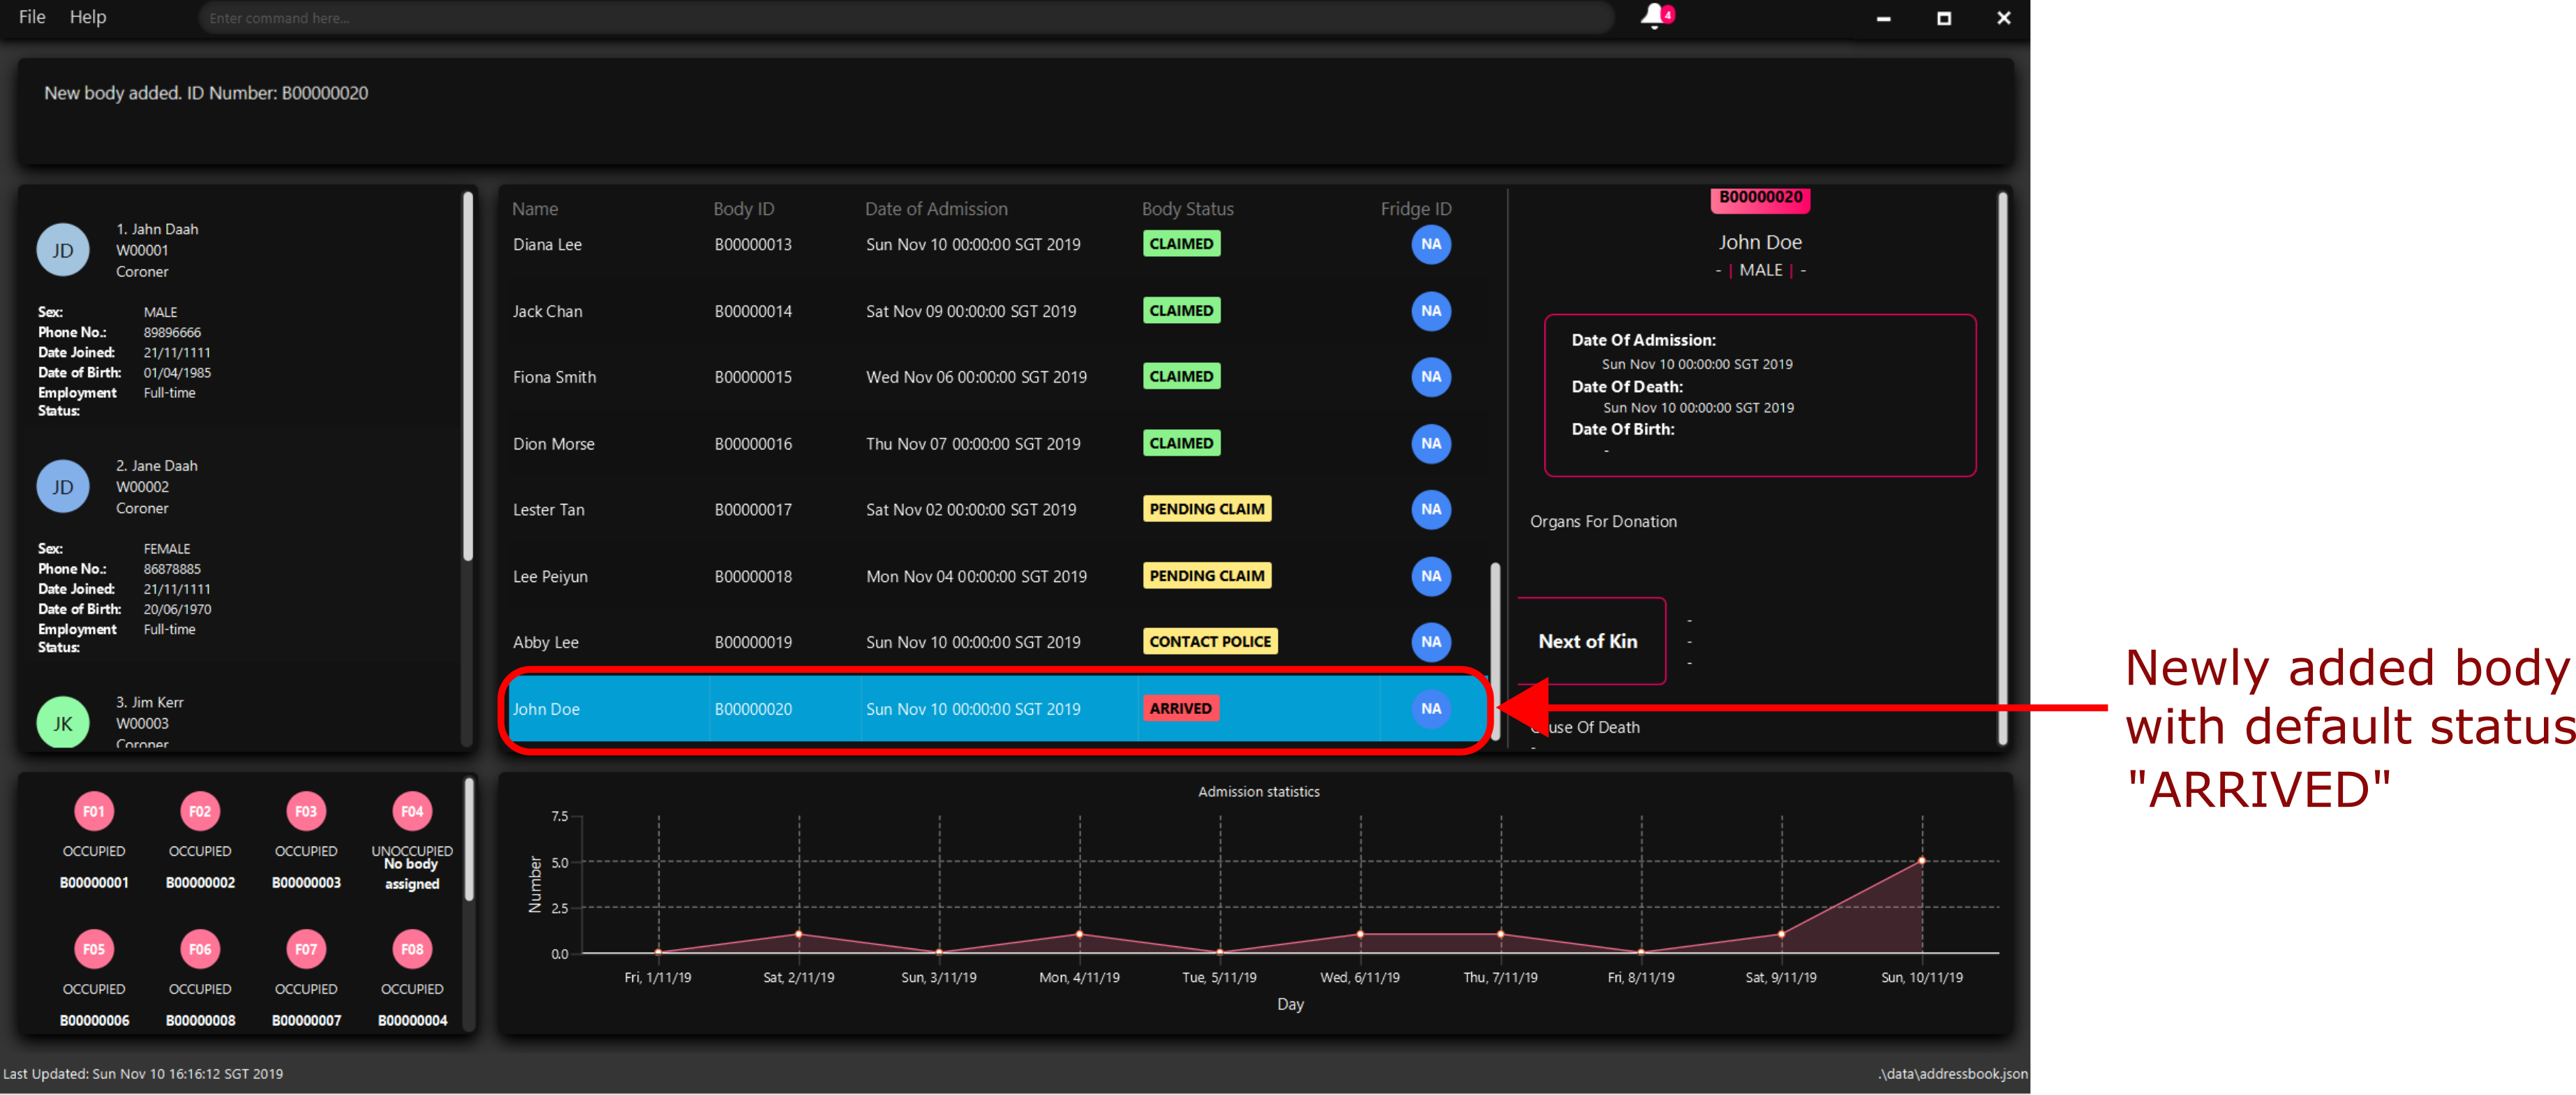
2) Wait for 10 seconds. Mortago automatically changes the status of the Body to CONTACT_POLICE and shows
you a
pop-up
notification.
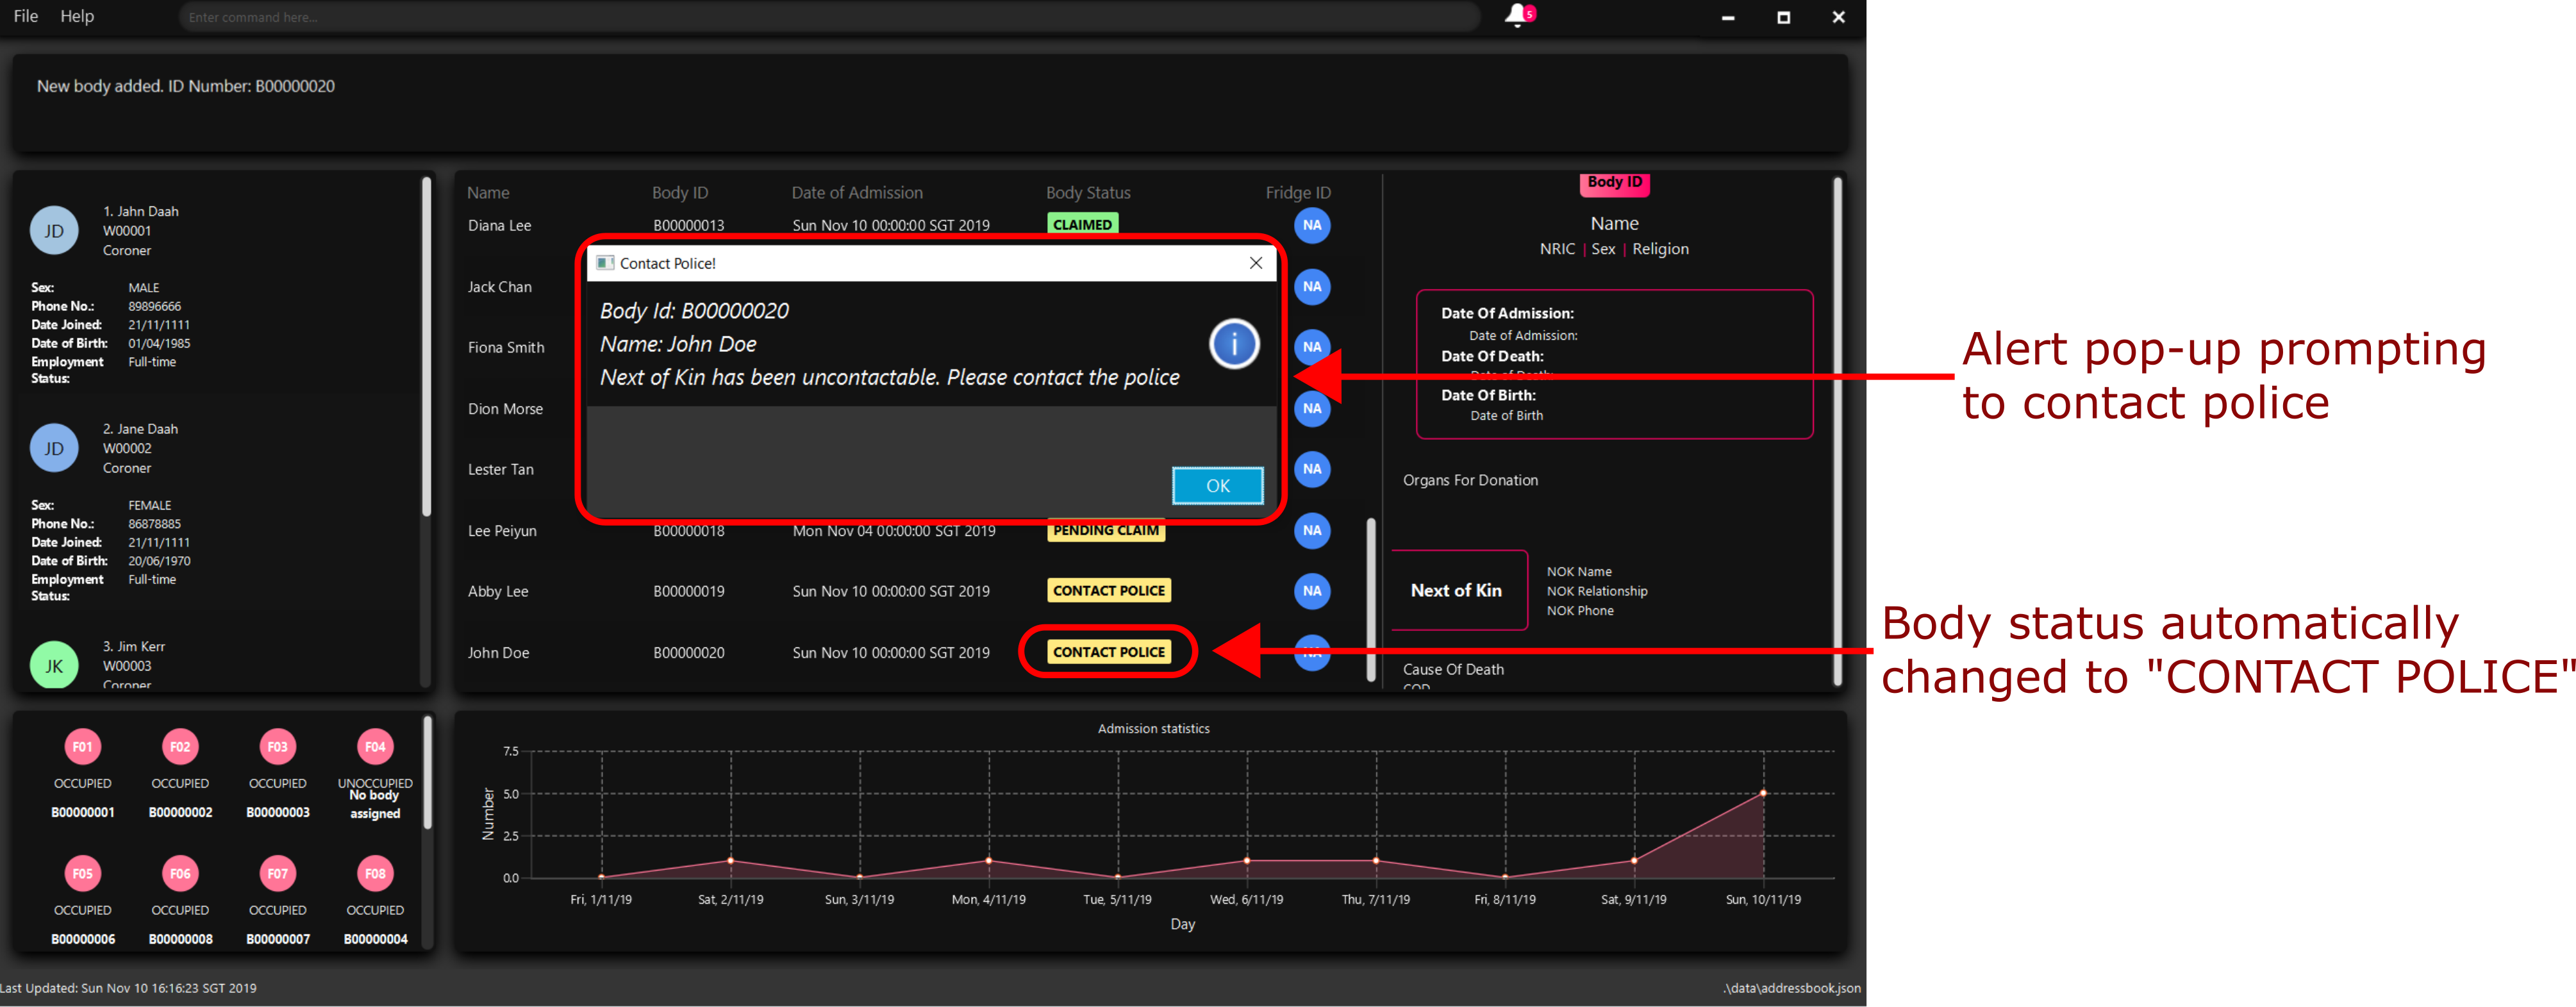
3) Type showNotif and press ENTER to execute it.

4) The notification bell opens up a panel and lists all the bodies for which you need to contact the police. You can see John Doe’s ID number B00000020 is in the list.
5) Suppose you have contacted the police, change the status of John Doe using the command update -b /id 20 /status
pending police report. John Doe’s ID is no longer listed in the notifs panel.
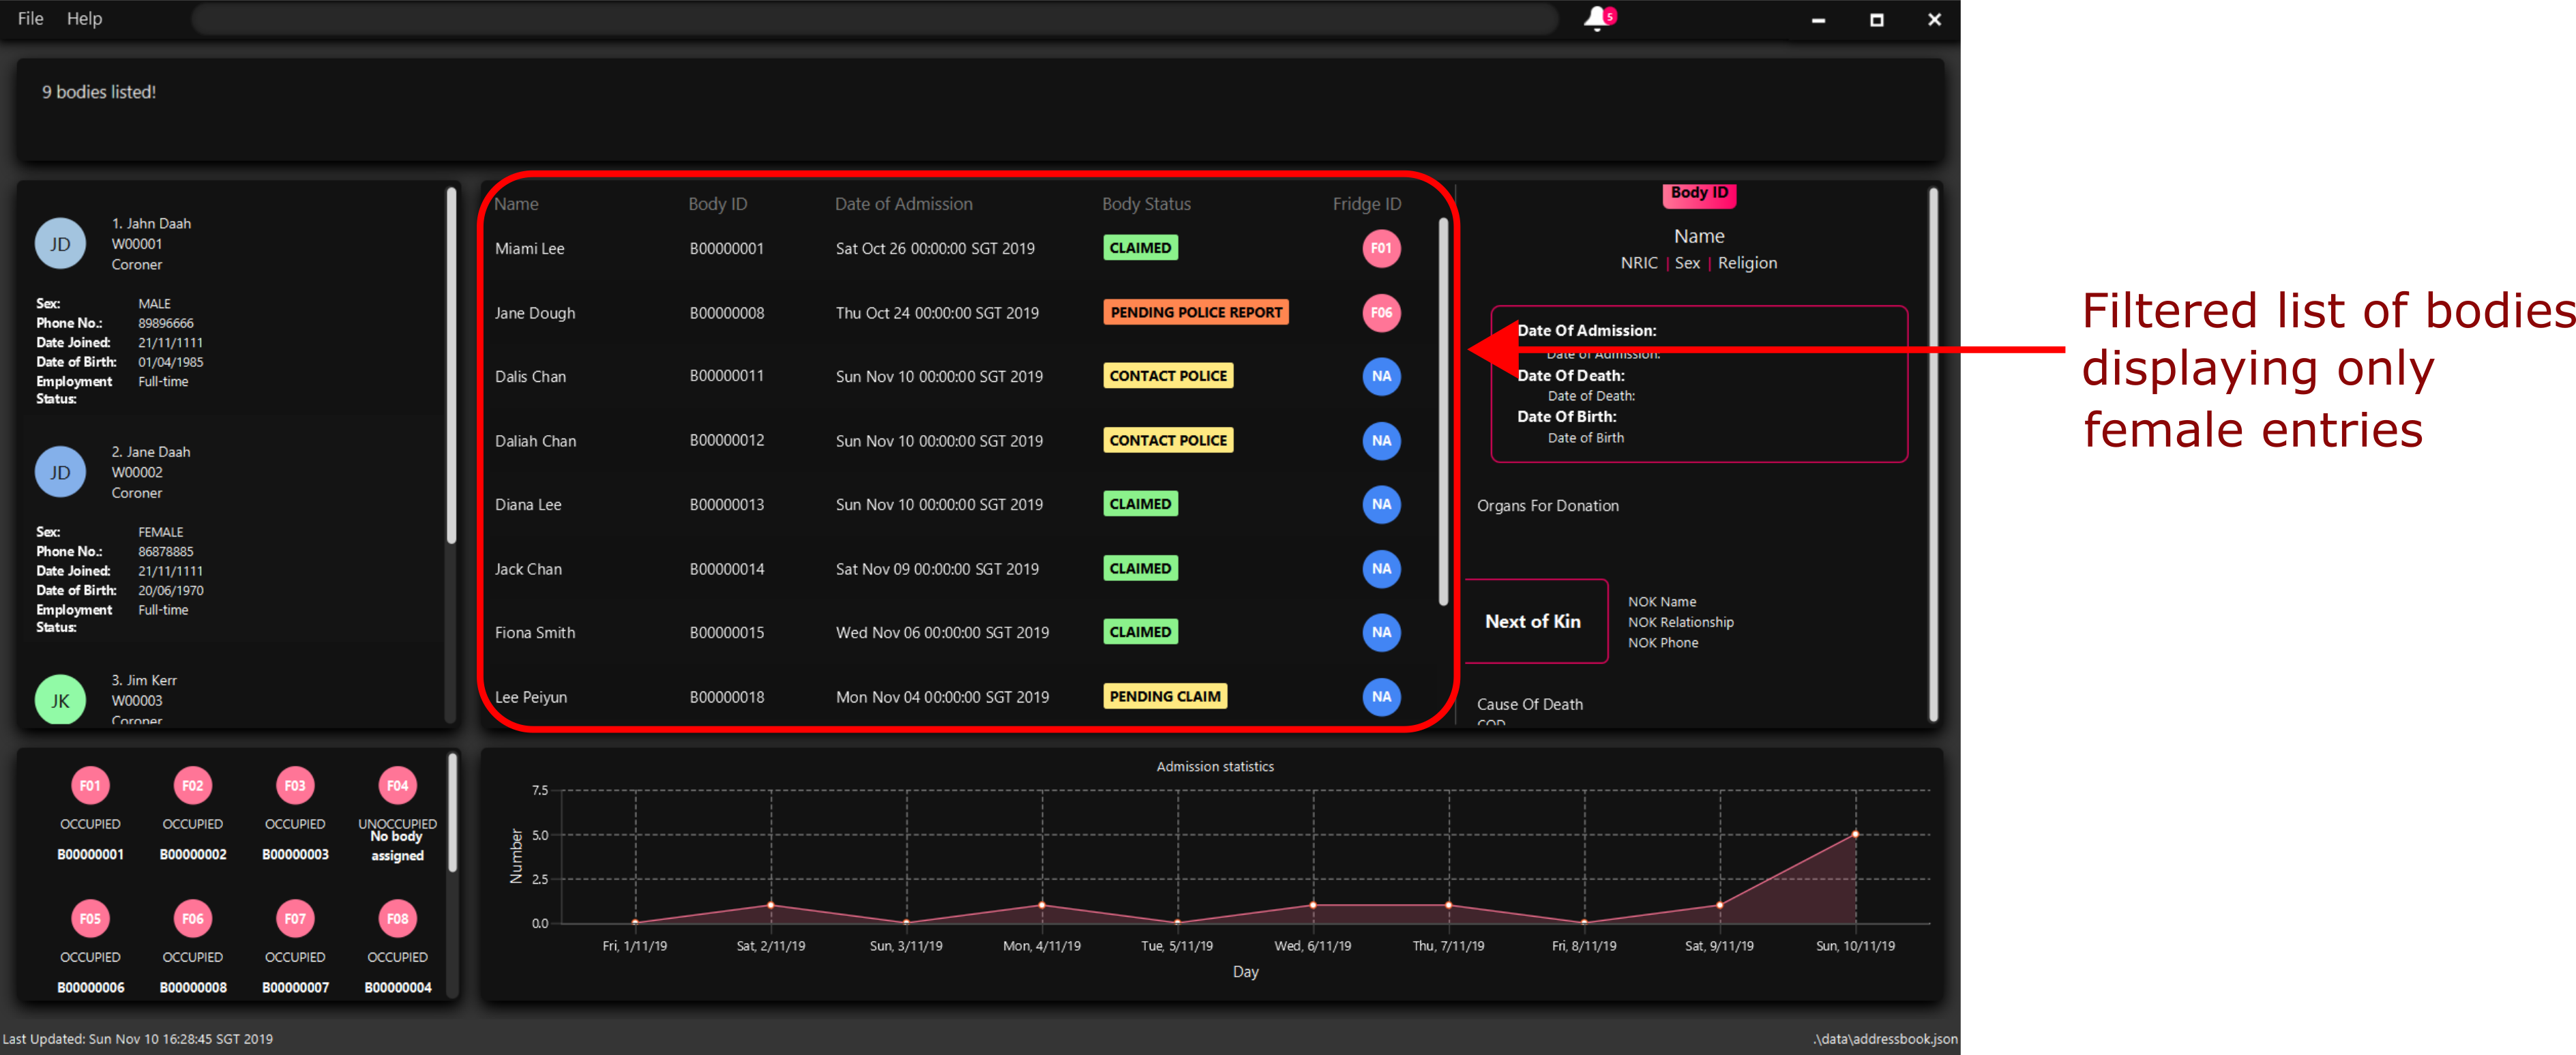
4.2.2. Filter all entries: filter
You can filter all entries according to the given keywords in any of an entry’s attributes by entering a filter command with the given format below.
All entries with matching keywords are displayed. Keyword is case-insensitive.
All attributes of a body or worker entry can be filtered. If more than one attribute is specified, the entries displayed must fulfill all attributes. Please refer to Section 3.1.1 for the different fields available to be filtered.
Format: filter -FLAG [/attributeName attributeValue …]
Example:
-
filter -w /sex female
All female worker entries are displayed. -
filter -b /cod Car Accident /sex male
All body entries with car accident as the cause of death and those that are male are displayed.
4.2.3. Undoing a command: undo
You can undo the effects of the last command you executed with undo.
This command lets you undo up to 10 most recent commands, one at a time.
The commands are undone starting from the most recent to the least recent.
Format: undo or u
The add, update, clear, and delete commands can be undone.
Commands like list or find cannot be undone.
Commands caused by automated commands, such as an update command caused by a Notif can be undone and redone.
For example, the automatic status change of a Body from ARRIVED to CONTACT_POLICE is caused by an update and can be undone and redone. However, note that this feature does not support
the Notif itself. For example, if a Body was added and deleted before the Notif associated with it has executed,
undoing the deletion does not restore the Notif.
Though you can undo a clear command, note that you cannot redo any past undone commands after that.
Example:
Imagine that you wanted to delete a Body with ID 10 from Mortago. However, your finger slips and you type 20 instead
of 10!

You don’t realise and execute the command. When you look at the dashboard, you realise you have deleted body 20. Even worse, you have no recollection of body 20’s name or information.
You can easily reverse that mistake with the undo command instead of adding body 20 all over again!
To undo:
1) Type undo or u into the command box.

2) Press Enter to execute the command.
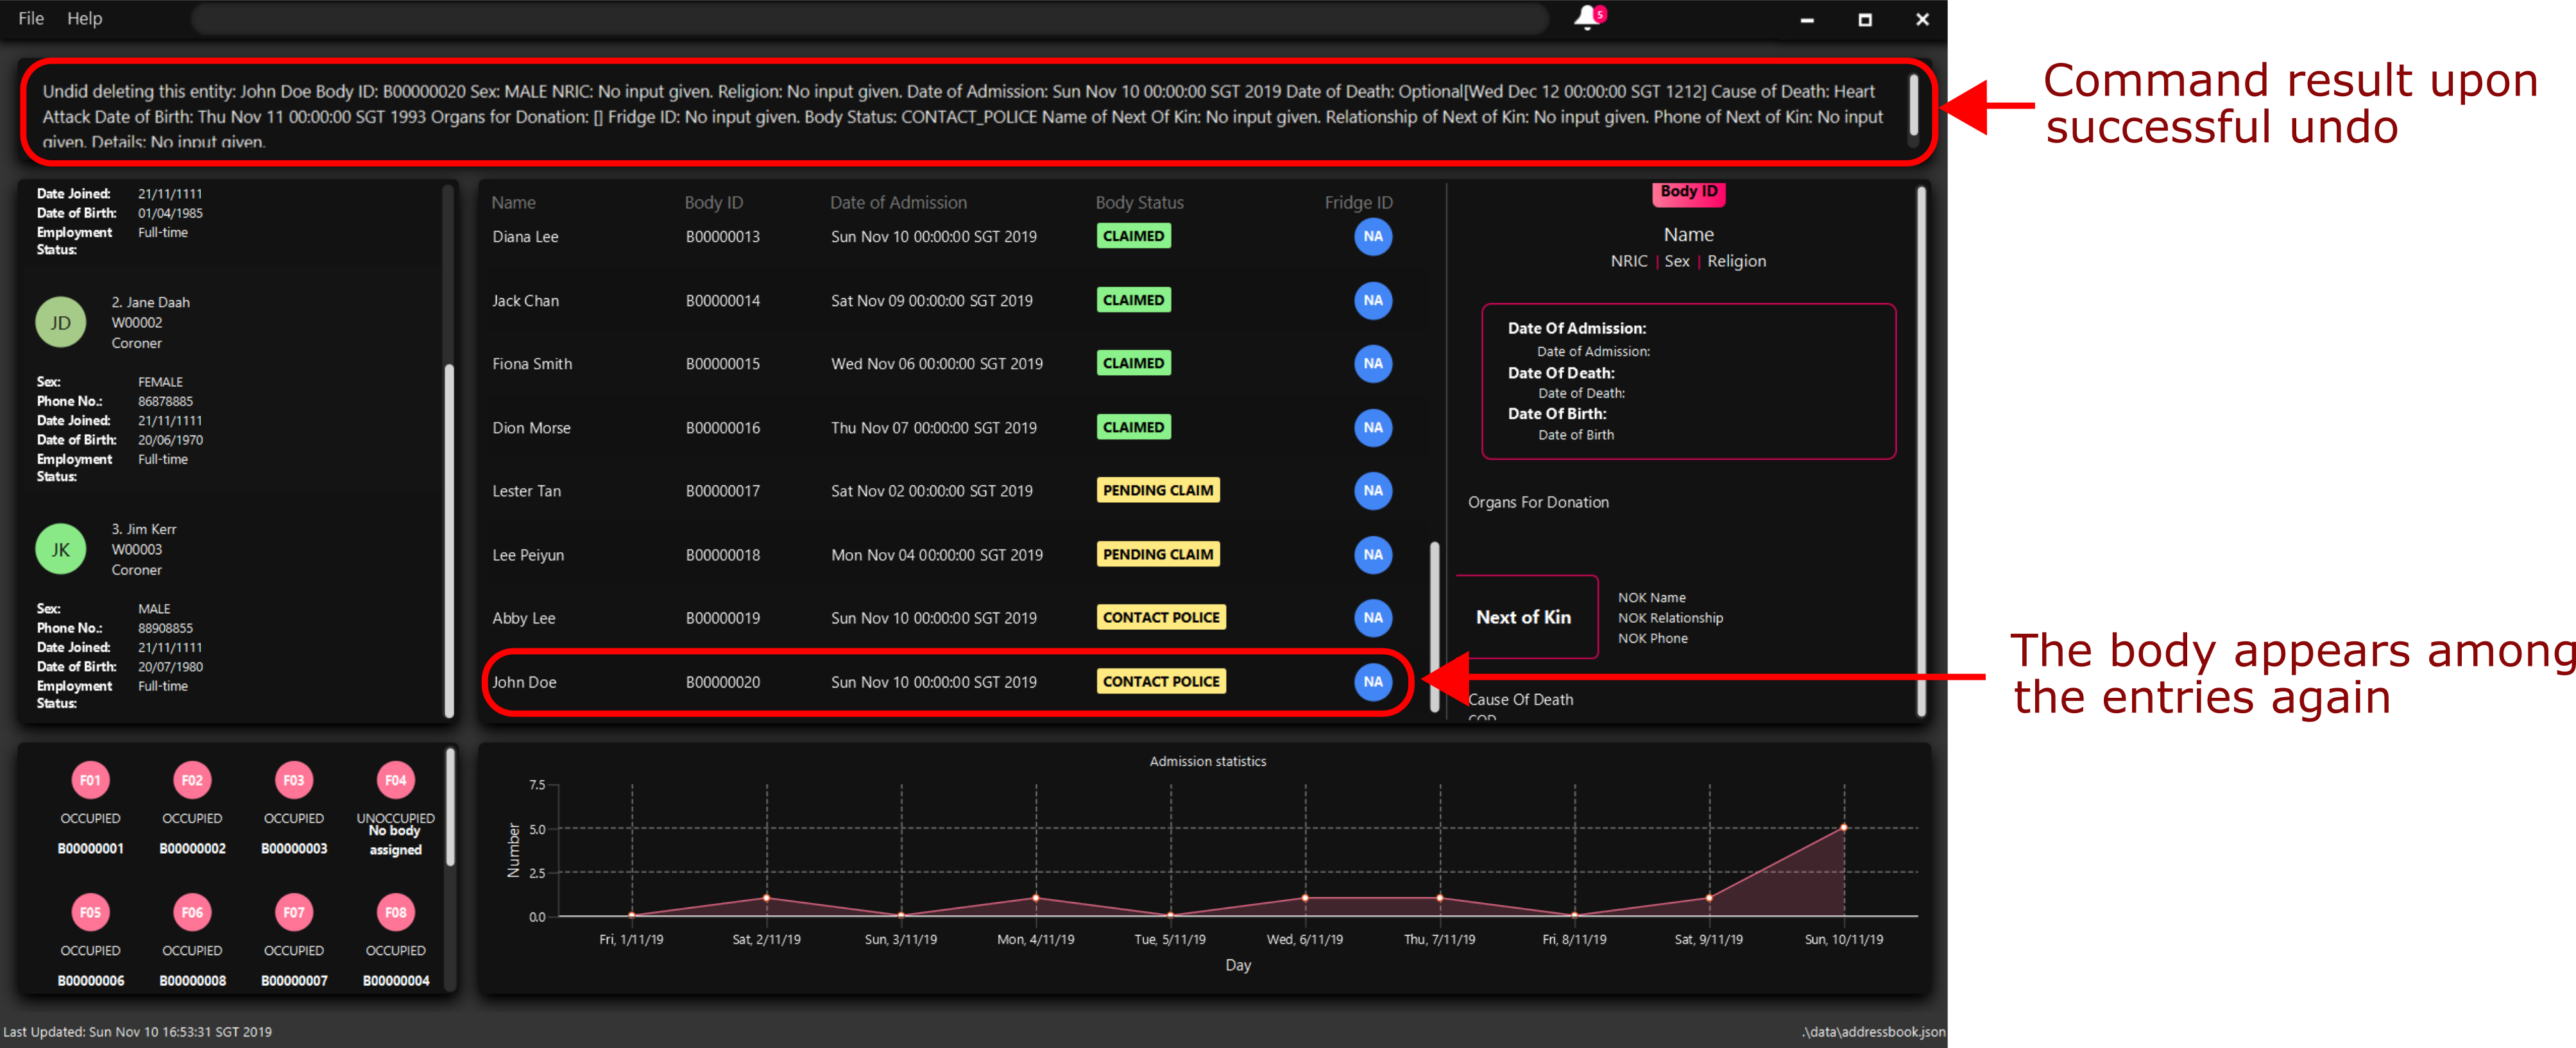
3) Notice that the result box shows text telling you what was undone, and body 20 is back in the list of bodies.
4.2.4. Redoing a command: redo
You can redo the effects of the last command you executed with redo.
This command lets you redo up to 10 most recent undone commands, one at a time.
All commands that can be undone can be redone. (See Section 4.2.3, “Undoing a command: undo” for how undo can be used.)
Format: redo or r
| A command can only be redone if it has been undone before. |
Example:
Imagine that you’ve previously executed undo to undo deleting body 20. You look at the data again and realise you’ve deleted the right thing after all!
Instead of deleting body 20 again, simply redo the command.
To redo:
1) Type redo or r into the command box.
2) Press Enter to execute the command.
3) Notice that the result box shows text telling you what was executed when redoing, and body 20 is now absent from the list of bodies.
4.2.5. Exiting the program : exit
You can exit the program by entering an exit command given below.
Format: exit
4.2.6. Sort all entries: sort [coming in v2.0]
Sort all displayed entries according to a given order. Only body and worker entries can be sorted. Sort only works on the entries that are in view. For example, to sort body entries, the you need to first navigate to the bodies view. Types of ordering can be found below:
-
name: entries are sorted by alphabetical order of their names -
id: entries are sorted by their id number, in descending order (newest entry appear first)-
id asc: entries are sorted in ascending order of id number -
id desc: entries are sorted in descending order of id number-
If neither 'asc' or 'desc' qualifiers are supplied, the ordering is by default descending.
-
-
-
status: entries are sorted by their statuses in this order:
Format: sort /order order
Example:
-
sort /order status
All entries are sorted and grouped according to their statuses. -
sort /order id asc
All entries are sorted according to their id number in ascending order.
4.3. Document Generation
This section showcases three commands you can use to generate different kinds of reports.
| You must ensure that all existing reports are closed before executing any report generation commands to allow updating the same PDF document. |
4.3.1. Generate report for a specific body: genReport
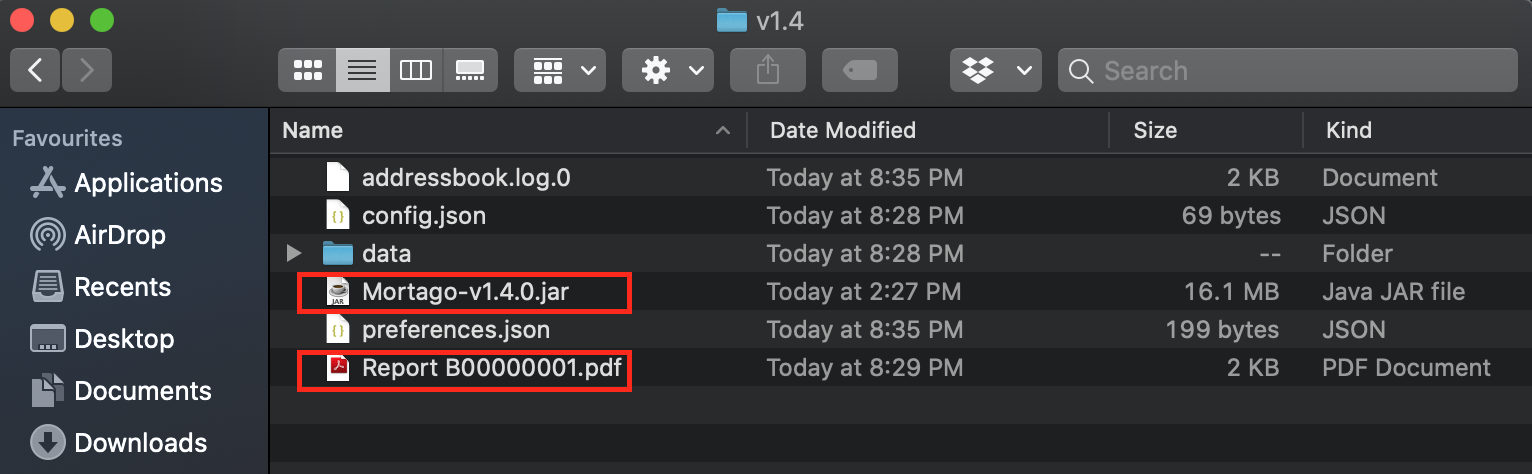
You can generate an individual report in a PDF filename Report <body_ID>.pdf located in the folder containing the jar file as shown in the screenshot below:
You can also add your signature name to the report by following the command format below.
| Your signature should only contain alphabets and whitespaces and must be less than 40 characters. |
Format: genReport bodyId (yourSignatureName)
Example:
-
genReport 1 John Doe
Outputs the PDF report for body ID B00000001 in the folder containing the jar file. The report contains signature of John Doe. -
genReport 1
Outputs the PDF report for body ID B00000001 in the folder containing the jar file. The report does not contain any signature.
4.3.2. Generate reports for all bodies: genReports
You can generate all individual reports in a PDF filename Report (ALL BODIES).pdf located in the folder containing the jar file.
You can also add your signature name to the report by following the command format below.
| Your signature should only contain alphabets and whitespaces and must be less than 40 characters. |
Format: genReports (yourSignatureName)
Example:
-
genReports John Doe
Outputs the PDF containing reports for all bodies in the folder containing the jar file. The reports contain signature of John Doe. -
genReports
Outputs the PDF containing reports for all bodies in the folder containing the jar file. The reports do not contain any signature.
4.3.3. Generate summary report for all bodies: genReportSummary
You can generate a tabular report overview containing key information for all bodies in a PDF filename Report Summary.pdf located in the folder containing the jar file.
You can also add your signature name to the report by following the command format below.
| Your signature should only contain alphabets and whitespaces and must be less than 40 characters. |
Format: genReportSummary (yourSignatureName)
Example:
-
genReportSummary John Doe
Outputs the PDF report summary for all bodies in the folder containing the jar file. The report contains signature of John Doe. -
genReportSummary
Outputs the PDF report summary for all bodies in the folder containing the jar file. The report does not contain any signature.
4.4. Administrative
4.4.1. View admission statistics: stats
You can view a the statistics of the number of bodies admitted to the morgue over the past 10 days, a specific week, a specific month, or a specific year by entering a stats command with the given format below.
The statistics appear in graphical form as a line-chart on the main page of the application. The line chart is initialised and updated automatically and you do not need to enter a command to see it. By default, the line-chart displayed shows the number of bodies admitted over the past 10 days. You can change the time frame with the stats command.
The following screenshot shows where the stats command should be inputted and where the line chart changes:
)The line chart’s position on the dashboard with respect to the command box. image::statsMonth.png[width="790"]
The following are the correct formats for typing in stats commands, with example usage:
-
To display the last 10 days:
stats
The line chart displays statistics over the last 10 days. The line chart appears as below:
)Line chart displaying the last ten days image::statsTenDays.png[width="790"]
-
To display a specific week:
stats /week 25/10/2019
The line chart displays statistics for the week which contains the specified day. In this case, it is the date 12/10/2019. The line chart appears as below:
)Line chart displaying the week containing the day 25/10/2019 image::statsWeek.png[width="790"]
-
To display a specific month:
stats /month 5/2019
The line chart displays statistics or the month specified. In this case, it is May 2019. The line chart appears as below:
)Line chart displaying the month of October image::statsMonth.png[width="790"]
-
To display a specific year:
stats /year 2019
The line chart displays statistics for the year specified. In this case is it 2019. The line chart appears as below:
)Line chart displaying the year 2019 image::statsYear.png[width="790"]
4.4.2. Archive entries: archive [coming in v2.0]
You can archive old or irrelevant entries by entering an archive command with the given format below. One entry can be archived at a time, or all entries of a certain specification can be archived at once.
Format:
-
archive -FLAG /id id -
archive -FLAG /status status
Example:
-
archive -b /id 2
Archives body entry with ID 2 -
archive -w /status inactive
Archives all entries of workers who are inactive
4.4.3. View archived entries: archives [coming in v2.0]
You can display all archived entries by entering an archives command with the given format below.
Format: archives -FLAG
Example:
-
archives -b
Displays all archived body entries, in order of archive date. -
archives -w
Displays all archived worker entries, in order of archive date.
4.4.4. Give and view feedback: feedback [coming in v2.0]
You can give workers feedback and display a history of all feedback entered by entering a feedback command with the given format below.
Format:
-
feedback /workerId workerId /details detailsto assign feedback -
feedbackto display all feedback entered
Example:
-
feedback /id 10 /details very meticulous
Notes down feedback for worker with ID W10010 with custom details
4.4.5. Assign tasks to worker: assign [coming in v2.0]
You can assign a body and task to a worker by entering an assign command with the given format below.
Format: assign /bodyId bodyId /workerId workerId /task taskDescription
Example: assign /bodyId 2 /workerId 1 /task send blood sample to lab for analysis
Assigns worker with worker ID W00001 to body with ID B00000002 with a task description.
4.5. Help
4.5.1. View all commands: help
You can view a summary of all available commands and their flags by entering a help command with the given format below.
Format: help
Example: help
Shows a link to the User Guide.
4.5.2. View help hotlines: hotlines [coming in v2.0]
You can view emergency help hotlines by entering a hotlines command given below.
Format: hotlines
Example: hotlines
Lists emergency help hotlines.
5. FAQ
Q: How do I transfer my data to another Computer?
A: Install the app in the other computer and overwrite the empty data file it creates with the file that contains your Mortago data.
Q: How do I save my data?
A: Mortago’s data is saved in the hard disk automatically after any command that changes the data. There is no need to save manually.
6. Command Summary
-
Add an entry:
add-
Add a new worker, body, or fridge with the
add -FLAG [/attributeName attributeValue…]
-
-
Update an entry:
update-
Update the status of each worker, or body with the
update -FLAG (/attributeName attributeValue)
-
-
Find :
find [keyword…]-
Find entries using a keyword.
Format:find keyword
-
-
Delete an entry:
delete-
Delete a body, worker or fridge entry, indicated by its id number.
Format:delete -FLAG id
-
-
Clear :
clear -
Select :
select id -
List :
list -FLAG -
View notifs :
showNotifs-
View all notifications brought up by the app.
-
-
Filter :
filter-
Filter all entries according to the given keyword in any of an entry’s field.
Format:filter -FLAG [/attribute attributeValue…]
-
-
Undo :
undo-
Undo the last executed command.
Format:undo
-
-
Redo :
redo-
Redo the last undone command.
Format:redo
-
-
Exit:
exit -
Sort :
sort[coming in v2.0]-
Sort all displayed entries according to a given order.
Format:sort /order order (/idOrder idOrder)
-
-
Generate report :
genReport-
Generate an individual report in a PDF.
Format:genReport bodyId
-
-
Generate all reports :
genReports-
Generate all individual reports in a PDF.
Format:genReports
-
-
Generate summary report :
genReportSummary-
Generate an overview for all reports in a PDF.
Format:genReportSummary
-
-
Archive entries :
archive[coming in v2.0]-
Archive old or irrelevant entries. Format:
archive -FLAG /id id,archive -FLAG /status status
-
-
View archived entries :
archives[coming in v2.0]-
Display all archived entries. Format:
archives -FLAG
-
-
Give and view feedback :
feedback[coming in v2.0] -
Give workers feedback and displays a history of all feedback entered. Format:
feedback /workerId workerId /notes notes, feedback` -
Assign tasks :
assign[coming in v2.0]-
Assign a body and task to a worker. Format:
assign /bodyId bodyId /workerId workerId /task taskDescription
-
-
Help summary:
help-
Get information about the commands Format:
help
-
-
Help hotlines :
hotlines[coming in v2.0]
7. Glossary
Attribute : In Mortago, an attribute is the property of a body, fridge or worker.
Automated Command : In Mortago, an automated command is a command that is not explicitly inputted by the user.
Body : a corpse
Worker : an employee working in the mortuary
Fridge : a refrigerator used to store a body in the mortuary
Notif : a reminder to notify the mortuary manager about the Body for which police needs to be contacted
Command Line Interface (CLI) : a text-based user interface (UI) used to view and manage computer files
Graphical User Interface (GUI) : an interface through which a user interacts with electronic devices such as computers, hand-held devices and other appliances. This interface uses icons, menus and other visual indicator (graphics) representations to display information and related user controls, unlike text-based interfaces, where data and commands are in text
Operating System (OS) : the low-level software that supports a computer’s basic functions, such as scheduling tasks
and controlling peripherals
Portable Document Format (PDF) : a file format for capturing and sending electronic documents in exactly the intended format
8. Appendix
8.1. Valid values for various ATTRIBUTES
The following table specifies all valid values, or format, that you must follow when entering the values for various ATTRIBUTES when adding or updating a worker or body.
|
Valid Values or Format |
Sex |
The following values are valid for sex:
|
Body Status |
The following values are valid for body status:
|
Phone Number |
A valid phone number contains exactly 8 digits only. The country calling code is omitted and assumed to be +65. The first digit should be '8' or '9'. |
Date and Time |
Your date and time should follow the following format:
It is not necessary to include the time for certain |
Path to Photo |
If you wish to provide a photo for the worker entry, please provide the absolute path of the image file.
You can follow the steps here to obtain the absolute path of the file. Only |
NRIC |
A valid NRIC number has 9 alphanumeric letters in total, with an alphabetic letter at the start and end. Singaporeans should either have the starting alphabets 'S' or 'T', while foreigners should either have the alphabets 'F' or 'G'. The ending character of each NRIC number can be any alphabet. |
8.2. Copy a file’s absolute path into the clipboard
The following steps will guide you on how to copy the absolute path of a file into the clipboard.
-
For Windows Users:
-
Navigate to the image file you wish to upload.
-
While holding down Shift, right-click on the image file.
-
In the menu that appears, as seen in the figure below, click on
Copy as pathto copy the absolute path into your clipboard.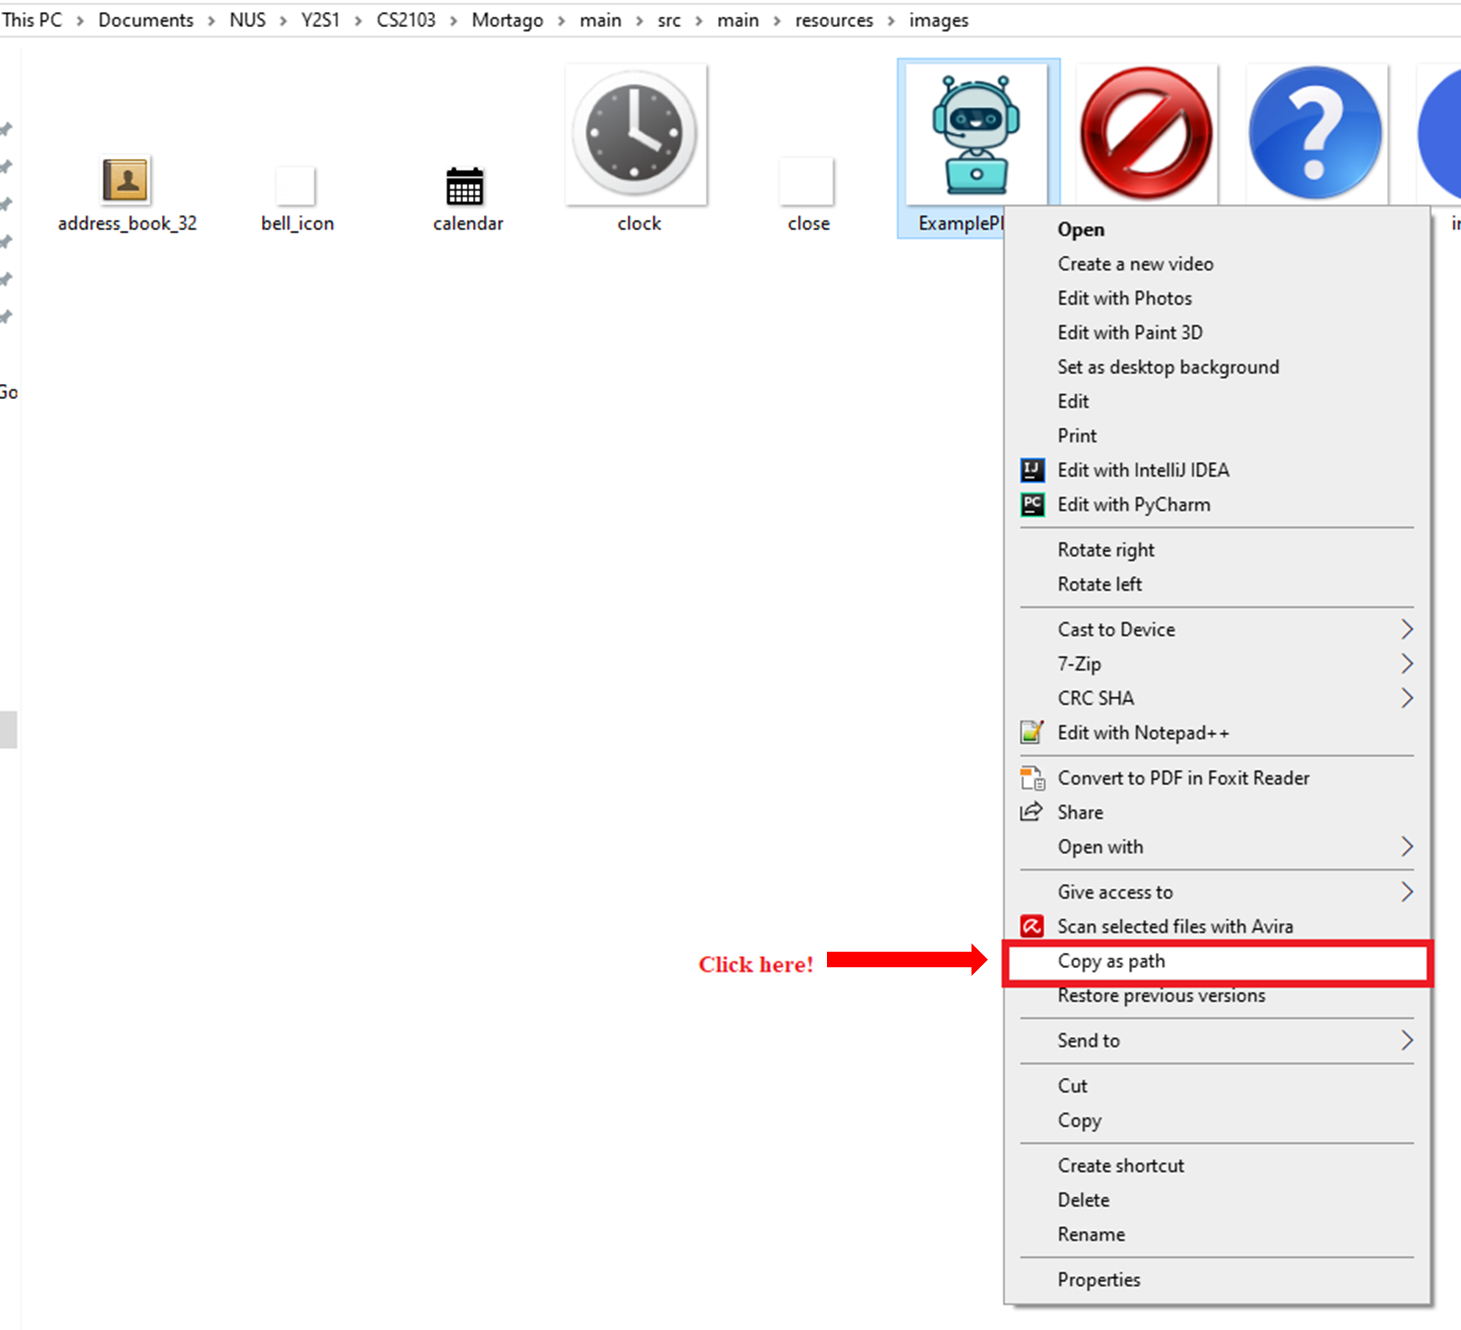
-
-
For Mac Users:
-
Navigate to the image file you wish to upload.
-
Right-click on the image file, then hold down the Option button.
-
In the menu that appears, click on
Copy <your file name> as Pathname, as seen in red box in the figure below, to copy the absolute path into your clipboard.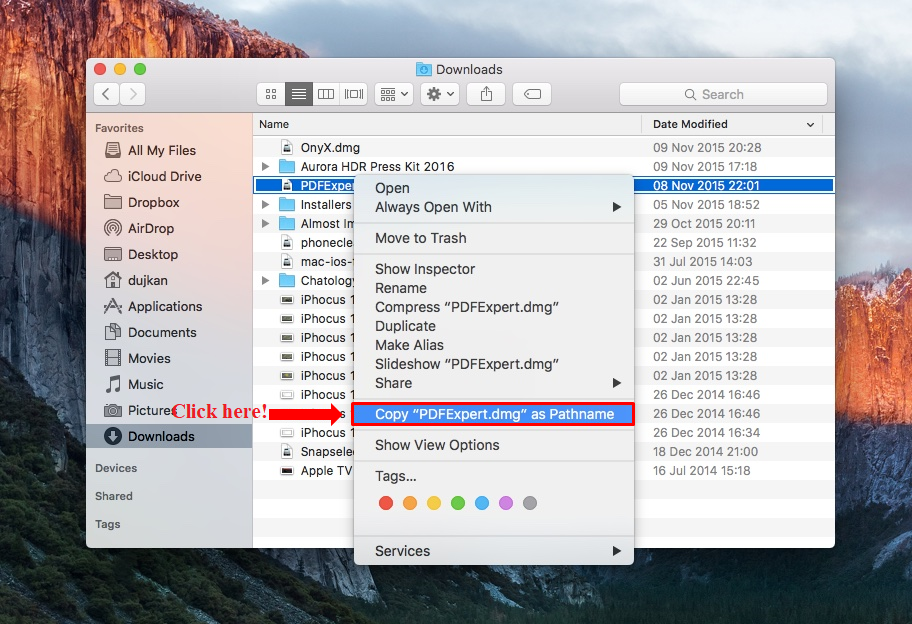
Alternatively,
-
Navigate to the image file you wish to upload and click on it.
-
Press
Commandandisimultaneously to bring upGet Info, as seen in the figure below.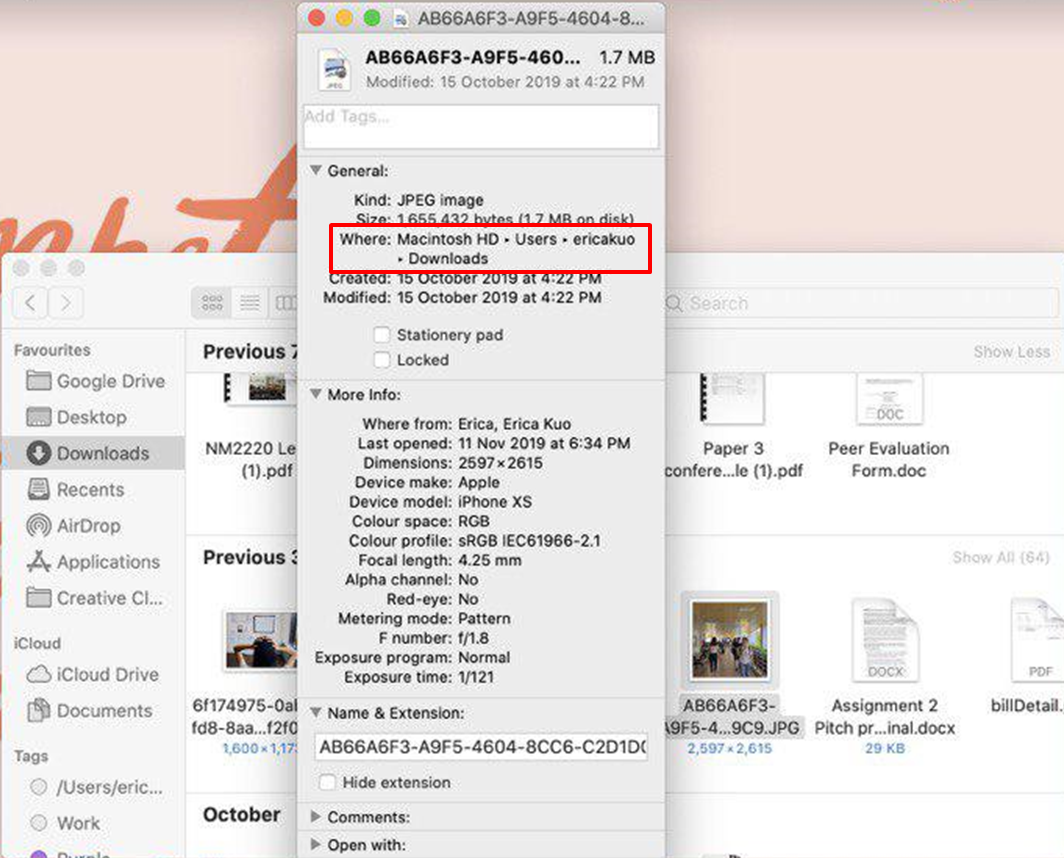
-
Highlight the text next to
Where, as seen in the red box in the figure above, then pressCommandandcsimultaneously to copy the full path to the clipboard.
-