1. Introduction
This portfolio serves to document my contributions to my team’s project - Mortago - for the CS2103T Software Engineering module.
1.1 Project Motivation
Mortago has came a long way and it started from the Address Book 3 (AB3) application, a rudimentary contacts-management application written in Java, targeted at CS2103T students for software engineering development. My team was tasked with enhancing or morphing AB3 to a fully functional application. We were given a tight span of three months to complete this project, all whilst balancing the workload of other modules. My team’s dedicated commitment has resulted in this mortuary management system - Mortago.
1.2 About The Team
My team consists of five Year 2 Computer Science undergraduates reading the CS2103T Software Engineering module.
1.3 About Mortago
Mortago is a desktop application dedicated for mortuary managers to track their mortuary records. It is based on a Command Line Interface (CLI) and in turn, most user interactions are mediated through commands keyed into Mortago. However, users still have to rely on the Graphical User Interface (GUI) to view and track any commands entered into the application.
Mortago provides a user-friendly dashboard that allows managers to manage various types of entries in a mortuary. It replaces and improves upon the traditional whiteboard to enhance productivity.
There are many main features that Mortago is capable of. Users can add a Body, Worker, or Fridge, as well as edit, delete and find these entities. Users can also undo and redo when needed, track important statistics and generate reports. Mortago also generates notifications to alert users of important events.
My role encompassed the complete design of the GUI and auxiliary features. The following sections illustrate these enhancements in greater detail. Excerpts - relevant to these enhancements - from the User Guide and Developer Guide are included to document my work.
2. Summary of contributions
This section gives an overview of my contributions to Mortago. A list of my pull requests (PRs) can be found here.
2.1. Major Enhancements
I have contributed 2 major enhancements for Mortago, which will be detailed here.
Major Enhancement 1: I did a major redesign of the GUI from AB3.
-
What it does: The GUI allows users to view all the entries in Mortago and serves as a visual representation of the data in the system.
-
Justification: This feature is important for users as a visually appealing GUI will attract and retain users. Users will find it easy to locate minute details in a large amount of information through the dashboard.
-
Highlights: This feature draws on more complex visual design techniques and guidelines to create visual elevation and impact. The dark theme utilised aims to improve visual ergonomics by reducing eye strain on the user. It was implemented through a meticulous and creative design process as perfecting minute details, such as positioning, counts towards the visual appeal of the interface. This feature posed unique challenges in terms of integrating Testfx GUI tests.
Major Enhancement 2: I morphed the add command to add the 3 different entities in Mortago.
-
What it does: The
addcommand allows the user to addBody,WorkerandFridgeentities in Mortago. -
Justification: The
addcommand is polymorphic as it utilizes a-FLAGto tell Mortago what type of entity is being added in. This is vastly different compared to AB3, where only one type of entity can be added in. Users are also not required to input all attributes of an entity, hence saving time by only keying in the necessary information. -
Highlight: This enhancement was particularly challenging due to the amount of refactoring required. Much of the refactoring for the
ModelandLogiccomponents was done through this enhancement, which thus laid the groundwork for further enhancements. The large amount of attributes inherent to Mortago’s entities also further deepens the complexity when parsing theaddcommand.
2.2. Minor Enhancement
This section details a minor enhancement that I have contributed in this project.
Minor Enhancement 1: I adopted and morphed the select command from AB4.
-
What it does: The
selectcommand allows users to select a body via its uniqueIdentificationNumber, which allows them to view the full details of the body. -
Highlights: The
selectcommand is different from that of AB4 as users now identify the body they want to select through itsIdentificationNumberinstead of its list index on the dashboard. This makes it more intuitive for the user as most interactions in Mortago are made through theIdentificationNumber.
Minor Enhancement 2: I created the mechanism for creating unqiue IdentificationNumbers in Mortago.
-
What it does:
IdentificationNumbersin Mortago consist of two parts: a leading letter that tells users whether it is a worker, body or fridge, and a number at the back that refers to its unique ID number. -
Justification: In Mortago, each entity is assigned a unique
IdentificationNumber. TheIdentificationNumberfor each entity is a central aspect of Mortago as most interactions with and references of entities in the application are made through theirIdentificationNumbers. -
Highlights: This mechanism is designed such that the
IdentificationNumberof any deleted entity will be reassigned to the next added entity. This prevents gaps in the numbering of entities in the system, which otherwise will never be filled, leading to an exponential increase in the running ID number.
2.3. Code contributed
You can view the code that I have contributed via RepoSense.
2.4. Other contributions
The following sections document other contributions made towards the project.
-
Project management
-
The project was separated to 3 milestones, from version 1.2 - 1.4. I managed the v1.3 milestone and its associated issues in Github
-
-
Enhancement to existing features
-
Added the ability to add photos for Worker
-
Added the
showNotifscommand -
Wrote additional tests for existing features to increase coverage by 5.8% in PR #125
-
-
Documentation
-
Community
-
Tools:
-
Integrated a third party library (ControlsFX) to the project in PR #79
-
Integrated TestFx and adapted Graphical User Interface tests from AB4 in this commit
-
Integrated a Continuous Integration platform for Github (AppVeyor) to the team repository (but was eventually taken down due to relaxation of workflow rigour)
-
3. Contributions to the User Guide
Given below are sections I contributed to the User Guide. They showcase my ability to write documentation targeting end-users. |
{start of extract 1}: Add Command
Add an entity: add
You can add a body, worker or fridge by entering an add command with the given format below.
Format:
This table details how you can craft your add command to add an entity in Mortago.
Adding a Worker |
Adding a Fridge |
Adding a Body |
||||
add -w |
add -f
|
add -b
|
| Please refer to Appendix 7.1 for a comprehensive list of valid values and formats for various attributes like sex, phone and dates. |
Example:
-
add -w /name Mary /phone 87654321 /sex female /dateJoined 18/08/2019 /designation Autopsy Technician-
You will see in the worker panel that a worker with the name "Mary", along with its associated details, will be added.
-
-
add -f-
You will see in the fridge panel that an empty fridge will be added.
-
-
add -b /name John Doe /sex male /dob 12/12/1984 /dod 12/08/2019 2358 /doa 13/08/2019 0200 /status arrived /nric S8456372C /religion Catholic /NOKname Jack Smith /relationship Husband /NOKphone 83462756 /cod Car Accident /details Heavy bleeding and head injury /organsForDonation NIL-
You will see in the body panel that a body with the name "John Doe", along with its associated details, will be added.
-
{end of extract 1}
{start of extract 2}: Select Command
Selecting a body: select
You can select a body and view its full details by entering a select command with the given format below.
Format: select id
Example: select 1
The following illustrates how you can use the select command.
-
Suppose you wish to select a body with ID B00000001.
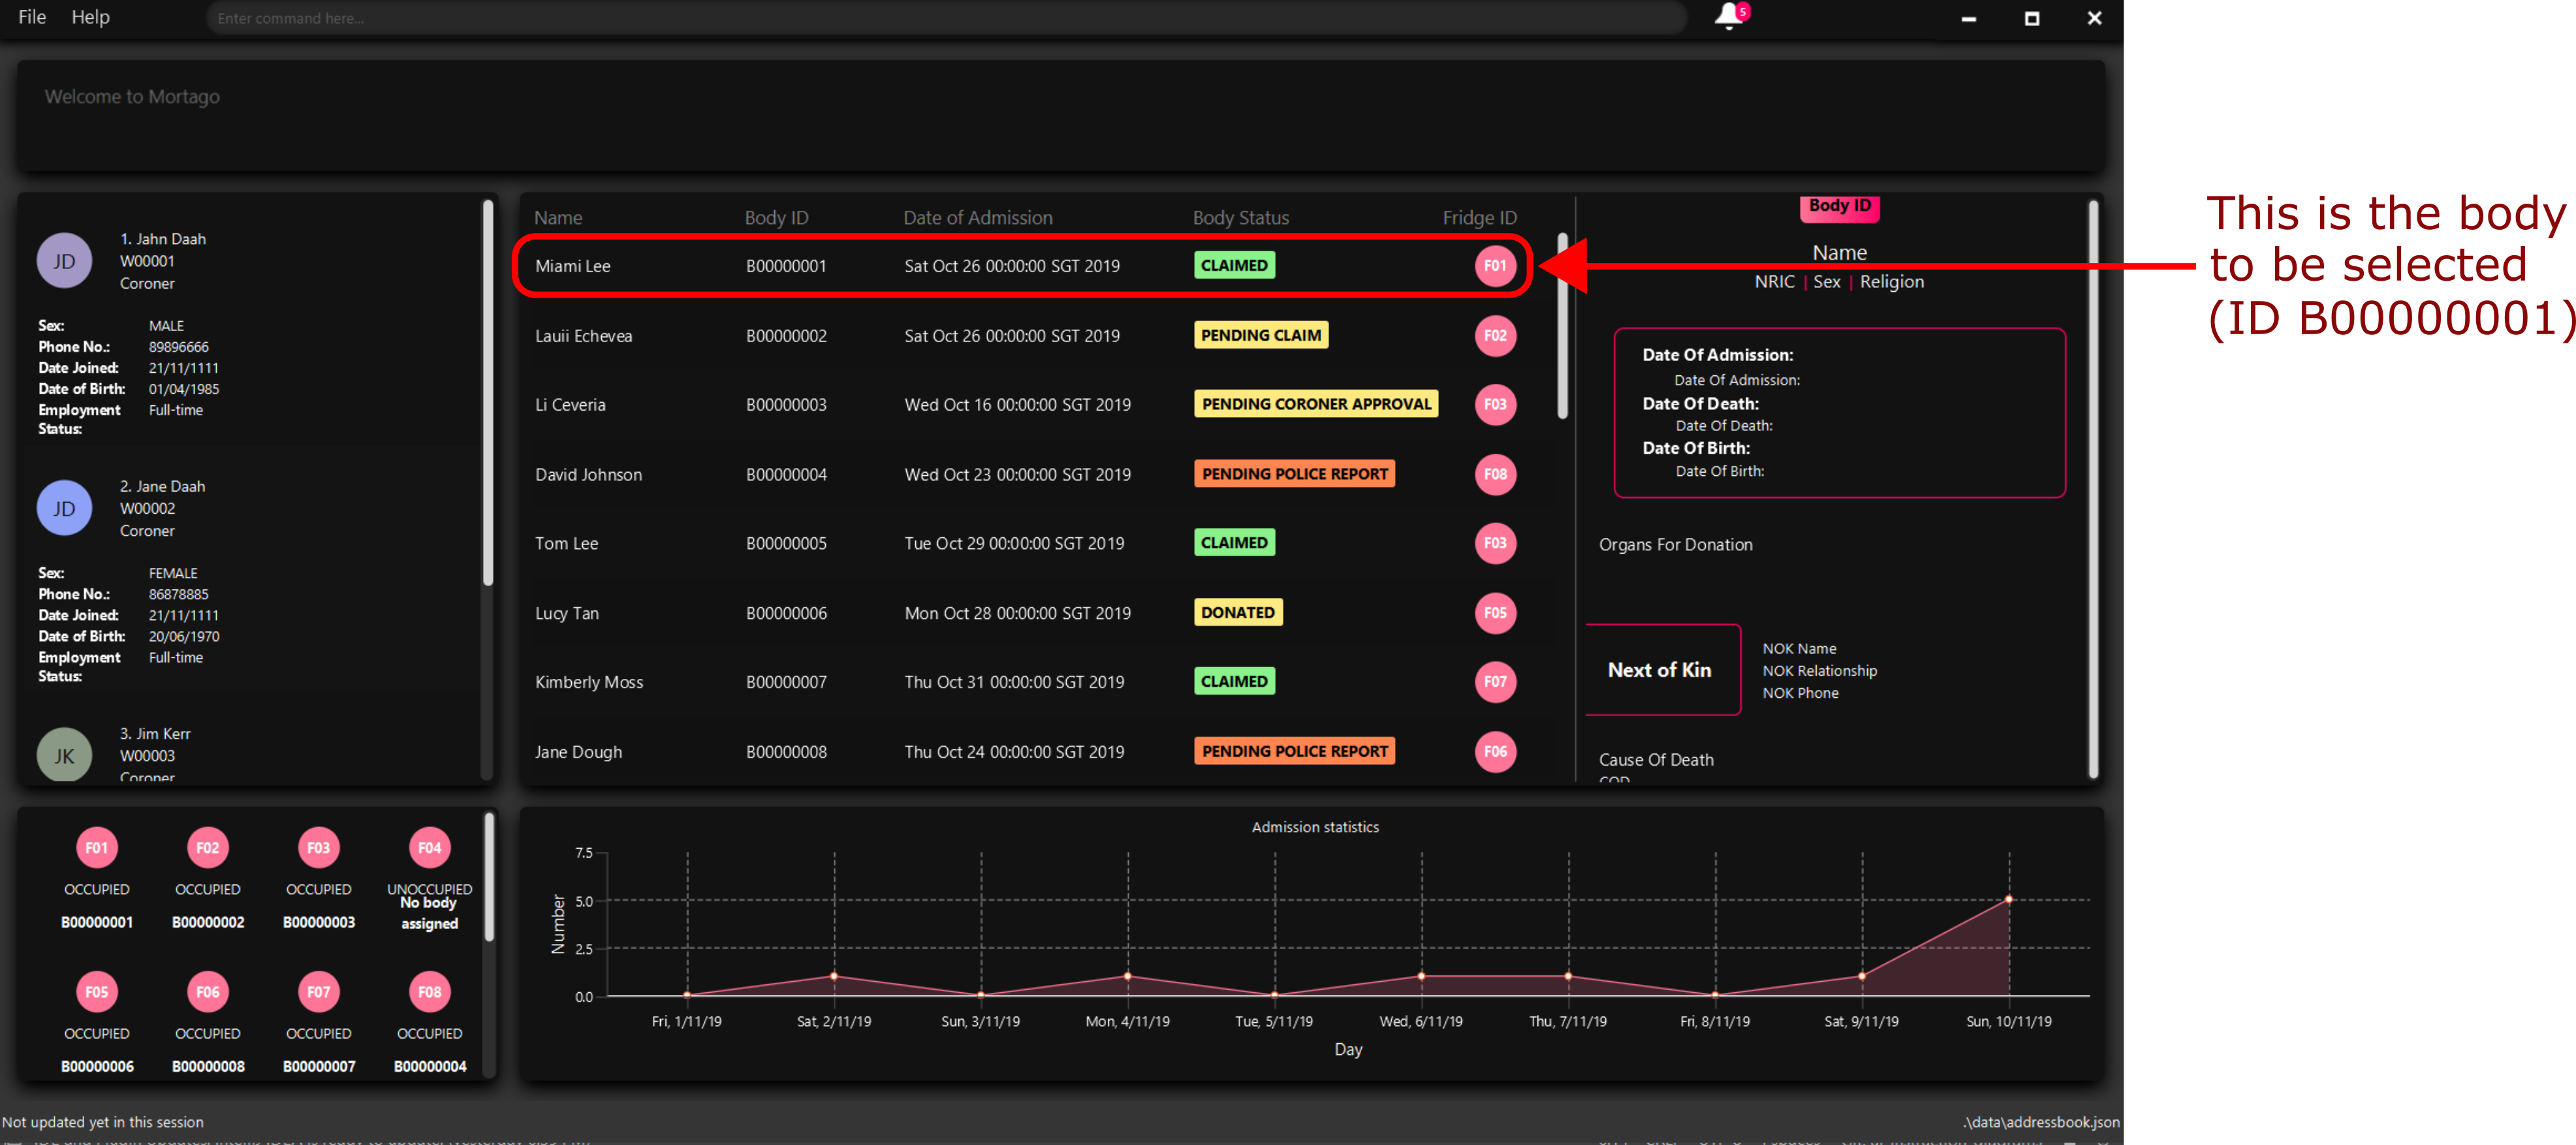
-
Enter in
select 1in the command box.

-
The body with ID B00000001 will be selected and you can view all its details on the side panel.
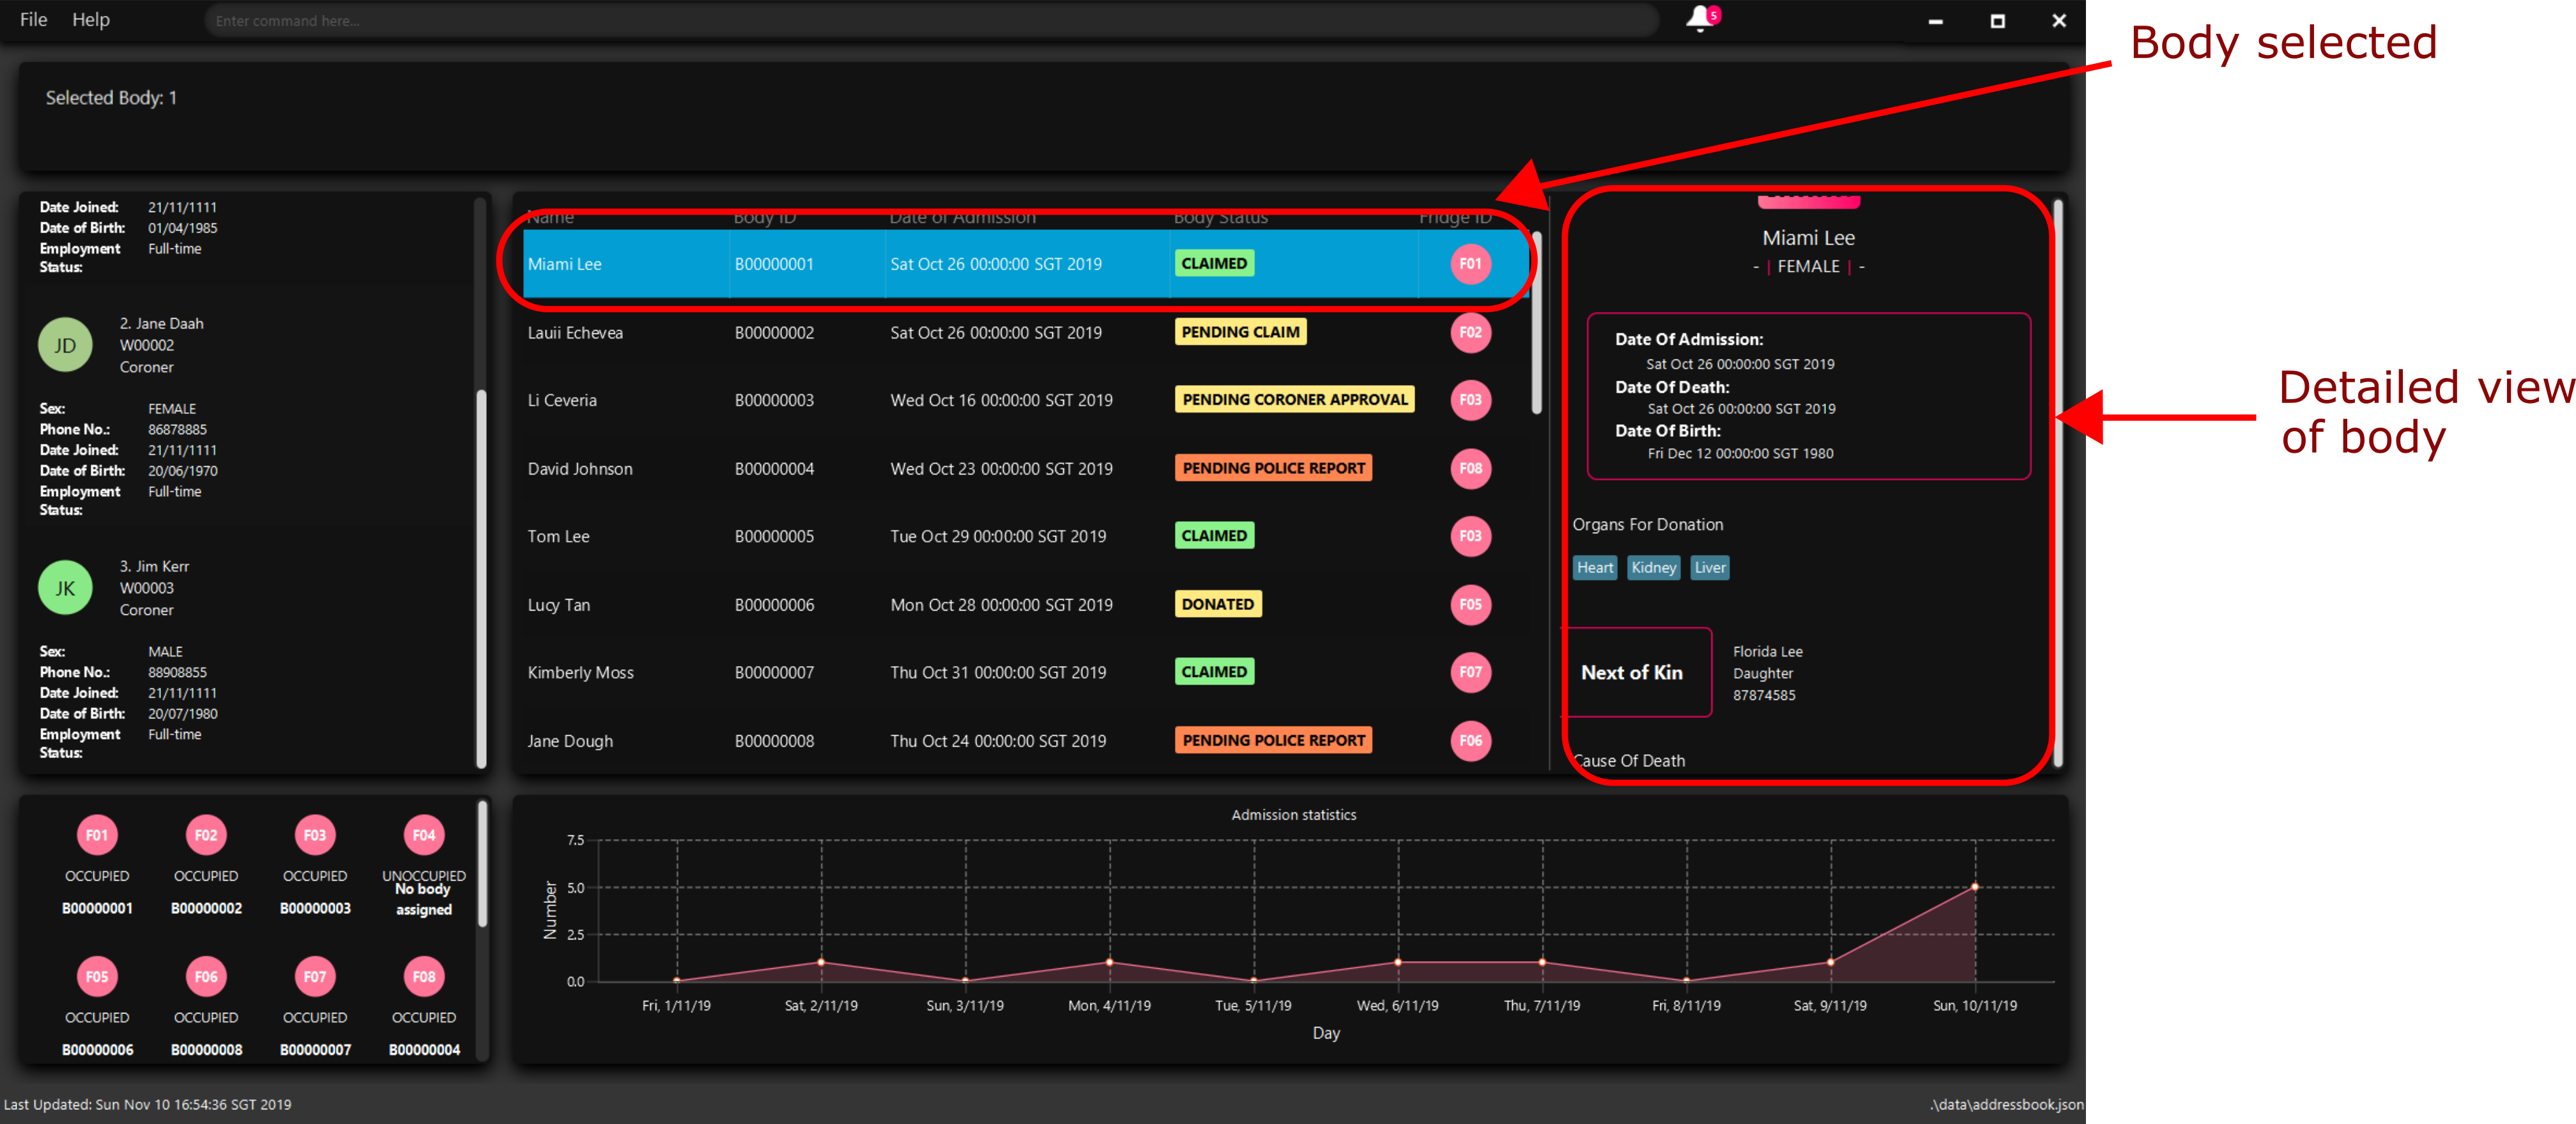
{end of extract 2}
4. Contributions to the Developer Guide
Given below are sections I contributed to the Developer Guide. They showcase my ability to write technical documentation and the technical depth of my contributions to the project. |
{start of extract 1}: Unique Identification Number
Unique Identification Number
In Mortago, you will find that each entity is assigned a unique IdentificationNumber.
-
The
IdentificationNumberfor each entity is a central aspect of Mortago as most interactions with and references of entities in the application are made through theirIdentificationNumbers. -
You can identify different entities solely based on their
IdentificationNumberdue to its uniqueness, without relying on attributes such asnamewhich may have similar duplications within the system. -
IdentificationNumbersin Mortago consist of two parts:String typeOfEntitythat tells you whether it is a worker, body or fridge, andInteger idNumthat refers to its unique ID number. -
Each
IdentificationNumberis automatically generated within the application, based on the next sequential ID number available.
Implementation
The generation of unique IdentificationNumbers is facilitated by UniqueIdentificationNumberMaps. UniqueIdentificationNumberMaps keeps three HashMap, one for each entity.
In each HashMap, the Integer ID number serves as the key, which maps to the entity it is assigned to. This keeps track of the numbers currently assigned to all entities and allows the next free Integer to be assigned to a newly added entity.
The code snippet below demonstrates how the next free number is determined.
    private static Integer putWorker(Worker worker) {
        Set<Integer> keys = uniqueWorkerMap.keySet();
        int numOfKeys = keys.size();
        for (int id = 1; id <= numOfKeys; id++) {
            if (uniqueWorkerMap.get(id) == null) {
                uniqueWorkerMap.put(id, worker);
                return id;
            }
        }
        int newId = numOfKeys + 1;
        uniqueWorkerMap.put(newId, worker);
        return newId;
    }
In the above putWorker method, the set of keys representing the existing ID numbers are generated and iterated through, based on the size of the keySet.
This sequential iteration checks for any number that is not assigned to any worker (i.e. gap) due to a prior deletion of its assigned worker, which removes the mapping of the ID number to the deleted worker.
If there is an existing gap in the sequential iteration of numbers, this number is assigned to the newly added worker.
If there is no gap available, the next highest number is assigned to the worker.
This leads us to forumulate the execution sequence of generating a unique IdentificationNumber for a worker:
-
The user executes
add -w /name Zach …to add a new worker to Mortago. -
AddCommandParserparses the given input and calls theWorkerconstructor. -
In the constructor, the worker’s
IdentificationNumberis created usingIdentificationNumber::generateNewWorkerId(). -
Consequently,
generateNewWorkerId()creates a newIdentificationNumber, where the number is determined after the execution ofUniqueIdentificationNumberMaps::addEntity(). -
UniqueIdentificationNumberMaps::addEntity()subsequently callsUniqueIdentificationNumberMaps::putWorker(), which inserts the worker into the workerHashMapand returns an ID number that is currently not assigned to a worker.
The figure below illustrates the sequence diagram of the aforementioned steps.
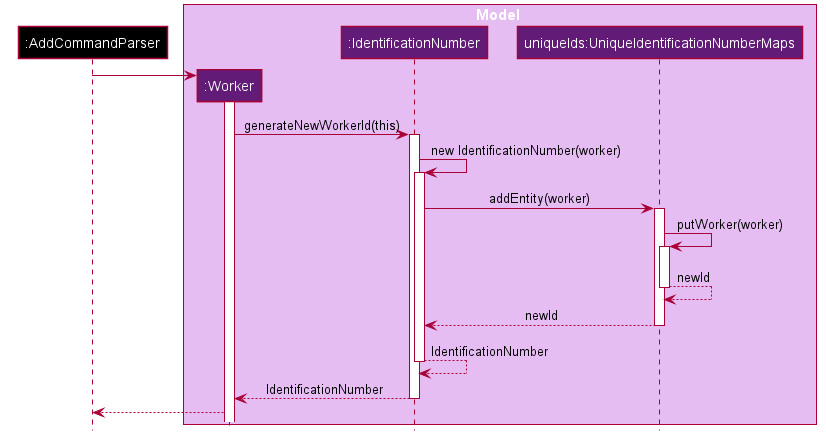
IdentificationNumber Sequence DiagramYou will find that the execution sequence will be similar for the generation of unique IdentificationNumber for fridges and bodies.
Design Considerations
When designing this feature, it is important to keep in mind the scalability of the application. When the number of entities grows exponentially, the ID number can become arbitrarily large if gaps in the middle are not (re)assigned.
Aspect: Tracking of numbers and determination of next free number*
-
Alternative 1: Three counters that track the total number of each entity in the system and assigns the next highest number to the added entity.
-
Pros:
-
Easy to implement.
-
-
Cons:
-
Does not cater for deletion of entity as deletion creates a gap which will be left unfilled.
-
-
-
Alternative 2 (current choice): A
HashMapkeeping track of the ID numbers and their respective assigned entity.-
Pros:
-
HashMapallows itskeySetto contain unique ID numbers. -
HashMapcaters for deletion of entities as thekeySetcan be iterated through to check for any gaps introduced during deletion. -
HashMapalso allows the assigned (mapped) entity to be made accessible via the O(1)HashMap#get()method.
-
-
Cons:
-
Harder to implement, especially for unit testing since a unique
IdentificationNumbercannot be duplicated usually.
-
-
Alternative 2 is chosen due to the comprehensive benefits of utilizing HashMap given below:
-
Tracking of unique keys
-
Catering for deletion of ID numbers and filling of the gap
-
Increasing the ease of accessibility of mapped entities
The difficulty in testing can be circumvented by executing UniqueIdentificationNumberMaps::clearAllEntries()
before each unit test. This resets the HashMaps and allows the newly added entities to start with the first ID number, simulating a fresh launch of the application.
{end of extract 1}
{start of extract 2}: Photo Feature
Photo Feature
When adding a worker in Mortago, you can assign a photo to the worker so as to identify your workers. This is especially useful when you are more visual oriented as this allows you to identify your workers more easily when sieving through a long list of workers.
Implementation
This section covers how the Photo feature is implemented. To gain a better overview of its implementation, you can refer to the following class diagram that illustrates how Photo and Worker are associated with the Ui component.
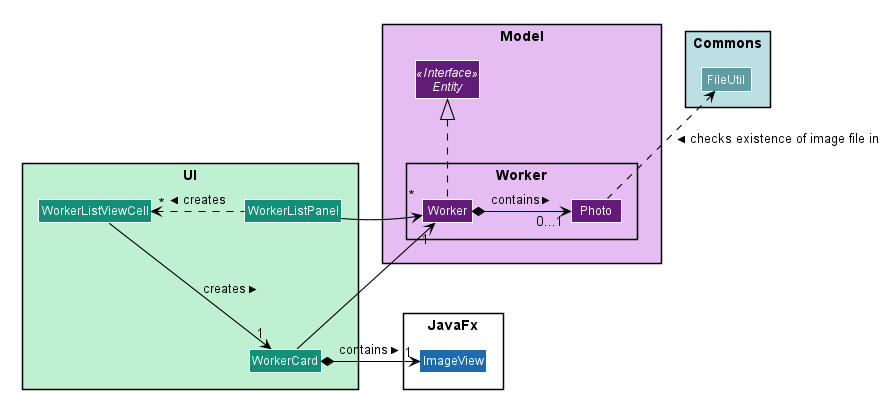
Here, notice that a WorkerCard contains an ImageView which serves to display the Photo. The ImageView displays the Photo by first retrieving the file path of the photo through the Worker in WorkerCard. This is demonstrated in the following code snippet:
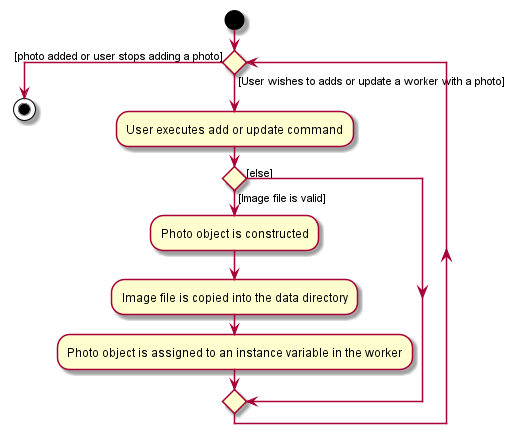
displayPhoto.setImage(new Image(worker.getPhoto().get().getPathToDataDirectory()));This brings us to explain how Photo is constructed, as demonstrated in the following diagram and the sequence of steps further below.
-
When the user wishes to add a photo, the user can do this through the add or update command.
-
Before constructing a
Photoobject, the validity of the absolute file path of the image is checked first through thePhoto::isValidPhoto(pathToPhoto)method, as part of a defensive programming measure.This method checks whether the image file exists, using FileUtil::isFileExists(Path)as seen in the class diagram above, and whether it ends with the common image file extensions:.jpeg,.jpgand.png. -
If the file is valid, the
Photoobject is constructed. -
In its construction, the image file is copied into the
data/images/directory (where all images are stored) and this path is saved as an instance variable,dataDirectory. ThePhotois then assigned to an instance variable inWorker.Copying the image file allows the application to retrieve it even when the user has deleted the original file.
After construction of the Photo, when the image needs to be retrieved, Photo#getPathToDataDirectory needs to be called to obtain the modified file path to the image, which can then be used for display via the ImageView node. The following code snippet shows how the file path is modified so that it can be used directly for image retrieval and display.
    /**
     * Returns the file path of the copied photo in the data directory.
     * Intended for {@code ImageView} to reference to the photo.
     */
    public String getPathToDataDirectory() {
        return "file://" + Paths.get(dataDirectory).toAbsolutePath().toUri().getPath();
    }
Note that appending file:// to the front is necessary for file retrieval.
Design Considerations
When designing Photo, it is important to consider the user profile. Given that our users are generally fast at typing and prefers a Command Line Interface, some thoughts had to be made to design how the user can upload the photo.
Aspect: How the user uploads the photo
-
Alternative 1 (current choice): Users must specify the absolute file path of the image file
-
Pros: This ensures accurate retrieval of the file.
-
Cons: Users require additional steps to obtain the absolute file path of the file.
-
-
Alternative 2 (current choice): Users can upload their image file through a popup dialog
-
Pros: Graphical dialog allows visual navigation towards where the file is.
-
Cons: Users might find it slow to navigate through a graphical interface.
-
Alternative 1 is chosen due to the user profile of our application. As they prefer typing over using the mouse, it will be much faster for them to provide the absolute file path as compared to navigating through a graphical dialog.
{end of extract 2}
{start of extract 3}: User Interface
User Interface and Dashboard Enhancement
The dashboard of Mortago plays a key part in presenting a sleek, organised, and concise overview to the entities in the system. Thus, designing an aesthetic and functional dashboard is a crucial aspect for Mortago.
Surface Design and Coloring
This section illustrates the motivations made behind Mortago’s color scheme.
4.6.1.1. Implementation
Mortago draws upon the guidelines specified in Material.io to design a dark theme that enhances visual ergonomics and minimises eye strain due to the bright luminance emitted by screens.
Designing the Visual Contrast Between Surfaces and Text
With reference to Web Content Accessibility Guidelines’ (WCAG), the guidelines recommend that the contrast level between dark surfaces and white text to be at least 15:8:1 to ensure visual accessibility. Thus, the following color values that complies with the above standards are chosen:
| Aspect of Mortago | Color | Color Preview |
|---|---|---|
Background |
derive(#121212, 25%) |

|
Surface |
#121212 |

|
Primary |
#FF7597 |

|
The background color uses the derive function in JavaFX, which computes a color that is brighter or darker than the original,
based on the brightness offset supplied.
The primary color is also desaturated to reach a WCAG’s AA standard of minimally 4:5:1.
This facilitates a mild yet impressionable visual aspect to Mortago while minimizing eye strain, as saturated colors can cause optical vibrations against the dark surface and exacerbate eye strain.
4.6.1.2. Design Considerations
This section details an aspect considered when designing Mortago’s color scheme.
Aspect: The contrast in brightness between the background and surfaces
-
Alternative 1 (current choice): Background is brighter than the surface.
-
Pros: Drop shadows designed to simulate elevation are more realistic
-
Cons: A deviation from what Material.io dictates
-
-
Alternative 2: Background is darker than the surface.
-
Pros: A different representation of elevation can be achieved
-
Cons: Overall visual brightness will be brighter compared to Alternative 1
-
Alternative 1 was chosen because, aside from the pros that it has to offer, bulk of the screen space in the Mortago is taken up by surfaces to optimize the amount of information available to the user, hence by giving surfaces a darker brightness, this improves overall visual ergonomics.
Replacing Window’s Title Bar
This section details how the default window’s title bar is replaced with a custom title bar.
4.6.2.1. Implementation
In spirit with designing a sleek and functional dashboard, the standard Windows platform title bar was removed. This exposes the user interface to become one that is self-contained, while providing extra space at the top that allows more details to be shown to the user.
How the window’s title bar was removed
The following code snippet demonstrates how the title bar was removed.
primaryStage.initStyle(StageStyle.TRANSPARENT);Note that this code was placed in MainApp#start() and has to be done before the stage is shown. Otherwise, the application will close automatically upon running.
However, with this removal, the default windows functions such as the default OS close button will inevitably be removed as well. Hence, these buttons will have to be rebuilt into the application.
How the default window functions were rebuilt
This section demonstrates how the default window function were rebuilt into the application.
Three buttons were manually created and customised to simulate the original window buttons. Each button was assigned to its respective handler method, based on different events. The following details the function of each button is recreated:
-
Exit Button
-
The method for exiting the application has already been implemented in
handleExit()in Address Book 3. Thus, setting the handler for the exit button to this method within theMainWindow.fxmlfile is sufficient.
-
-
Minimise Button
-
Minimisation of the application is implemented such that when the user clicks on the minimise button, it triggers an
onMouseClickedevent that callsprimaryStage.setIconified(true)which minimises the window. Hence, setting theonMouseClickedhandler to call this function is sufficient to implement minimisation through this button..
-
-
Maximise Button
-
Maximisation is implemented slightly different compared to minimisation. When the maximise button is clicked initially, the window should be maximised. When the button is clicked for the second time, the window should be restored to its pre-maximised size. Hence, notice that this button has two functions: maximisation and restoration. This switch in function is achieved via the following code snipped shown below.
/** * Enables the maximization and restoration of the window. */ private void maximiseRestore() { if (primaryStage.isMaximized()) { primaryStage.setMaximized(false); if (primaryStage.getScene().getWindow().getY() < 0) { primaryStage.getScene().getWindow().setY(0); } maximiseButton.setId("maximiseButton"); } else { Rectangle windowBounds = GraphicsEnvironment.getLocalGraphicsEnvironment().getMaximumWindowBounds(); primaryStage.setMaximized(true); primaryStage.setHeight(windowBounds.height); primaryStage.setWidth(windowBounds.width); maximiseButton.setId("restoreButton"); } } -
The
onMouseClickedhandler is set to call the above function such that when the button is clicked, if the window is maximised, the window will be restored to its original size, and if the window is not maximised, the window will be maximised. -
Notice also that the button is assigned to different
FXMLids for theifandelseblocks. This allows the button image to change accordingly, which is defined in theDarkTheme.cssstylesheet.
-
Finally, the last thing is to rebuild the resizability of the window.
The implementation of this feature is adapted from this hyperlinked post in StackOverFlow. Briefly, ResizableWindow::enableResizableWindow() allows the Windows to be resizable by implementing a helper class ResizeListener. The helper class listens to mouse events and tracks the mouse’s movements to pinpoint the coordinates of the mouse. This determines the change in size of the Window, which will then be resized accordingly.
4.6.2.2. Design Consideration
The following section details an aspect to consider when designing the title bar.
Aspect: Designing the default window’s title bar
-
Alternative 1 (current choice): Replace the default title bar with a custom title bar
-
Pros: Sleek interface that is pleasing to the eye and showcases a comprehensive product design
-
Cons: Default window functions have to be rebuilt into the application
-
-
Alternative 2: Retain the default title bar
-
Pros: Window functions will be perfectly working
-
Cons: The default title bar does not fit into the theme of the user interface
-
Alternative 1 was chosen despite the need to rebuild the default window functions as it is imperative to produce a complete product design. The visual appearance of the dashboard is a significant feature of the application as it details all the necessary information to the user. Hence, a product design that is visually appealing is necessary to attract more users and gain traction into opting our application.
{end of extract 3}