1. Introduction
This project portfolio showcases the contributions I have made to Mortago, a software project my team and I built for CS2103T, a software engineering module.
About the Team
Our team comprises 5 dedicated Year 2 Computer Science students taking CS2103T.
About the Project
Our task for CS2103T was to build upon and enhance Address Book Level 3 (AB3), a sample address book application used to teach software engineering. It primarily uses a command line interface (CLI) for user interaction, and our enhanced application was required to have this as well.
Given a 3 month time span, we decided to morph the application into Mortago, a mortuary management application. Written in Java, the software totals to around 20,000 lines of code (20 kLoC). Mortago is a desktop application and is designed to make the mortuary workflow faster and smarter for mortuary managers in Singapore.
Mortago’s primary purpose is to act as a user-friendly database for mortuaries. A neat and appealing dashboard allows users to see important data with one glance. Mortago is comprehensive and tracks a mortuary’s bodies, workers, and fridges. Other than basic commands to manipulate and find data, Mortago also automates fridge management for bodies and generates critical reminders according to Singapore’s laws. It also automatically shows key statistics and allows reports to be easily generated.
Singapore’s mortuaries are still using paper records. This idea was conceived because we noticed a gap in the market for modern mortuary solutions. The user interacts with Mortago using a CLI, and it has a graphical user interface (GUI) created with JavaFX. Knowing that Singapore’s mortuary managers are familiar with Microsoft Excel and are comfortable with typing, Mortago’s CLI is the perfect fit for them.
I designed and implemented the undo, redo, and update functionality in Mortago. I was responsible for the largest base class in Mortago, and also added storage functionality for almost everything in Mortago. The sections below detail my contributions as well as the documentation I wrote for the user and developer guides.
You will encounter the following symbols and formatting in this document:
-
undo: Dark red text with monospace font indicates that this text is a command that can be entered into the CLI or a code component. -
Tips: A tip annotation contains information that is likely to be useful to users.
| This is an example of a tip. |
-
Notes: A note contains explanatory information.
| This is an example of a note. |
2. Summary of Contributions
The contributions I have made towards the team project are detailed in this section.
Enhancements
Major enhancement: I added the ability to undo/redo commands.
-
What it does: The
undocommand allows the user to undo all previous commands one at a time. Previously undone commands can be redone by using the redo command. -
Justification: This feature improves the product significantly because a user can make mistakes and needs a convenient way of undoing them. Undo and redo are utility functions that many users have come to expect in desktop applications.
-
Highlights: This feature affects existing commands and has to support future commands. It contains a defensive design to ensure that commands were not undone or redone in error. It also required a careful analysis of design choices. In particular, this feature posed these unique challenges:
-
The design I chose for this feature is challenging to implement, as it requires an individual command to have undo/redo functionality. Compared to designs in Address Book Level 4 or module examples, this design requires a lot more effort to implement. However, it is faster, requires less space, and provides much better scalability.
-
The application carries out automated actions when certain fields are changed, which had to be accounted for in undo/redo’s implementation.
-
The application contains automated user-triggered, time-based pop-ups that trigger additional changes. It was extremely important that undo/redo maintained data integrity. This was especially difficult to do because these automated changes could happen at any time.
-
Major enhancement: I morphed the edit command in AB3 to an update command.
-
What it does: The
updatecommand allows users to update any field of a body or worker in Mortago. The command only requires the updated field itself to be specified, instead of every field. It can also take in multiple fields to update at once. -
Justification: The
editcommand in AB3 did not support any Mortago-specific entities. Being able to update the fields of an entity is essential, as the states of entities must be allowed to change. It was vital that the command didn’t require every field to be supplied, as it would require excessive user effort. -
Highlights: The
updatecommand took a lot of effort to implement because Mortago’s entities contain many fields. For instance, theBodyclass contains 16 fields. To make updating more efficient and easy to undo or redo,updatemakes use of special descriptors to store the fields' values.
Minor enhancement: I added storage functionality for Mortago’s entities.
-
What it does: The storage functionality allows Mortago’s
Body,Worker,Fridge, andPhotoobjects to be stored on the user’s computer. Data is automatically saved after every change to Mortago. -
Justification: The storage functionality is critical to Mortago, as its core purpose is to act as a digital database.
-
Highlights: The storage functionality took more effort to implement and write tests for, because Mortago’s entities contain many fields. I also had to deal with storing entities that contained other entities.
Code Contributed
You can view my code at Reposense. If you are on Mac and this link is broken, please open the PDF using Google Chrome’s PDF reader or Acrobat Reader DC instead of Preview.
Other contributions
Other contributions I have made to the team and the project are listed in this section, along with relevant links.
-
Project management:
-
Maintained the issue tracker and project discussion board on GitHub for every release (link to issue tracker, link to discussion board)
-
Managed two out of three releases in this project,
v1.2andv1.4on GitHub (#88)
-
-
Enhancements to existing features:
-
Documentation:
-
Wrote the UG and DG for the
undo,redo, andupdatefeatures (Pull requests #113, #119, #229, #70, #280) -
Morphed general sections of AB3’s User Guide, Developer Guide, and various documents for Mortago (Pull requests #22, #280)
-
Updated the User Guide diagrams to fit the team’s chosen colour scheme (#249)
-
Added tags to the User Guide for all features (#70)
-
Added use cases and a value preposition to the Developer Guide (Pull requests #41, #43)
-
-
Community:
-
PRs reviewed (with non-trivial review comments): (Pull requests #31, #63, #49)
-
Reported bugs and suggestions for other teams in the class (examples: for Team AddMin+, for Team CaloFit)
-
-
Branding
-
Designed and drew the Mortago icon used in the PDFs of the User Guide and Developer Guide
-
3. Contributions to the User Guide
These sections of the User Guide teach the user how to use the undo, redo, and update commands. It contains relevant examples, useful pictorial guides, and tips for the user.
Given below are sections I contributed to the User Guide. They showcase my ability to write documentation targeting end-users. |
{start of extract}
Undoing a command: undo
You can undo the effects of the last command you executed with undo.
This command lets you undo up to 10 most recent commands, one at a time.
The commands are undone starting from the most recent to the least recent.
Format: undo or u
The add, update, clear, and delete commands can be undone.
Commands like list or find cannot be undone.
Commands caused by automated commands, such as an update command caused by a Notif can be undone and redone.
For example, the automatic status change of a Body from ARRIVED to CONTACT_POLICE is caused by an update and can be undone and redone. However, note that this feature does not support
the Notif itself. For example, if a Body was added and deleted before the Notif associated with it has executed,
undoing the deletion does not restore the Notif.
Though you can undo a clear command, note that you cannot redo any past undone commands after that.
Example:
Imagine that you wanted to delete a Body with ID 10 from Mortago. However, your finger slips and you type 20 instead
of 10!

You don’t realise and execute the command. When you look at the dashboard, you realise you have deleted body 20. Even worse, you have no recollection of body 20’s name or information.

You can easily reverse that mistake with the undo command instead of adding body 20 all over again!
To undo:
1) Type undo or u into the command box.

2) Press Enter to execute the command.

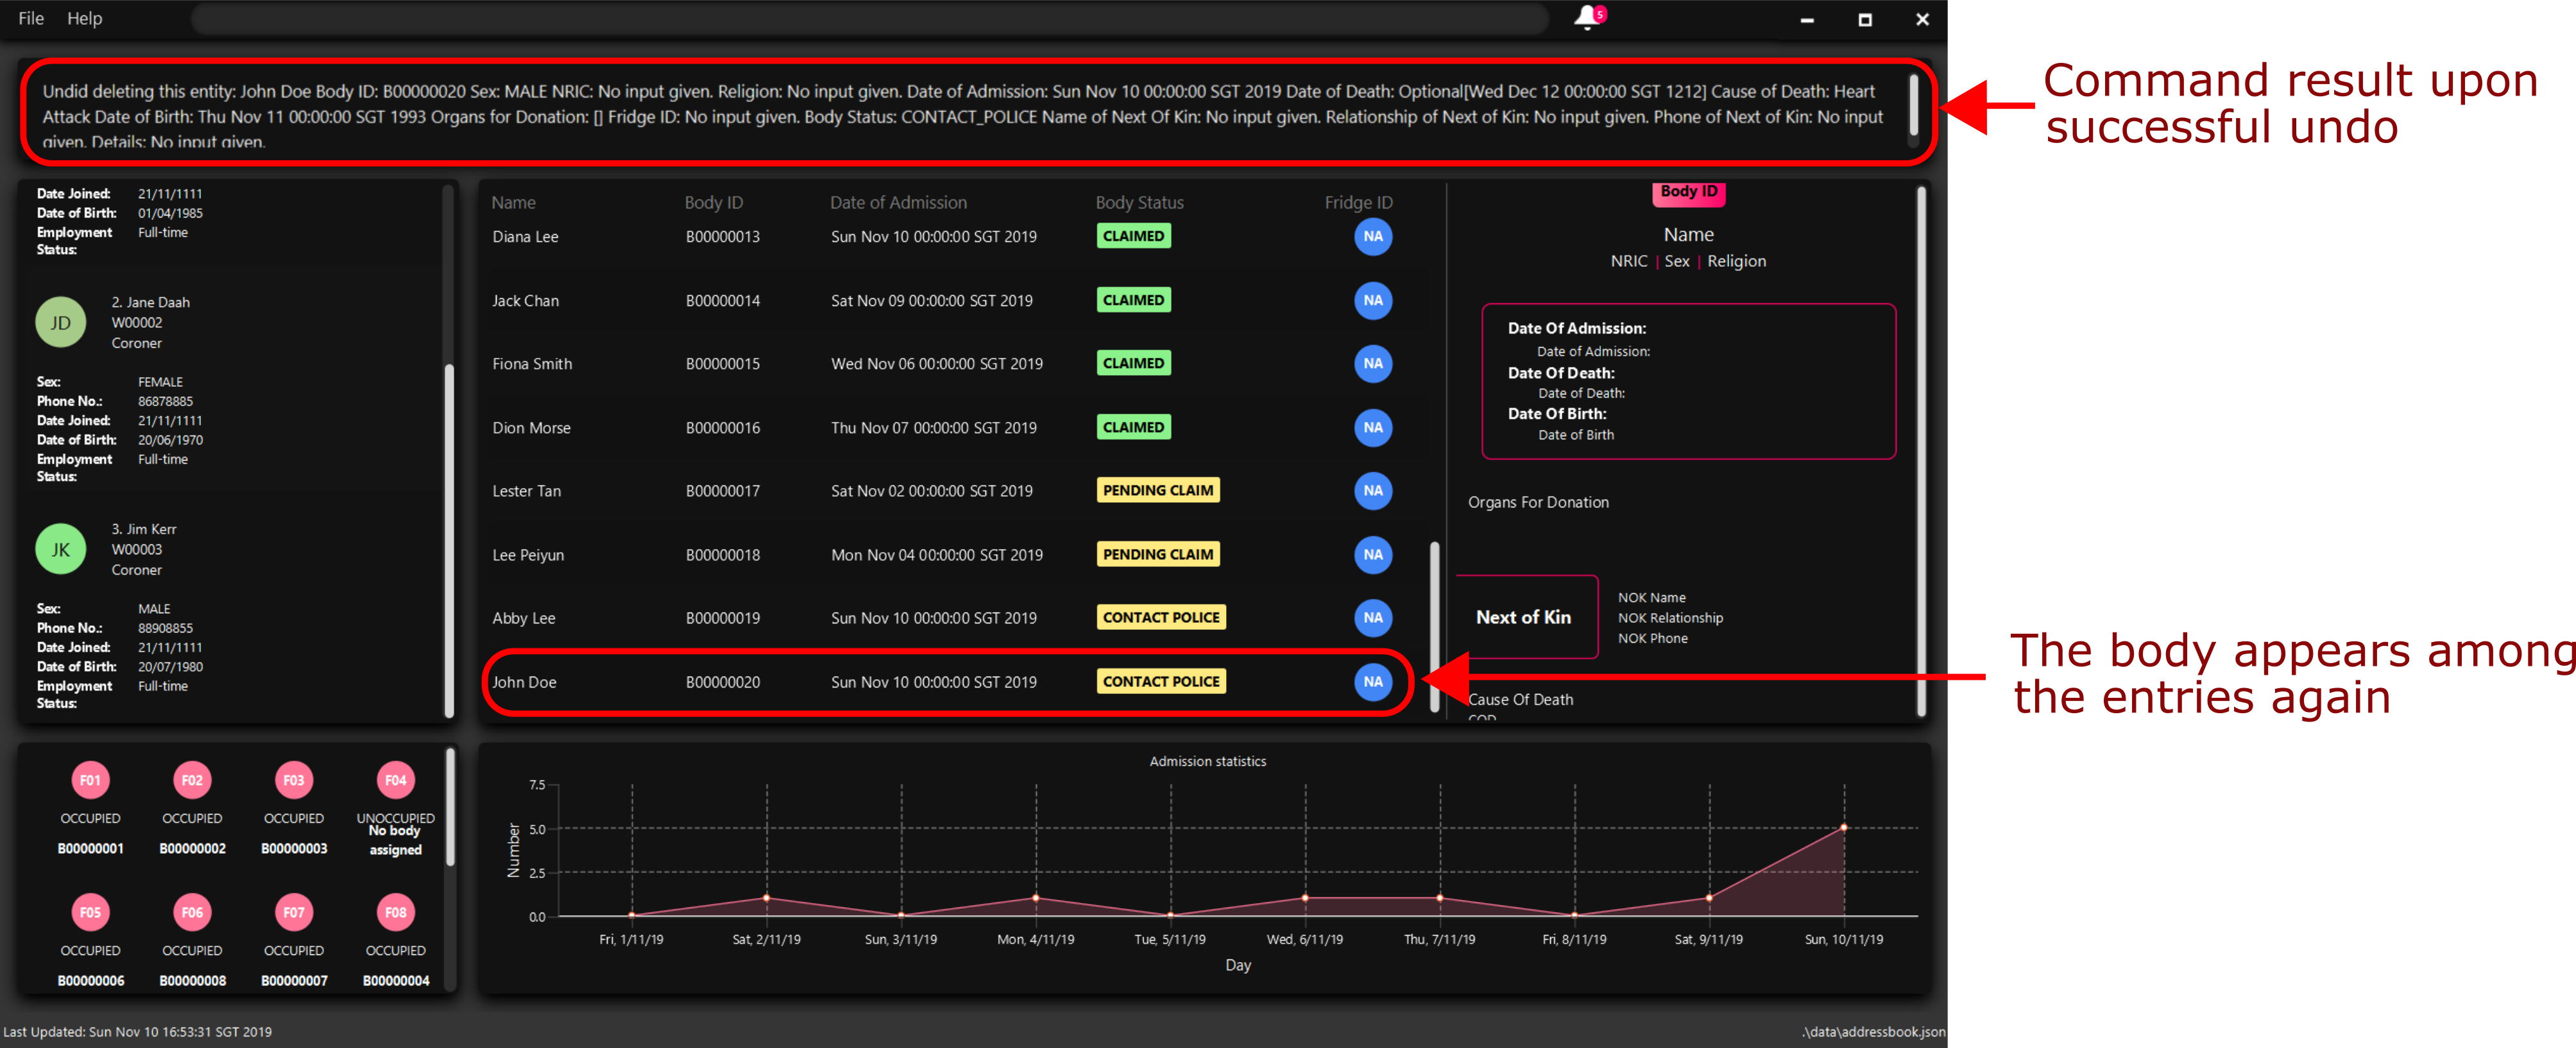
3) Notice that the result box shows text telling you what was undone, and body 20 is back in the list of bodies.
Redoing a command: redo
You can redo the effects of the last command you executed with redo.
This command lets you redo up to 10 most recent undone commands, one at a time.
All commands that can be undone can be redone. (See Undoing a command: undo for how undo can be used.)
Format: redo or r
| A command can only be redone if it has been undone before. |
Example:
Imagine that you’ve previously executed undo to undo deleting body 20. You look at the data again and realise you’ve deleted the right thing after all!
Instead of deleting body 20 again, simply redo the command.
To redo:
1) Type redo or r into the command box.
2) Press Enter to execute the command.
3) Notice that the result box shows text telling you what was executed when redoing, and body 20 is now absent from the list of bodies.
Updating an entity: update
You can update the attributes of a body or worker by entering an update command. You have to indicate the entity type you want to update with a flag, as described in section 3.
-f is not a valid flag for this command. Fridges are automatically updated when bodies are assigned or removed.
|
You can specify one or more attributes to change, but at least one valid attribute must be provided.
Format: update -FLAG /id id [/attributeName attributeValue …]
When you update the fridgeId of a Body, changes to the fridges are made as follows:
-
Previous fridge’s status is set to
UNOCCUPIEDand is no longer assigned thisBody. -
New fridge’s status is set to
OCCUPIEDand is assigned thisBody.
When you update the status of a Body to CONTACT_POLICE, the Notif associated with the Body is automatically
deleted.
When you update bodyStatus to ARRIVED, a Notif pop-up is be shown after 10 seconds.
When a Body is assigned a Fridge and you update its status to CLAIMED or DONATED, it is removed from the
Fridge and its status is set to UNOCCUPIED.
There are some attributes that you can update once the entity is created. For this command, the list of valid attributes and their command prefixes can be found below:
Body |
Worker |
Name |
Phone Number |
| Make sure you key in dates in the format DD/MM/YYYY. |
Example:
Imagine that someone (Jane Doe) just got promoted! You have to change her designation to 'Manager' in Mortago.
Instead of typing out all the irrelevant attributes a Worker has, you just have to input her ID number and her new designation.
To update Jane Doe’s designation:
1) Locate her identification number on the dashboard. You see on the dashboard that her ID number is W00001.
2) Type update -w /id 1 /designation Manager into the command box, and press Enter to execute it.
3) The result box indicates that the delete command has been undone.
4) You can also see on the dashboard that Jane Doe’s designation has been updated.
| Command | Expected Output |
|---|---|
|
Output box shows: This entity was successfully updated. ID Number: W00001 |
{end of extract}
4. Contributions to the Developer Guide
These sections of the Developer Guide explains to a developer how the undo/redo feature works, its architecture, and important considerations for its design.
Given below are sections I contributed to the Developer Guide. They showcase my ability to write technical documentation and the technical depth of my contributions to the project. |
{start of extract}
Undo/Redo Feature
The undo/redo feature allows you to undo a command that you have made or redo a command you have undone.
Implementation
You can find the core of undo/redo in the undo/redo history of ModelManager.
The history stores UndoableCommands, and an UndoCommand or RedoCommand will undo() or redo() commands in the history.
The design of UndoableCommand uses the Command pattern, a common design pattern often used in software engineering.
It allows each individual command to be undone/redone at a high-level without needing the specific command type to be known.
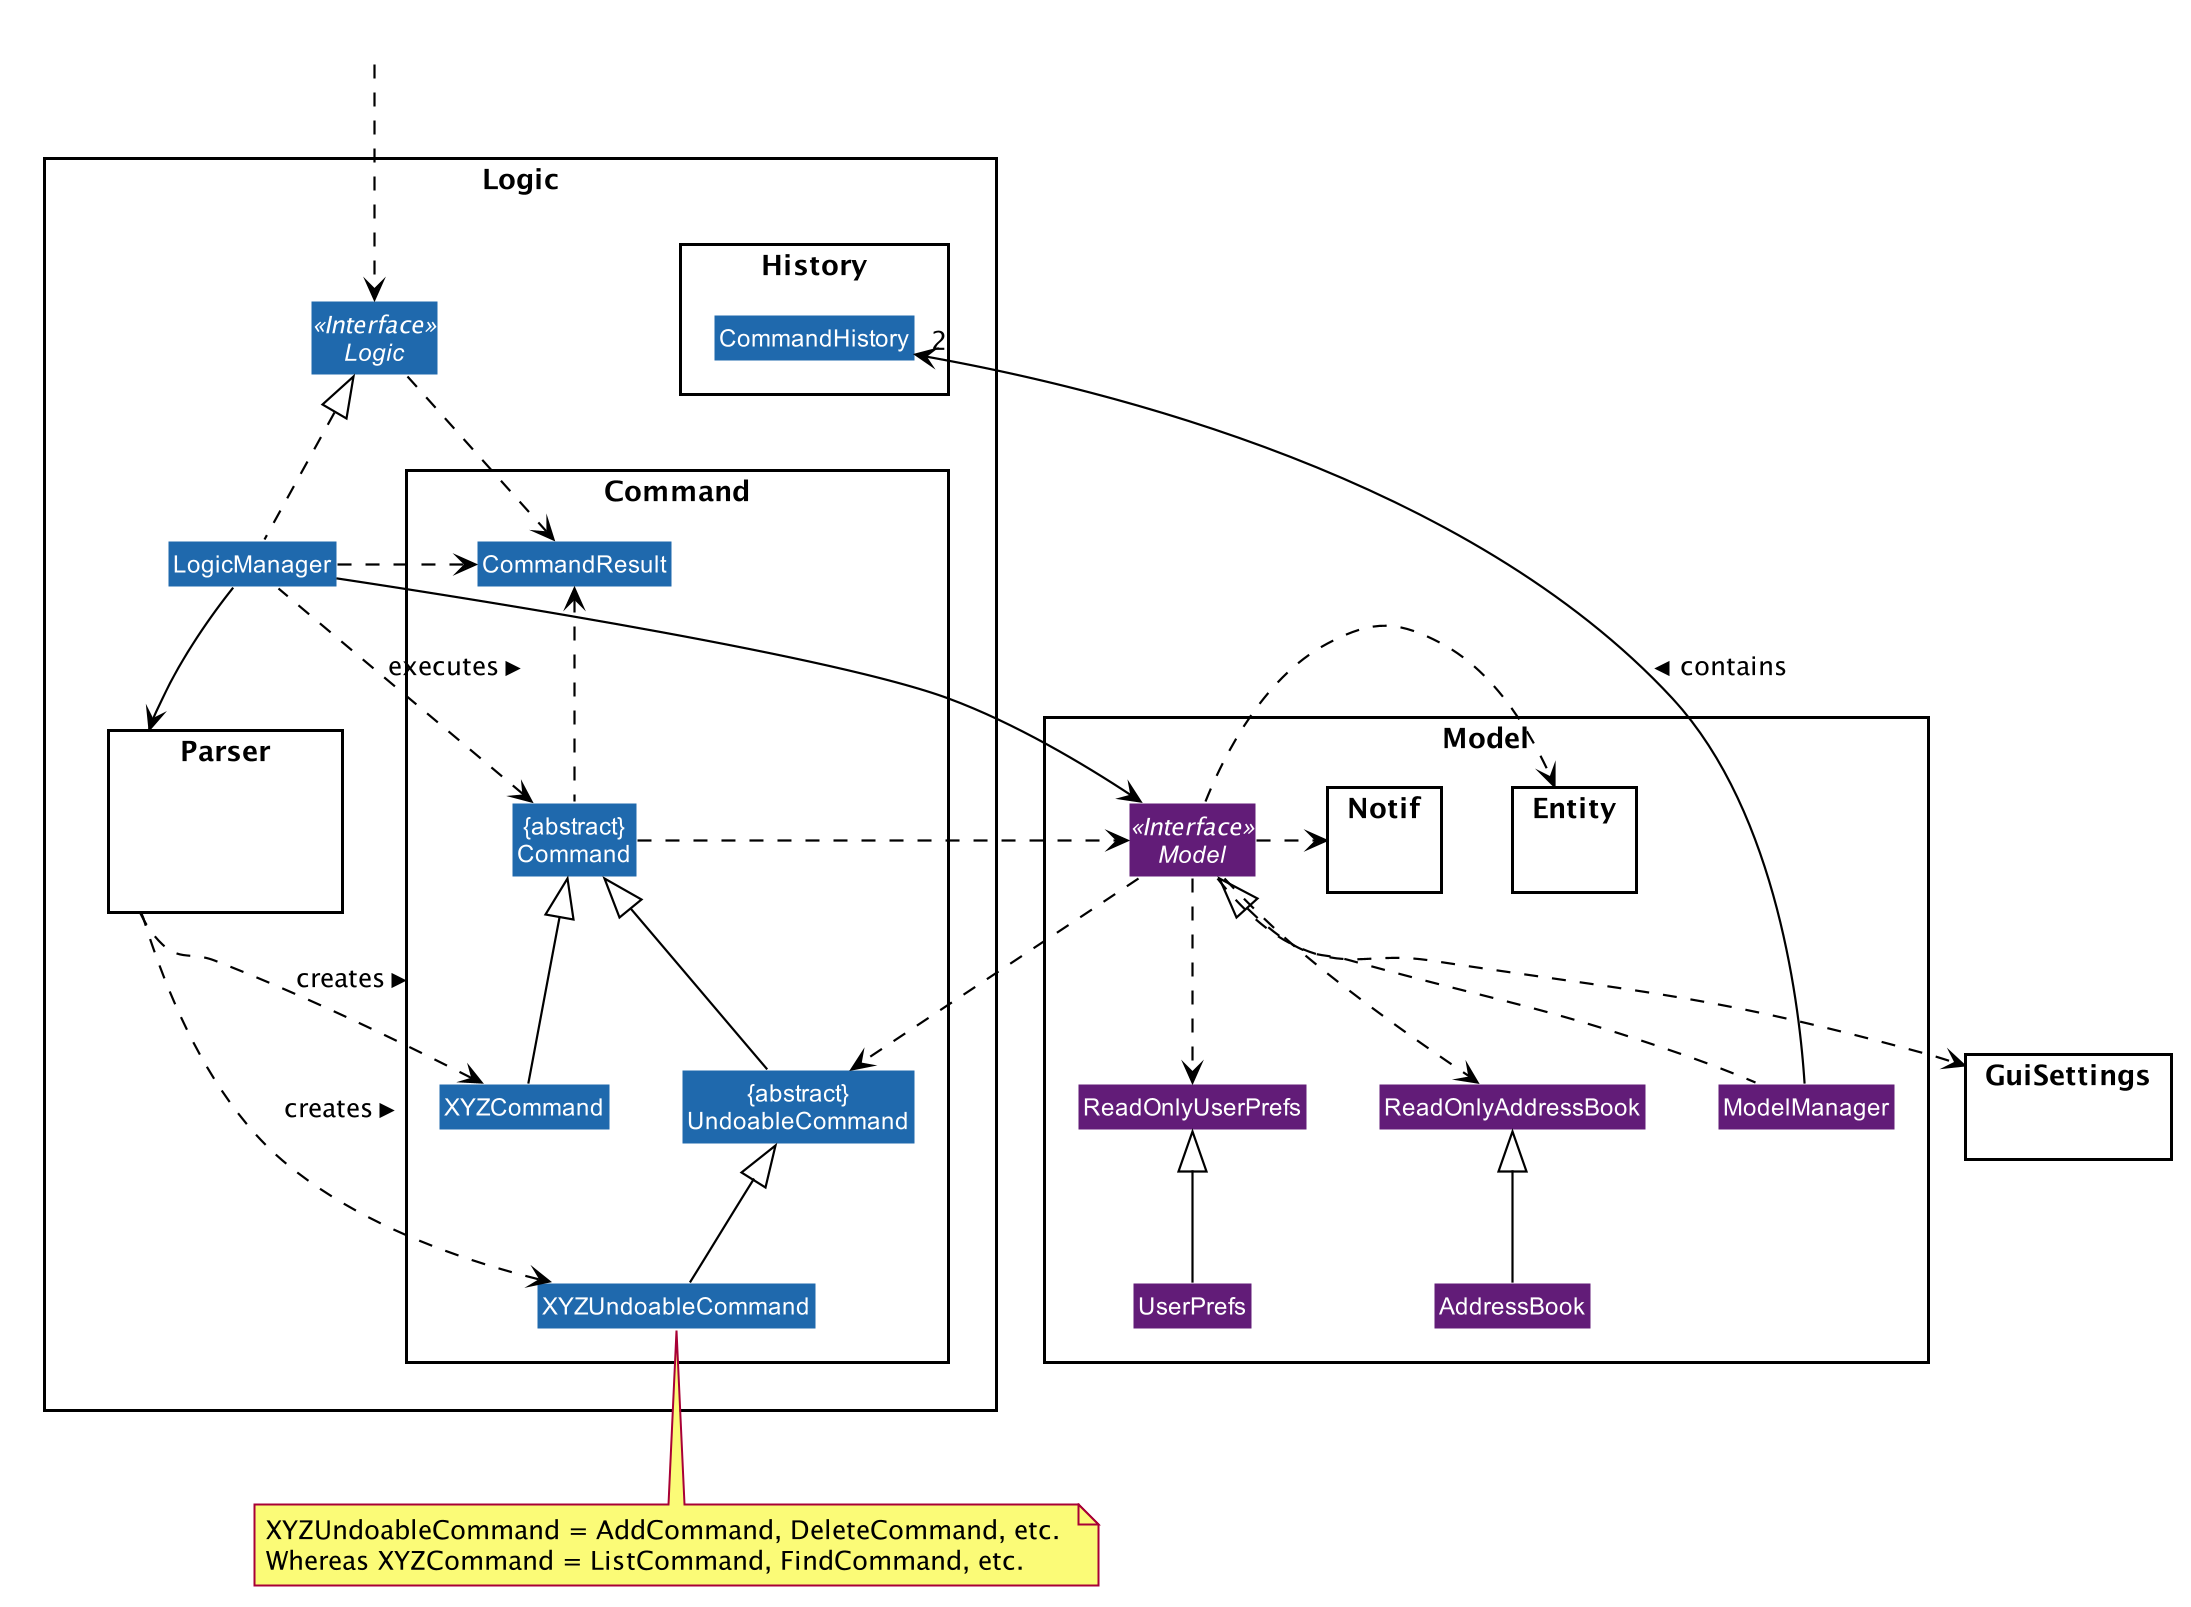
Classes related to undo/redo and their relationships are shown in Figure 12.

Architecture
To start off, you will find two instances of CommandHistory in ModelManager. They are stored internally as commandHistory and undoHistory.
commandHistory stores previously executed commands while undoHistory stores previously undone commands.
CommandHistory wraps a Deque<UndoableCommand>. Its methods imposes a MAX_SIZE which determines how many commands can be stored in the command history.
In ModelManager, four key operations to access and modify CommandHistory are implemented:
-
ModelManager#addExecutedCommand(UndoableCommand command)— Adds a command that was executed to the start ofcommandHistory. -
ModelManager#getExecutedCommand()— Removes the last command that was executed and added tocommandHistoryand returns it. -
ModelManager#addUndoneCommand(UndoableCommand command)— Adds a command that was undone to the start ofundoHistory. -
ModelManager#getUndoneCommand()— Removes the last command that was undone and added toundoHistoryand returns it.
In the Model interface implemented by ModelManager, these four operations are respectively exposed as
Model#addExecutedCommand(UndoableCommand command), Model#getExecutedCommand(), Model#addUndoneCommand(UndoableCommand command), and Model#getUndoneCommand().
Next, the UndoableCommand stored in the Model is actually a normal Command that changes program state.
The UndoableCommand class is an abstract class that extends the abstract Command class, as shown in Figure 12. Commands like AddCommand or UpdateCommand extends UndoableCommand instead of Command.
Commands that don’t change the user-visible program state, like FindCommand, can still inherit directly from Command.
Here is where the Command pattern comes in. A class extending UndoableCommand must implement an additional method, UndoableCommand#undo(Model model). This means that every child class of UndoableCommand has a custom undo implementation.
UndoableCommand#redo(Model model) is a concrete implementation of the redo mechanism and is inherited by all child classes.
Lastly, undo/redo is initiated when user input creates an UndoCommand or RedoCommand. When either of them are executed, they respectively get the last
executed or undone command from the CommandHistory in ModelManager. As the retrieved command is an instance of UndoableCommand, an attempt will be made to execute UndoableCommand#undo(Model model) or UndoableCommand#redo(Model model).
If it is successful, undo/redo is succesful. Otherwise, an error message is shown.
This is the mechanism of undo/redo, from start to end.
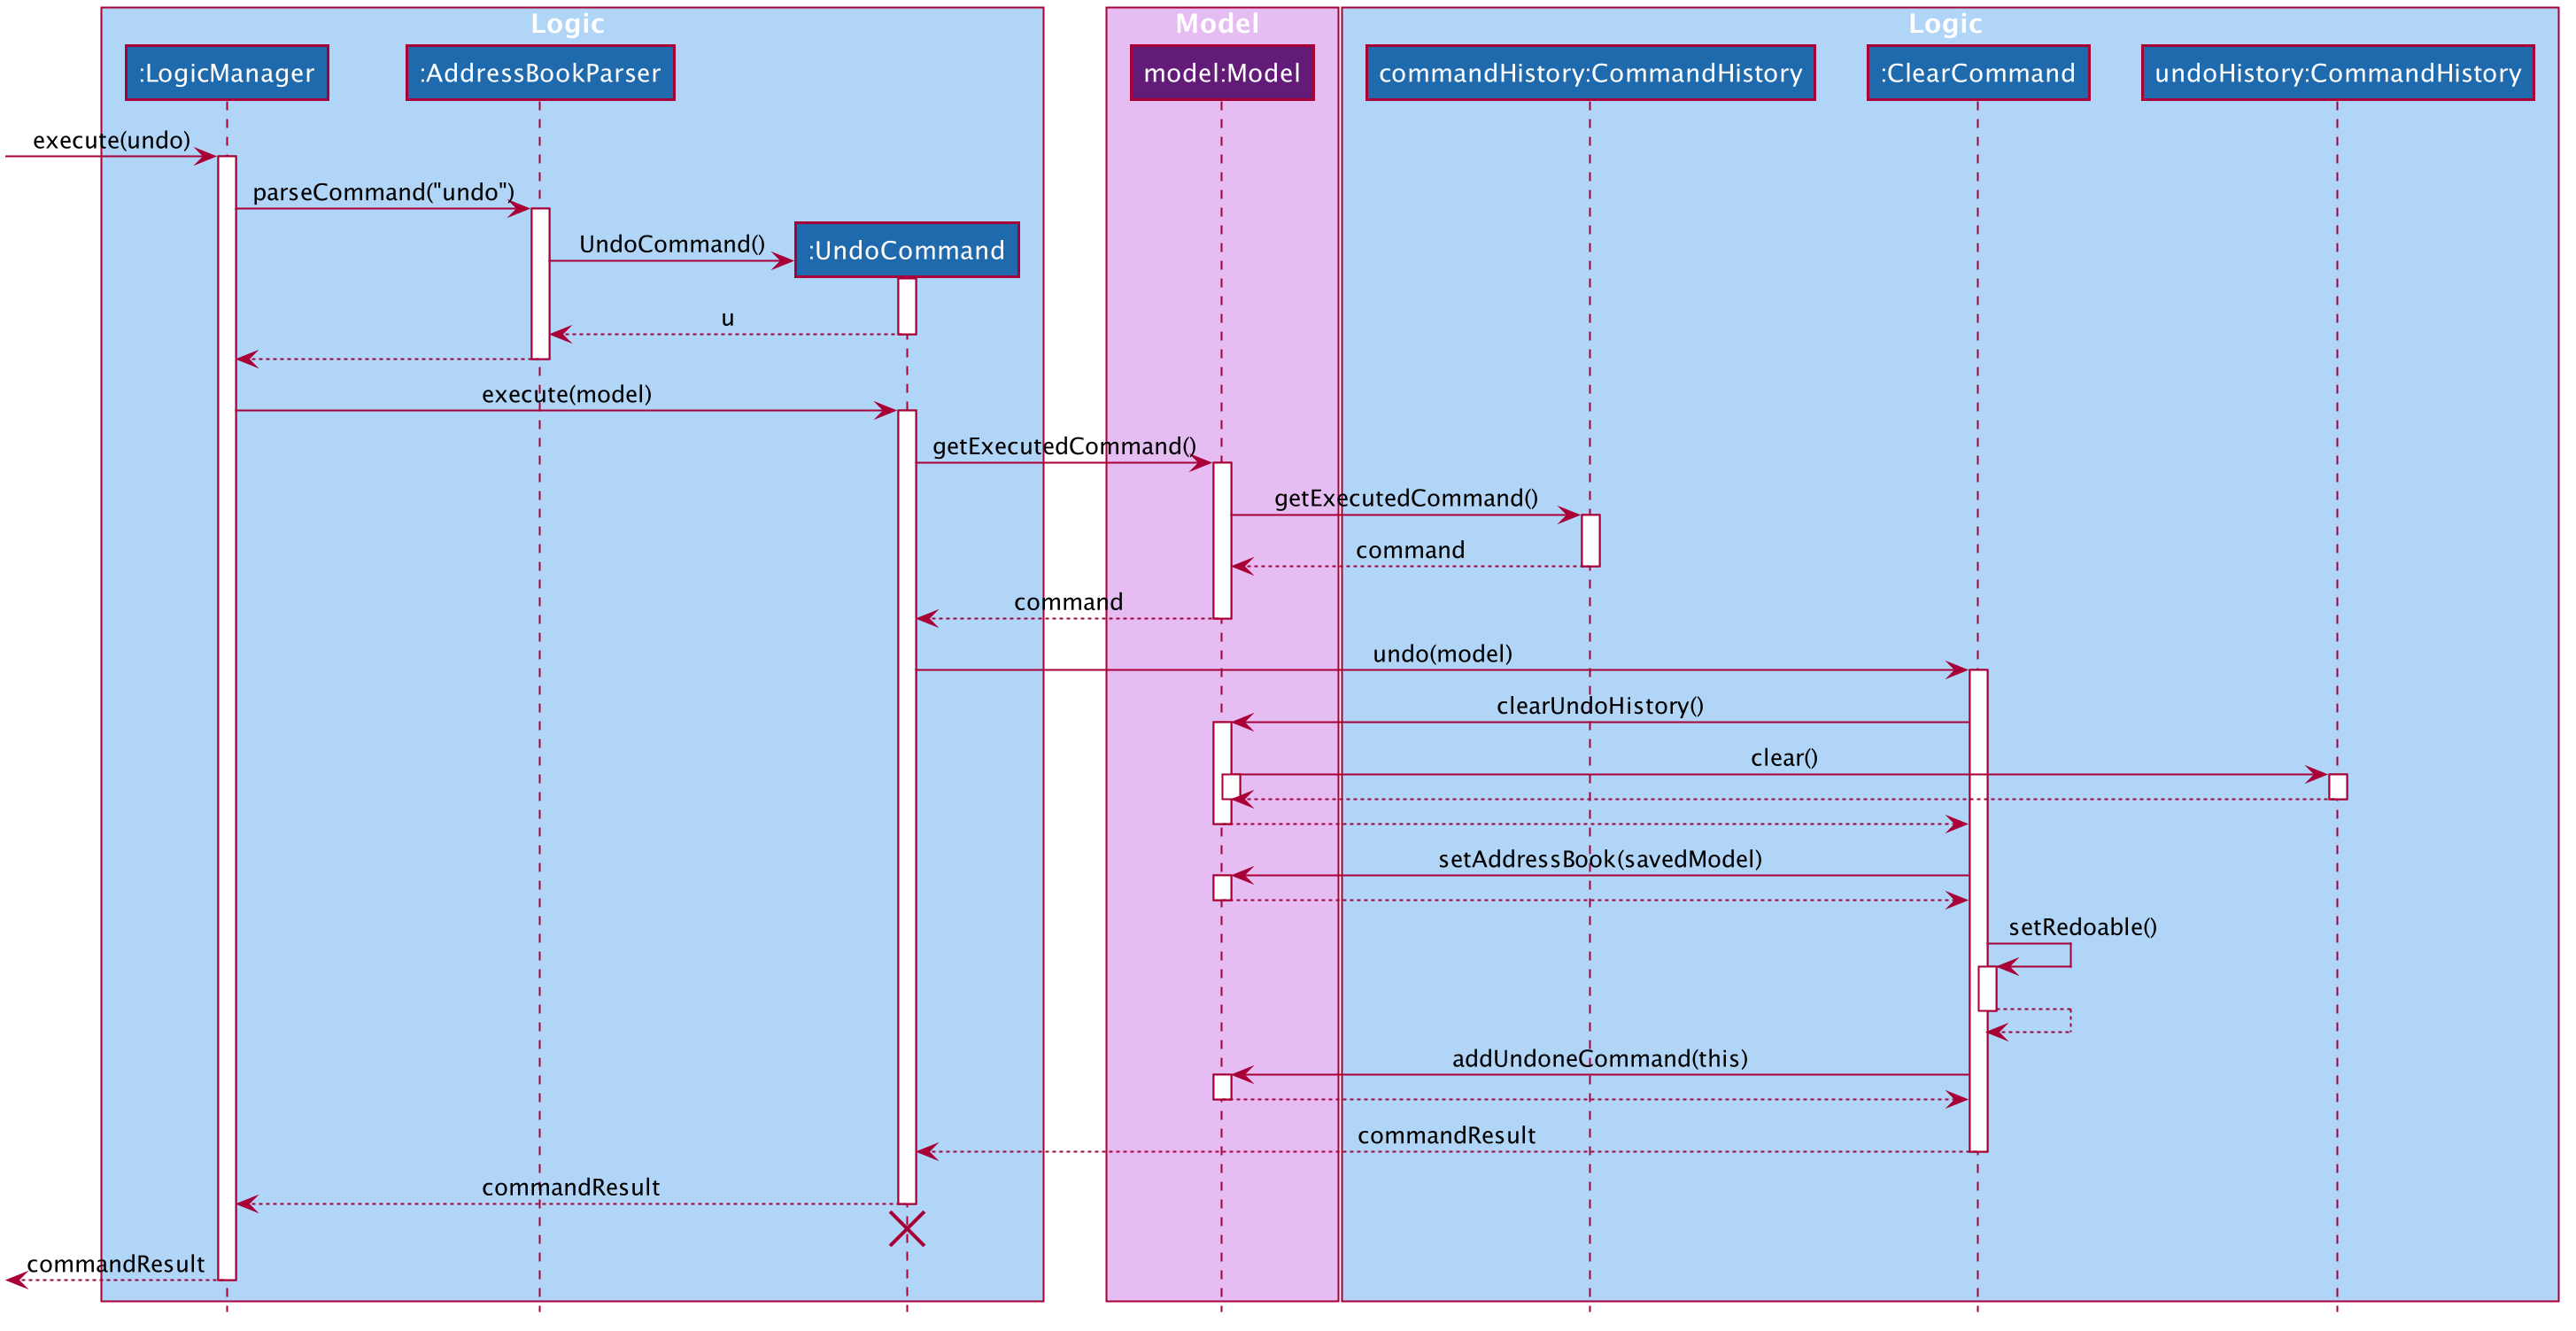
The sequence diagram below shows how an undo command works to undo a ClearCommand:

The lifeline for UndoCommand should end at the destroy marker (X) but due to a limitation of PlantUML, the lifeline reaches the end of diagram.
|
If a redo command was executed afterwards, the ClearCommand would simply be executed again.
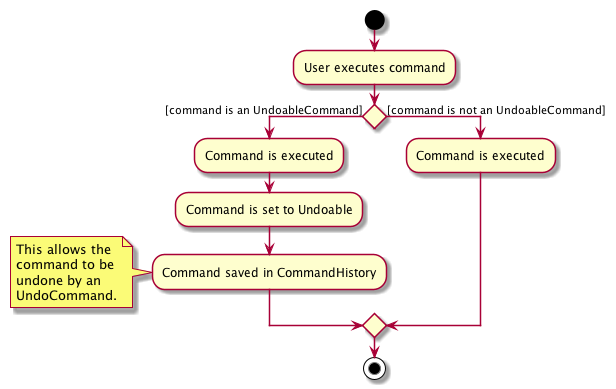
The following activity diagram shows what happens when a user executes a new UndoableCommand. In this case, it is the ClearCommand being undone. The control flow is similar for other UndoableCommands; they only differ in the implementation of undo().

Defensive programming
To defend against improper undoing or redoing, an UndoableCommand can only be added to the commandHistory or undoHistory of ModelManager through its execute() or undo() method.
Additionally, UndoableCommand contains a small inner class, the enumeration UndoableCommandState which allows an UndoableCommand to have its state set to any value in the enumeration.
The values are as shown below.
    /**
    * Enumerates through the possible states of an UndoableCommand.
    */
    public enum UndoableCommandState {
        UNDOABLE, REDOABLE, PRE_EXECUTION
    }
Before a command is undone or redone, the command’s state is checked for validity. An example is shown below in the redo() method.
    /**
     * Re-executes an UndoableCommand if it had been previously undone.
     */
    public CommandResult redo(Model model) throws CommandException {
        if (getCommandState() != UndoableCommandState.REDOABLE) {
            return new CommandResult(MESSAGE_NOT_UNDONE_BEFORE);
        }
        return execute(model);
    }
As shown in the code snippet, when an UndoableCommand is redone, the method first checks that its state was set to UNDOABLE.
These states are only changed when a Command#execute(Model model) or UndoableCommand#undo(Model model) has successfully executed.
Therefore, it is unlikely that an UndoableCommand will be unwittingly undone or redone in error.
Design considerations
When designing the undo/redo feature, scalability and speed were the key considerations. There was also an extra layer of difficulty as Mortago has automated commands that are both time-based and user-triggered. After the analysis described below, the Command pattern was thought to be the best solution.
Aspect: Designing the undo/redo mechanism
Alternative 1 was chosen despite its difficult implementation because it is faster and more scalable.
-
Alternative 1: Individual command knows how to undo/redo by itself.
-
Pros:
-
Better scalability. Will use less memory (e.g. For
add, only the added entity needs to be saved). -
Faster for big programs.
-
Easier to implement defensive measures.
-
-
Cons:
-
Must implement custom undo functions for each command.
-
More difficult to implement and maintain.
-
-
-
Alternative 2: Saves the whole program state.
-
Pros:
-
Easy to implement and maintain.
-
-
Cons:
-
Likely to use a lot of memory.
-
Slower for big programs.
-
-
Aspect: Handling automated timed commands
Mortago has a Notification feature, which are user-triggered automated commands that are triggered by time. Though the undo/redo feature does not support it directly, the Notification can make changes to program state at any time. When undoing or redoing, it was essential that data integrity was preserved.
Alternative 1 was chosen as it causes almost no overhead, guarantees data integrity, and causes the user the least inconvenience.
-
Alternative 1: Allow automated commands to be undone
-
Pros:
-
Causes minimal overhead as only one additional command needs to be stored.
-
Maintains data integrity.
-
Allows the user to undo automated changes, if it is not desired.
-
Shows consistency and will not cause visual jumps between states.
-
-
Cons:
-
Confuses the user initially.
-
-
-
Alternative 2: Do not undo the automated command
-
Pros:
-
Easiest to implement.
-
-
Cons:
-
Confuses the user initially.
-
Causes visible jumps between states (e.g. The user might see changes to 2 fields being undone even though his
updatecommand only changed one field). -
Loss of data integrity.
-
-
Aspect: Storing executed/undone commands
-
Alternative 1 (current choice): Store
UndoableCommand(s) only.-
Pros:
-
Logic can be reused for both executed and undone commands.
-
Easy to implement.
-
Uses less space.
-
-
Cons:
-
Loses some information about
Commandsthat were previously executed.
-
-
-
Alternative 2: Store all
Commands.-
Pros:
-
No loss of information.
-
-
Cons:
-
Harder to implement. Requires differentiating between commands that have been undone and executed commands.
-
Needs extra space to store non-
UndoableCommand(s) even though they are useless for undo/redo.
-
-
{end of extract}